Security News
Deno 2.2 Improves Dependency Management and Expands Node.js Compatibility
Deno 2.2 enhances Node.js compatibility, improves dependency management, adds OpenTelemetry support, and expands linting and task automation for developers.
@eslint-kit/configure
Advanced tools
All-in-one solution for configuring ESLint in all of your projects
✨ All-in-one solution for configuring ESLint in all of your projects ✨
The README on main branch can contain some unreleased changes.
Go to release branch to see the actual README for the latest version from NPM.
ESLint Kit is solving all these problems by providing a many small presets, each performing a specific task.
You can select presets by using configure function in your .eslintrc.js file:
const { configure, presets } = require('@eslint-kit/configure')

module.exports = configure({
  presets: [
    presets.typescript(),
    presets.prettier(),
    presets.node(),
    presets.react({ version: '18.0' }),
    presets.alias({
      root: './src',
      paths: { '@app': './' }
    })
  ],
  extend: {
    rules: {
      'some-rule': 'off'
    }
  }
})
@eslint-kit/configure package contains all the dependencies you might need. It's ok - this is a development dependency, so you won't get any bundle size problems.
The ESLint Kit presets try to contain only the best-practice rules to make overwriting as rare as possible. But you can still easily override them by using extend property.
NPM:
npm install -D @eslint-kit/configure
Yarn:
yarn add -D @eslint-kit/configure
After installing, add the .eslintrc.js file in your project root:
const { configure, presets } = require('@eslint-kit/configure')

module.exports = configure({
  presets: [],
})
Now, just select the presets you need. The full information about them is located in Presets section.
You can also set up your editor if you haven't already.
@typescript-eslint/parser.ts and .tsx extensionsconfigure({
presets: [
presets.typescript({
// (optional) Project's root
root: './',
// (optional) A path to tsconfig file
tsconfig: 'tsconfig.json'
})
]
})
prettier/prettier from Prettier ESLint pluginconfigure({
presets: [
/*
* Optionally, you can pass the Prettier config
* Note: it will merge and override any options set with .prettierrc files
*/
presets.prettier({
semi: false,
singleQuote: true
// ...
})
]
})
The recommended Prettier config:
{
  "semi": false,
  "singleQuote": true,
  "tabWidth": 2,
  "quoteProps": "consistent",
  "endOfLine": "lf",
  "importOrder": [
    "^(child_process|crypto|events|fs|http|https|os|path)(\\/(.*))?$",
    "<THIRD_PARTY_MODULES>",
    "^~(\\/(.*))?$",
    "^@(\\/(.*))?$",
    "^@app(\\/(.*))?$",
    "^[./]"
  ],
  "experimentalBabelParserPluginsList": [
    "jsx",
    "typescript"
  ]
}
As you see, we use @trivago/prettier-plugin-sort-imports. You can find the options on its README page.
node environmentconfigure({
presets: [presets.node()]
})
browser environment and jsx ecma featureconfigure({
presets: [
presets.react({
// (optional) Allows to specify React version
version: 'detect',
// (optional) Allows using JSX without importing `React`
newJSXTransform: false
})
]
})
vue pluginvue-eslint-parser/recommended rules for it@typescript-eslint/parser for <script> blocks when typescript preset is usedbrowser environment and jsx ecma featureexport defaultYou still need to setup your editor / IDE to lint .vue files. You can use this guide from Vue documentation.
configure({
  presets: [
    presets.vue({
      // (optional) Allows to specify Vue version
      version: 'detect'
    })
  ]
})
solid plugin and enables /recommended rules/typescript rules when typescript preset is activeconfigure({
presets: [presets.solidJs()]
})
effector plugin and enables /recommended, /scope, and /react rulesconfigure({
presets: [
presets.effector({
// (optional) Enables /future rules
onlySample: false
})
]
})
svelte3 plugin and configures ittypescript preset is activeYou still need to setup your editor / IDE to lint .svelte files. You can use this guide from svelte3 plugin repo.
configure({
  presets: [
    presets.svelte({
      // (optional) Disable type checking for .svelte files
      noTypeCheck: true
    })
  ]
})
@next/eslint-plugin-next plugin rulesexport defaultconfigure({
presets: [presets.nextJs()]
})
import plugintsconfig.json when typescript preset is appliedconfigure({
presets: [
presets.alias({
// (optional) Base path for all aliases
// Defaults to './'
root: './src',
// (optional) Alises, all paths should be relative or absolute
// Defaults to empty object
paths: { '@app': './' },
// (optional) A path to jsconfig
// When specified, also respects jsconfig's "compilerOptions.paths"
jsconfig: 'jsconfig.json'
})
]
})
Q: My .eslintrc.js doesn't work, why?
A: It's a regular issue with tools like @vue/cli and create-react-app. Check package.json and remove eslintConfig if you find it. Otherwise, try to restart your editor.
Install ESLint VSCode extension:

Next, select from the following and click on it:
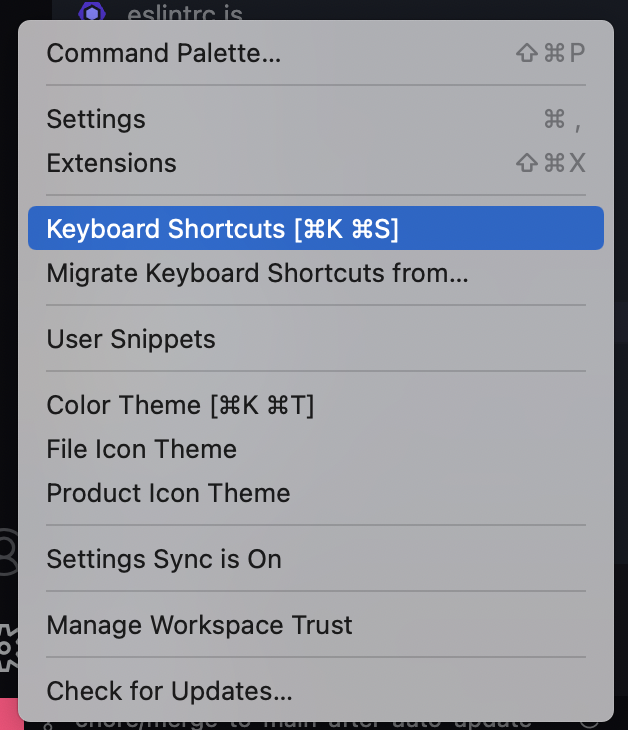
Click on Settings icon:

Select "Keyboard shortcuts"

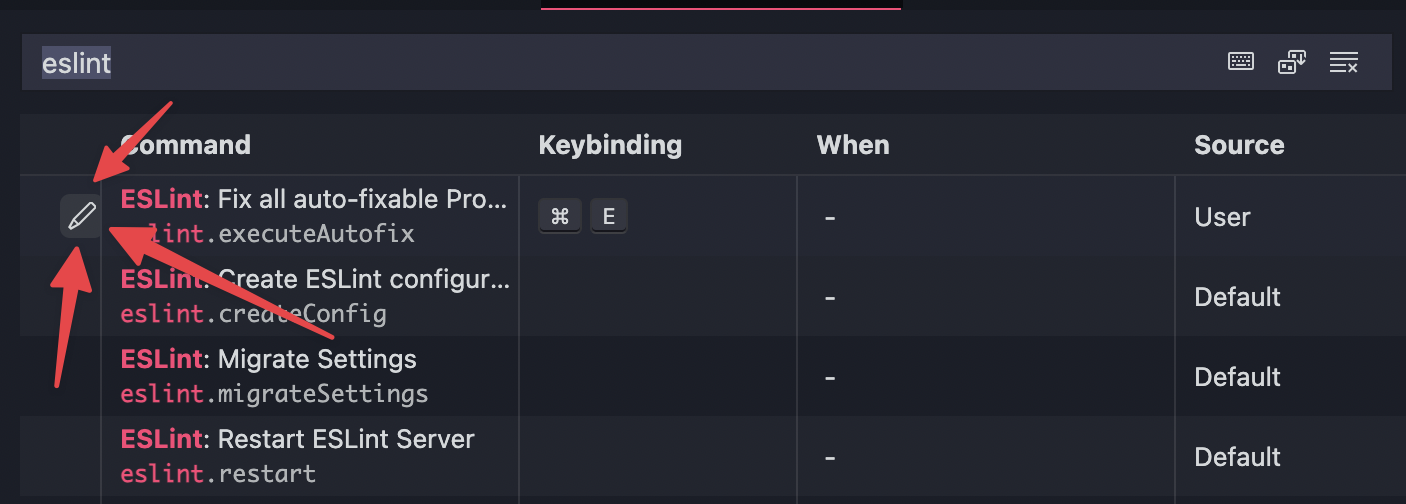
Type "eslint" and click on "edit" button:

Finally, choose the keybind you like.
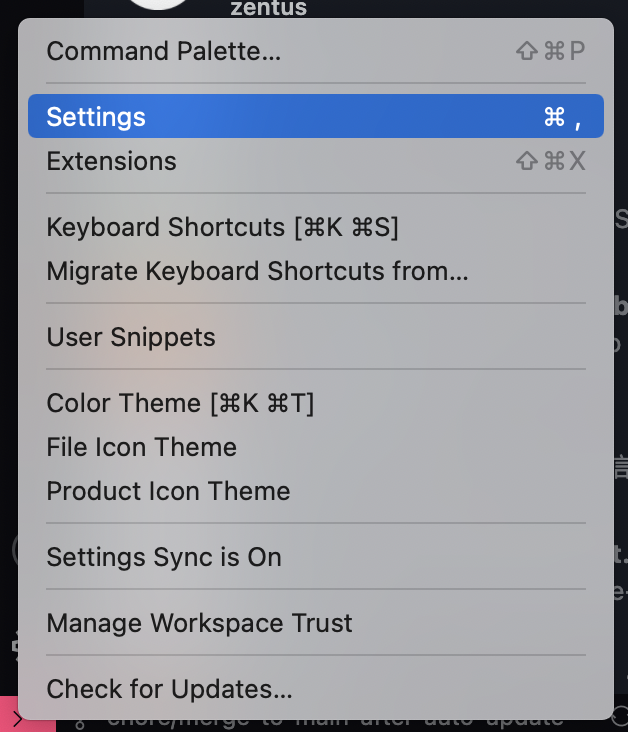
Click on Settings icon:

Select "Settings"

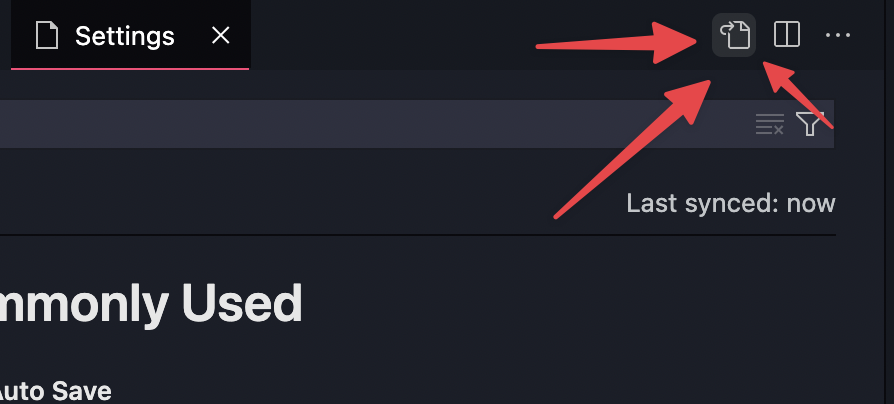
Switch to text mode:

Finally, add the following and save:
{
  "eslint.validate": [
    "javascript",
    "javascriptreact",
    "typescript",
    "typescriptreact",
  ],
  "editor.codeActionsOnSave": {
    "source.fixAll.eslint": true,
  },
}
feat/, fix/, docs/, refactor/, and etc., depending on the changes you want to proposemain branchmain and it will create a new record in the changelog. Then, when release is finally ready, your changes will be released.The dev branch is main - any developer changes is merged in there. Also, there is a release branch. It always contains the actual published release source code and tag.
All changes is made using Pull Requests - push is forbidden. PR can be merged only after successfull test-and-build workflow checks.
When PR is merged, release-drafter workflow creates/updates a draft release. The changelog is built from the merged branch scope (feat, fix, etc) and PR title. When release is ready - we publish the draft.
Then, the release workflow handles everything:
release branchAlso, this repo has Renovate bot set up to auto-update typescript preset dependencies (they change frequently).
That's how it works:
release branch, cause we want to create a new release from the old one, without any pending dev changesrelease-auto-update workflowrelease branch, bump its minor number, and set the newly created tag at the latest commit from releaserelease workflow, and it works just like the regular releaseFAQs
All-in-one solution for configuring ESLint in all of your projects
The npm package @eslint-kit/configure receives a total of 2 weekly downloads. As such, @eslint-kit/configure popularity was classified as not popular.
We found that @eslint-kit/configure demonstrated a not healthy version release cadence and project activity because the last version was released a year ago. It has 1 open source maintainer collaborating on the project.
Did you know?

Socket for GitHub automatically highlights issues in each pull request and monitors the health of all your open source dependencies. Discover the contents of your packages and block harmful activity before you install or update your dependencies.

Security News
Deno 2.2 enhances Node.js compatibility, improves dependency management, adds OpenTelemetry support, and expands linting and task automation for developers.

Security News
React's CRA deprecation announcement sparked community criticism over framework recommendations, leading to quick updates acknowledging build tools like Vite as valid alternatives.

Security News
Ransomware payment rates hit an all-time low in 2024 as law enforcement crackdowns, stronger defenses, and shifting policies make attacks riskier and less profitable.