
Security News
Maven Central Adds Sigstore Signature Validation
Maven Central now validates Sigstore signatures, making it easier for developers to verify the provenance of Java packages.
By Sarah Gooding - Feb 06, 2025
@frameright/react-image-display-control
Advanced tools


![]()
➡️ See this document rendered at docs.frameright.io/react
An easy way to do Image Display Control in your React web app. Made with :heart: by Frameright. Power to the pictures!
Less than 5kB in your final client-side bundle.
:sparkles: Live demo
This React component extends any <img>-like element/component with the ability
to retrieve Image Display Control metadata from its image file in order to
automatically and responsively zoom in on the most interesting part of the
image.
It integrates nicely with other advanced features you may be using in your existing project, e.g.:
<Image>,It doesn't change the structure of your DOM: your existing CSS rules still apply.
:sparkles: Live demo
:bulb: GitHub Discussions
NOTE: if you are not using React, you may want to have a look at the Image Display Control Web component instead.
When an image is too big for its <img> HTML element, the best option browsers
offer nowadays is to use the
object-fit: cover;
CSS property in order to scale and middle-crop it:
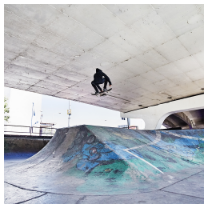
<img
  src="https://react.frameright.io/assets/pics/skater.jpg"
  width="200"
  height="200"
  style="object-fit: cover;"
/>
This is less than optimal, as there might be, in the example above, a better square-ish region in the image that could be displayed instead of the middle-crop.
This React component extends its <img>-like children with the ability to
retrieve image regions from their image metadata, and to zoom in on the best one
for the current element size:
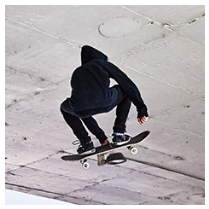
<ImageDisplayControl>
  <img
    src="https://react.frameright.io/assets/pics/skater.jpg"
    width="200"
    height="200"
  />
</ImageDisplayControl>
The resulting HTML element is responsive and will automatically reassess the best region to zoom in on when it gets resized, e.g. when the user turns their phone from portrait to landscape.

:sparkles: Live demo
:bulb: GitHub Discussions
Nowadays an image file (e.g. JPEG, PNG) can contain this type of image regions
in their metadata according to
the IPTC standard.
This React component uses
a library
to let the back-end or front-end extract the regions from the image file. It
then passes them to the <img> tag and turns it into
a web component,
which automatically and responsively zooms in on the best region.
Photographers, or anyone else, can use the Frameright webapp to define and store image regions in the metadata of their pictures.
In your Node.js-based project (e.g. using Next.js or Vite) run:
npm install @frameright/react-image-display-control
Less than 5kB in your final client-side bundle.
:floppy_disk: Importing in your project
// src/MyComponent.tsx

import { ImageDisplayControl } from "@frameright/react-image-display-control";

export default function MyComponent() {
  return (
    <ImageDisplayControl>
      <img
        src="https://react.frameright.io/assets/pics/skater.jpg"
        width="200"
        height="200"
      />
    </ImageDisplayControl>
  );
}
This doesn't change the structure of the resulting DOM, i.e.:
<img> tag remains an <img> tag, and<img> tag directly will still apply,
and<img> tag will still naturally take the same space and position in the
layout.Other <img>-like elements/components are supported as well, e.g.
Next.js <Image>s or
React-Bootstrap <Image>s.
:airplane: Advanced usage
:wrench: Contributing
:sparkles: Local demo
:bulb: GitHub Discussions
:sparkles: Live demo
FAQs
Image Display Control React component
The npm package @frameright/react-image-display-control receives a total of 0 weekly downloads. As such, @frameright/react-image-display-control popularity was classified as not popular.
We found that @frameright/react-image-display-control demonstrated a healthy version release cadence and project activity because the last version was released less than a year ago. It has 2 open source maintainers collaborating on the project.
Did you know?

Socket for GitHub automatically highlights issues in each pull request and monitors the health of all your open source dependencies. Discover the contents of your packages and block harmful activity before you install or update your dependencies.
Security News
Maven Central now validates Sigstore signatures, making it easier for developers to verify the provenance of Java packages.

Security News
CISOs are racing to adopt AI for cybersecurity, but hurdles in budgets and governance may leave some falling behind in the fight against cyber threats.

Research
Security News
Socket researchers uncovered a backdoored typosquat of BoltDB in the Go ecosystem, exploiting Go Module Proxy caching to persist undetected for years.