Security News
Deno 2.2 Improves Dependency Management and Expands Node.js Compatibility
Deno 2.2 enhances Node.js compatibility, improves dependency management, adds OpenTelemetry support, and expands linting and task automation for developers.
@jlab-enhanced/cell-toolbar
Advanced tools
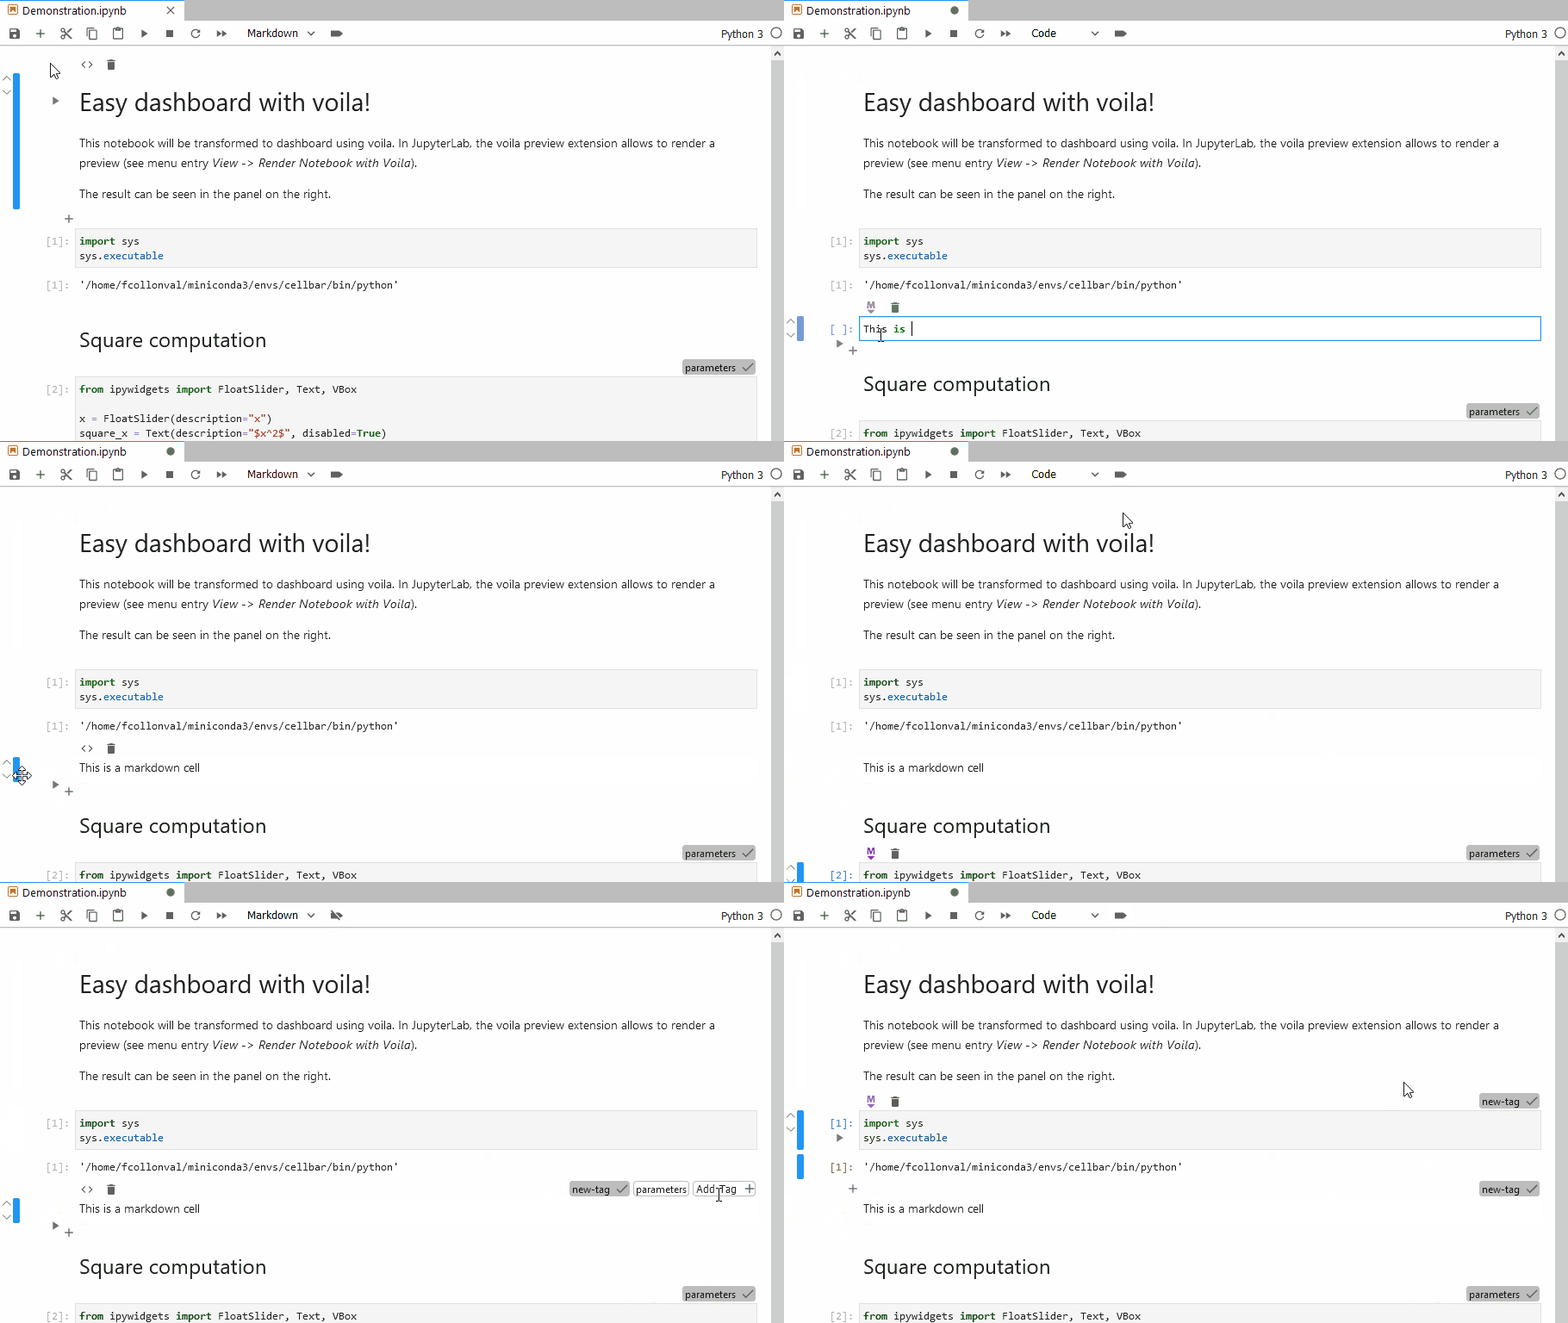
A cell toolbar for JupyterLab.

Tags are displayed as read-only by default. You can click on the notebook toolbar button to start editing the tags on the cell toolbars (as shown in the animation above).
There are some Settings to tune the available buttons and the look of this extension. For example, to show only the tags, you can set the following settings:
{
"helperButtons": null,
"leftMenu": null,
"rightMenu": null
}
For JupyterLab 2.x, have look there.
pip install jlab-enhanced-cell-toolbar
or
conda install -c conda-forge jlab-enhanced-cell-toolbar
pip uninstall jlab-enhanced-cell-toolbar
or
conda remove -c conda-forge jlab-enhanced-cell-toolbar
{
    "defaultTags": ["hide", "slide"]
}

For example, to obtain a cell toolbar partially overlapping the cell:
{
    "floatPosition": {
        "right": 20,
        "top": 10
    }
}
Another example, to put the toolbar inside the cell:

{
    "floatPosition": {
        "right": 20,
        "top": 24
    }
}

The
leftSpacesetting is ignored if this one is defined.
{
    "helperButtons": ["insert-cell-below", "run-cell-and-select-next"]
}

{
    "leftMenu": [
        {
            "command": "notebook:run-cell",
            "icon": "ui-components:run",
            // Will only display the item on code cells.
            "cellType": "code"
        }
    ],
    "rightMenu": [
        {
            "command": "notebook:delete-cell",
            "icon": "@jlab-enhanced/cell-toolbar:delete"
        }
    ]
}

The default JupyterLab icon names can be found in the ui-components package.
{
    "leftSpace": 48
}

This setting is ignored if
floatPositionis defined.
{
    "showTags": false
}

Don't like what you see here? Try these other approaches:
Note: You will need NodeJS to build the extension package.
The jlpm command is JupyterLab's pinned version of
yarn that is installed with JupyterLab. You may use
yarn or npm in lieu of jlpm below.
# Clone the repo to your local environment
# Change directory to the jlab_enhanced_cell_toolbar directory
# Install package in development mode
pip install -e .
# Link your development version of the extension with JupyterLab
jupyter labextension develop . --overwrite
# Rebuild extension Typescript source after making changes
jlpm run build
You can watch the source directory and run JupyterLab at the same time in different terminals to watch for changes in the extension's source and automatically rebuild the extension.
# Watch the source directory in one terminal, automatically rebuilding when needed
jlpm run watch
# Run JupyterLab in another terminal
jupyter lab
With the watch command running, every saved change will immediately be built locally and available in your running JupyterLab. Refresh JupyterLab to load the change in your browser (you may need to wait several seconds for the extension to be rebuilt).
By default, the jlpm run build command generates the source maps for this extension to make it easier to debug using the browser dev tools. To also generate source maps for the JupyterLab core extensions, you can run the following command:
jupyter lab build --minimize=False
FAQs
A cell toolbar for JupyterLab.
The npm package @jlab-enhanced/cell-toolbar receives a total of 1 weekly downloads. As such, @jlab-enhanced/cell-toolbar popularity was classified as not popular.
We found that @jlab-enhanced/cell-toolbar demonstrated a not healthy version release cadence and project activity because the last version was released a year ago. It has 7 open source maintainers collaborating on the project.
Did you know?

Socket for GitHub automatically highlights issues in each pull request and monitors the health of all your open source dependencies. Discover the contents of your packages and block harmful activity before you install or update your dependencies.

Security News
Deno 2.2 enhances Node.js compatibility, improves dependency management, adds OpenTelemetry support, and expands linting and task automation for developers.

Security News
React's CRA deprecation announcement sparked community criticism over framework recommendations, leading to quick updates acknowledging build tools like Vite as valid alternatives.

Security News
Ransomware payment rates hit an all-time low in 2024 as law enforcement crackdowns, stronger defenses, and shifting policies make attacks riskier and less profitable.