Security News
Fluent Assertions Faces Backlash After Abandoning Open Source Licensing
Fluent Assertions is facing backlash after dropping the Apache license for a commercial model, leaving users blindsided and questioning contributor rights.
build-plugin-component
Advanced tools
通过 build-scripts 和 build-plugin-component 支持业务组件(即 NPM 包)的开发,功能:
es/,使用 babel 构建lib/,使用 babel 构建dist/,使用 webpack 构建build/,使用 webpack 构建该方案同时支持 React 和 Rax 业务组件开发,如果是开发 Rax 组件请查阅 Rax 官方文档,本文档主要介绍 React 组件开发。
通过命令行初始化一个业务组件项目:
# 安装全局 CLI
$ npm i -g iceworks
# 新建组件文件夹
$ mkdir my-component && cd my-component
# 初始化
$ iceworks init component
如果是阿里内部的同学并且想接入 DEF 发布 NPM 包,可以参考文档 组件开发接入 DEF
$ cd my-component
$ npm install
$ npm start

# 实时编译 lib&es 产物
$ npm start -- --watch

# 实时编译 dist 产物
$ npm start -- --watch-dist

# 启动 https 服务
$ npm start -- --https

# 跳过 demo 构建
$ npm start -- --skip-demo
$ npm build -- --skip-demo

# 跳过自动打开预览链接
$ npm start -- --disable-open
├── src/                  # 组件源码
│  └── index.js
├── demo                  # 组件 demo
│  └── usage.md
├── lib/                  # 构建产物,编译为 ES5 + Commonjs 规范的代码
├── es/                   # 构建产物,编译为 ES5 + ES Module 规范的代码
├── dist/                 # 构建产物,UMD 相关产物,默认不生成,需要通过设置 library 参数开启
├── build/                # 构建产物,用于组件文档预览
├── build.json            # 工程配置
├── README.md
└── package.json
组件入口文件为 src/index.tsx:
import React from 'react';

export default function ExampleComponent(props) {
  const { type, ...others } = props;
  return <>Hello</>;
}
默认生成样式文件为 src/index.css,根据需求可调整成 sass 或 less 文件。
推荐在 src/index.tsx 中引入组件样式:
import React from 'react';
+ import './index.css';

export default function ExampleComponent(props) {}
组件的 demo 演示文件,位于 demo 目录下,使用 yaml-markdown 语法。可以通过修改默认的 usage.md 来调整组件 demo,或通过增加 example.md 文件来创建多个 demo。
每个 demo 的格式如下:
---
title: Simple Usage
order: 1
---

本 demo 演示一行文字的用法。

```jsx
import React from 'react';
import ReactDOM from 'react-dom';
import ExampleComponent from 'my-component';

function App() {
  return <ExampleComponent />;
}

ReactDOM.render(<App />, mountNode);
```
在执行 npm run build 时,会通过 demo/ 以及 README.md 生成 build/index.html,将 html 进行托管即可完整预览组件的文档。
以 @icedesign/qrcode 组件的文档为例,通过 unpkg 的服务即可查阅文档:文档地址 。
注意:构建 build 会加长 npm run build 的时间,如不需要可通过 --skip-demo 的命令行参数关闭。
基于 build-scripts 的项目统一使用 build.json 作为工程配置的文件:
{
  "type": "react",
  "plugins": [["build-plugin-component"]]
}
通过 build-plugin-component 这个基础插件,我们支持了以下配置项:
{}{
"alias": {
"@": "./src"
}
}
注意:该选项仅影响 es/lib 目录构建产物,如需要修改 demo 预览时的 babel 配置,请通过 webpack-chain 形式进行自定义。
{ hot: true, disableHostCheck: true, clientLogLevel: 'silent' }同 webpack devServer 配置,自定义配置将会与默认配置合并。
null如果打包 library 到 dist 目录,用来配置打包文件的名字。
null如果打包 library 到 dist 目录,用来配置 library 名字。
null如果打包 library 到 dist 目录,用来配置 library 出口配型,如可配置 default,对应的组件出口为 export default MyComponent。
null如果打包 library 到 dist 目录,用来配置 library 的类型,如 umd、amd 等。
false如果打包 library 到 dist 目录,用来配置是否产出 sourceMap 文件。
nullfalse如果打包 library 到 dist 目录,配置打包文件是否压缩。
false{}向 demo 预览的 html 里注入内容,比如插入一些静态脚本等:
{
  "htmlInjection": {
    "headAppend": [
      "<script src='http://foo.com/a.js' />",
      "<link href='http://foo.com/a.css' />"
    ],
    "headPrepend": [],
    "bodyAppend": [],
    "bodyPrepend": [],
  }
}
null如果打包 library 到 dist 目录,用来配置是否需要外部 externals,用来避免三方包被打包。
比如修改 preset-env 的配置:
{
  "babelOptions": [{ "name": "@babel/preset-env", "options": { "module": false } }]
}
注意 babelOptions 仅影响 es/lib 目录构建产物,如需要修改 demo 预览时的 babel 配置,请通过 webpack-chain 形式进行自定义
[]disableGenerateStyle: true 时,该功能也会随之关闭插件内置了 ['antd', '@alifd/next'] 两个 NPM 包,开发者配置的数组会跟内置数组做合并。配置在该数组里的 NPM 包会在构建时经过 babel-plugin-import 处理,也就是会经过一下转换:
// src/index.tsx
import { Button } from 'antd';

      ↓ ↓ ↓ ↓ ↓ ↓

// es/index.js
import Button from 'antd/es/button';
// lib/index.js
var _button = require('antd/lib/button');
应用级的项目在使用 webpack + babel-loader 时,一般都会设置 exclude: /node_modules/ 的选项,这会导致 babel-plugin-import 无法处理 NPM 包里的此类语法,因此我们在 NPM 包打包时前置做了该项转换。
当下的构建工具都已经内置支持 tree-shaking,不再需要使用 babel-plugin-import 做一层转换,因此该选项不推荐使用,建议通过设置 disableGenerateStyle: true 来关闭该能力。
如果不设置该选项或者设置为 false,组件打包时会自动分析 src/ 代码并生成 [es|lib]/style.js 的文件,内容格式如下:
// es/style.js
import '@formily/next-components/esm/time-picker/style';
import '@alifd/next/es/input/style';
import '@alifd/next/es/tag/style';
代码里依赖的 NPM 包符合下述规则之一则会被生成到 style.js 中:
antd, @alifd/nextstylePath 字段功能设计初衷:假设业务组件依赖了 antd 里面的 N 个组件,在应用项目里使用该业务组件时如何有效引入 antd 这 N 个组件的样式?要么显视的一个一个 import,要么直接引入 antd 的全量样式,前者手写成本太高,后者无法按需引入样式,因此我们设计了这个功能,项目里只需要引入这个业务组件的 style.js 即可(如果使用了 icejs 框架那么应用会自动分析并引入 style.js,开发者完全不需要关心样式引入问题)。
经过一些实践之后,我们发现按需引入大包组件样式的收益并不大,参考 issue,另外还会引入一些复杂的工程问题,因此我们不再推荐使用该能力,建议应用项目里直接全量引入大包(antd/fusion)组件的样式。
是否包含子组件,一般用于开发类似 fusion/antd 这种大包,开启该选项之后,会为每个组件生成对应的 style.js 文件。
template-component-demo插件内置了 npm 包 template-component-demo 作为组件开发及构建时的 demo 预览,可以通过指定 demoTemplate 对进行自定义。
demo 预览组件默认接受如下参数:
readmeData:readme.md 文件中的解析数据demoData:demo 文件夹下 markdowm 内容解析的数据env:当前运行环境 development|productiontemplateProps:模版自定义参数,可以通过设置 "demoTemplate": ["template-component-demo", { "platform": "h5" }] 的方式为模版定义参数[]使用 react-docgen 自动生成 demo api 预览。需要配置代码扫描路径才会生效,例如:
{
  "plugins": ["build-plugin-component"],
  "docGenIncludes": ["src/*.tsx"]
}
便会扫描代码文件 src 文件夹下的所有 *.tsx 文件(不包含子文件夹):
interface ComponentProps {
  /** Title of the example  */
  title: string;
  /** Type of the example  */
  type?: 'native' | 'hybrid';
}

export default function ExampleComponent(props: ComponentProps) {
  ...
}
则会生成对应的 api 预览:

该能力目前支持 PropType、TypeScript 等方式的类型注解,具体可详见 react-docgen 文档。需要注意的是,react-docgen 不支持为匿名组件生成 api 预览:
// 不支持匿名组件
export default (props: ComponentProps) => {
  ...
}
如果是多组件项目,且配置了多页文档,例如文件结构为:
可以在 demo/List/ 下面新建 api.md 文件,并在头部配置此页面包含哪些接口文档。(正文可以留空,也可以补充内容)
---
title: 列表组件 API
order: 3
docGenIncludes:
  - src/components/List.tsx
  - src/components/ListItem.tsx
---
build-plugin-component@1.x 完全向前兼容,因此直接修改 package.json 中的对应依赖即可。
demo/usage.md:
---
title: Simple Usage
order: 1
---

```jsx
ReactDOM.render(<div className="ttt">hello<>, mountNode);
```

+ ```css
+ .ttt {
+   background: red;
+ }
+ ```
新建 demo/usage.jsx:
import React from 'react';
import ReactDOM from 'react-dom';
import ExampleComponent from 'my-component';

function App() {
  return <ExampleComponent />;
}

export default App;
修改 demo/usage.md:
---
title: Simple Usage
order: 1
---

本 demo 演示一行文字的用法。

```jsx
+ <DemoCode src="./usage.jsx" />
```
工程上将自动将路径中的源码获取,并展示在 Demo 预览页面中。通过上述的方式开发 Demo 可以享受编辑器带来的代码提示、语法高亮等便捷功能。
通过设置工程上的 UMD 的相关配置,可以将业务组件以 UMD 模块方式打包,比如对上述示例组件进行设置:
{
  "library": "ExampleComponent",
  "libraryTarget": "umd"
}
默认情况下,demo/ 目录里的文件都是扁平的,适合展示单个组件的文档,比如:
demo/
├── simple.md
└── usage.md
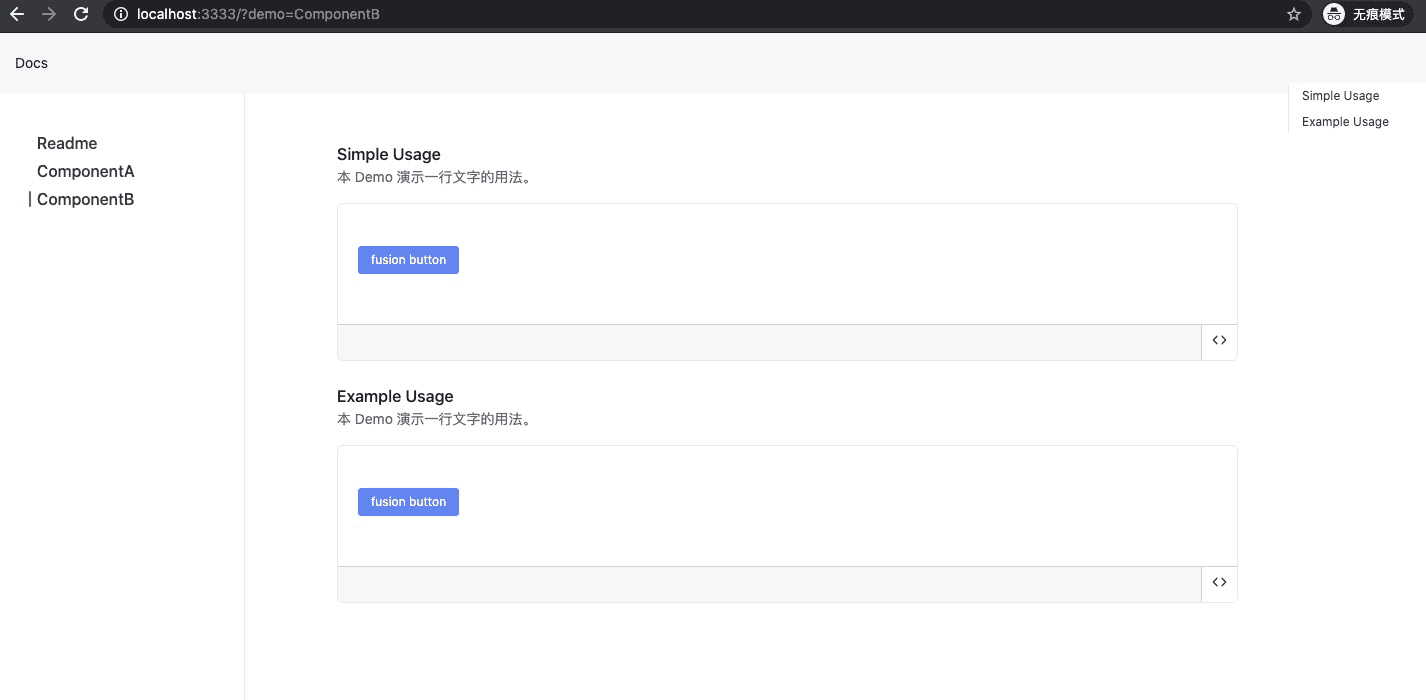
但是某些情况下,我们的业务组件可能会导出多个组件,此时可以通过目录嵌套来展示多个组件的文档:
├── demo/
│   ├── ComponentA/
│   │  ├── simple.md
│   │  └── simple2.md
│   ├── ComponentB/
│   │  ├── simple.md
│   └──└── simple2.md
最终效果如下,其中每个目录对应一个组件,即左侧的一个导航:

FAQs
build plugin for component development
The npm package build-plugin-component receives a total of 0 weekly downloads. As such, build-plugin-component popularity was classified as not popular.
We found that build-plugin-component demonstrated a not healthy version release cadence and project activity because the last version was released a year ago. It has 7 open source maintainers collaborating on the project.
Did you know?

Socket for GitHub automatically highlights issues in each pull request and monitors the health of all your open source dependencies. Discover the contents of your packages and block harmful activity before you install or update your dependencies.

Security News
Fluent Assertions is facing backlash after dropping the Apache license for a commercial model, leaving users blindsided and questioning contributor rights.

Research
Security News
Socket researchers uncover the risks of a malicious Python package targeting Discord developers.

Security News
The UK is proposing a bold ban on ransomware payments by public entities to disrupt cybercrime, protect critical services, and lead global cybersecurity efforts.