


Generates HTML with JS and CSS from templates containing source files of scripts, styles and other assets.
Advanced alternative to html-webpack-plugin and modern replacement of many plugins and loaders.
💡 Highlights
- An entry point is any HTML template. Start from HTML, not from JS.
- Find and automatic processing of templates in the entry directory.
- Renders the template engines "out of the box":
Eta, EJS, Handlebars, Nunjucks, Pug, TwigJS, LiquidJS.
- Source files of
script and style can be specified directly in HTML:
<link href="./style.scss" rel="stylesheet">
No longer need to define source style files in Webpack entry or import styles in JavaScript.<script src="./app.ts" defer="defer"></script>
No longer need to define source JavaScript files in Webpack entry.
- Resolves source files of assets in attributes such as
href src srcset using relative path or alias:
<link href="../images/favicon.svg" type="image/svg" rel=icon /><img src="@images/pic.png" srcset="@images/pic400.png 1x, @images/pic800.png 2x" />
Source files will be resolved, processed and auto-replaced with correct URLs in the bundled output.
- Inlines JS, CSS and Images into HTML. See how to inline all resources into single HTML file.
- Recompiles the template after changes in the data file assigned to the entry page as a JSON or JS filename.
- Generates the preload tags for fonts, images, video, scripts, styles.
- Generates the integrity attribute in the
link and script tags. - Generates the favicons of different sizes for various platforms.
- You can create own plugin using the Plugin Hooks.
- Over 600 tests for various use cases.
See full list of features.
HTML template as entry point
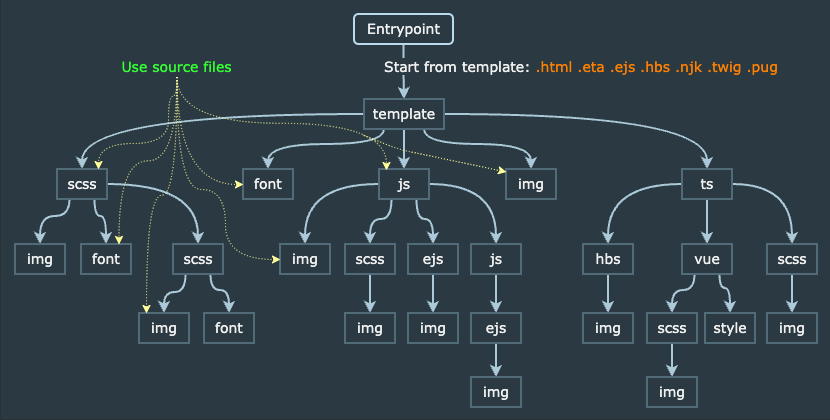
The HTML Bundler generates static HTML or template function from various templates containing source files of scripts, styles, images, fonts and other resources, similar to how it works in Vite.
This plugin looks at the template files in entry option to start building the bundle.
The source files of dependencies (scripts, styles, etc.) can be defined directly in the template.
The plugin resolves source files of assets in templates and replaces them with correct output URLs in the generated HTML.
The resolved assets will be processed via Webpack plugins/loaders and placed into the output directory.
You can use a relative path or Webpack alias to a source file.
A template imported in JS will be compiled into template function. You can use the template function in JS to render the template with variables in runtime on the client-side in the browser.
For example, using source asset files is HTML template ./src/views/index.html:
<html>
<head>
<link href="../scss/style.scss" rel="stylesheet" />
<script src="../app/main.ts" defer="defer"></script>
</head>
<body>
<h1>Hello World!</h1>
<img src="../assets/images/picture1.png" />
<img src="@images/picture2.png" />
</body>
</html>
The folder structure of the example:
./src/views/index.html
./src/app/main.ts
./src/scss/style.scss
./src/assets/images/picture1.png
./src/assets/images/picture2.png
Simple and clear Webpack configuration:
const path = require('path');
const HtmlBundlerPlugin = require('html-bundler-webpack-plugin');
module.exports = {
output: {
path: path.resolve(__dirname, 'dist'),
},
plugins: [
new HtmlBundlerPlugin({
entry: {
index: 'src/views/index.html',
},
js: {
filename: 'js/[name].[contenthash:8].js',
},
css: {
filename: 'css/[name].[contenthash:8].css',
},
}),
],
module: {
rules: [
{
test: /\.s?css$/,
use: ['css-loader', 'sass-loader'],
},
{
test: /\.(ico|png|jp?g|svg)/,
type: 'asset/resource',
},
],
},
};
See full list of all plugin options.
Open an example in StackBlitz
🦖 Mozilla already uses this plugin to build static HTML files for the Mozilla AI GUIDE site.
The plugin has been actively developed for more than 2 years, and since 2023 it is open source.
Please support this project by giving it a star ⭐.
Thank you to all our sponsors and patrons!


")


⚙️ How works the plugin
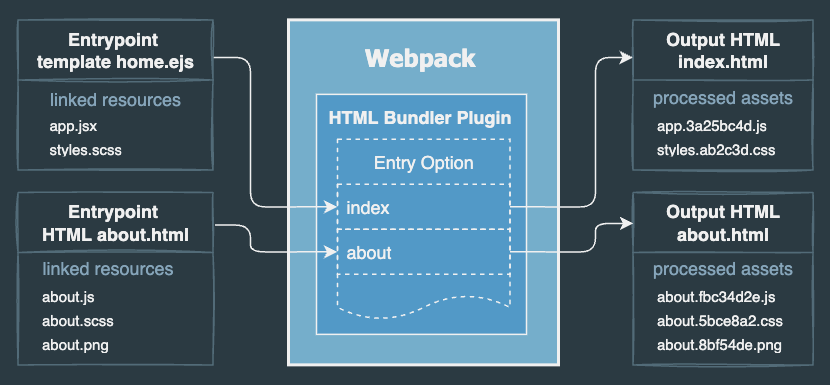
The plugin resolves references in the HTML template and adds them to the Webpack compilation.
Webpack will automatically process the source files, and the plugin replaces the references with their output filenames in the generated HTML.
See how the plugin works under the hood.
❓Question / Feature Request / Bug
If you have discovered a bug or have a feature suggestion, feel free to create an issue on GitHub.
📚 Read it
🔆 What's New in v4
🔆 What's New in v3
- NEW added supports the template function in JS runtime on the client-side.
- NEW added Pug preprocessor.
- NEW added Twig preprocessor.
- NEW added supports the dynamic import of styles.
- NEW added supports the CSS Modules for styles imported in JS.
- NEW added CSS extraction from styles used in
*.vue files. - NEW added Hooks & Callbacks. Now you can create own plugin to extend this plugin.
- NEW added the build-in FaviconsBundlerPlugin to generate and inject favicon tags.
🔆 What's New in v2
- NEW added importing style files in JavaScript.
- NEW added support the integrity.
- NEW you can add/delete/rename a template file in the entry path without restarting Webpack.
For full release notes see the changelog.
⚠️ Limitations
Cache type
The current version works stable with cache.type as 'memory' (Webpack's default setting).
Support for the 'filesystem' cache type is experimental.
Install and Quick start
Install the html-bundler-webpack-plugin:
npm install html-bundler-webpack-plugin --save-dev
It's recommended to combine html-bundler-webpack-plugin with the css-loader and the sass-loader.
Install additional packages for styles:
npm install css-loader sass-loader sass --save-dev
Start with an HTML template. Add the <link> and <script> tags.
You can include asset source files such as SCSS, JS, images, and other media files directly in an HTML template.
The plugin resolves <script src="..."> <link href="..."> and <img src="..." srcset="..."> that references your script, style and image source files.
For example, there is the template ./src/views/home.html:
<html>
<head>
<title><%= title %></title>
<link href="./favicon.ico" rel="icon" />
<link href="./style.scss" rel="stylesheet" />
<script src="./main.js" defer="defer"></script>
</head>
<body>
<h1>Hello World!</h1>
<img src="./picture.png" />
</body>
</html>
All source filenames should be relative to the entrypoint template, or you can use Webpack alias.
The references are rewritten in the generated HTML so that they point to the correct output files.
The generated HTML contains URLs of the output filenames:
<html>
  <head>
    <title>Homepage</title>
    <link href="img/favicon.3bd858b4.ico" rel="icon" />
    <link href="css/style.05e4dd86.css" rel="stylesheet" />
    <script src="js/main.f4b855d8.js" defer="defer"></script>
  </head>
  <body>
    <h1>Hello World!</h1>
    <img src="img/picture.58b43bd8.png" />
  </body>
</html>
Pages can be defined in the entry option.
JS and CSS can be configured using the js and css options.
If the entry option is a path, the plugin finds all templates automatically
and keep the same directory structure in the output directory.
If the entry option is an object, the key is an output filename without .html extension and the value is a template file.
const HtmlBundlerPlugin = require('html-bundler-webpack-plugin');
module.exports = {
plugins: [
new HtmlBundlerPlugin({
entry: 'src/views/',
entry: {
index: 'src/views/home.html',
'news/sport': 'src/views/news/sport/index.html',
},
entry: [
{
import: 'src/views/home.html',
filename: 'index.html',
data: { title: 'Homepage' },
},
{
import: 'src/views/news/sport/index.html',
filename: 'news/sport.html',
data: { title: 'Sport news' },
},
],
entry: {
index: 'src/views/home.html',
'news/sport': {
import: 'src/views/home.html',
data: { title: 'Sport news' },
},
},
js: {
filename: 'js/[name].[contenthash:8].js',
},
css: {
filename: 'css/[name].[contenthash:8].css',
},
}),
],
module: {
rules: [
{
test: /\.(css|sass|scss)$/,
use: ['css-loader', 'sass-loader'],
},
{
test: /\.(ico|png|jp?g|webp|svg)$/,
type: 'asset/resource',
generator: {
filename: 'img/[name].[hash:8][ext][query]',
},
},
],
},
};
Note
To define the JS output filename, use the js.filename option of the plugin.
Don't use Webpack's output.filename, hold all relevant settings in one place - in plugin options.
Both places have the same effect, but js.filename has priority over output.filename.
No additional template loader is required. The plugin handles templates with base EJS-like syntax automatically.
The default templating engine is Eta.
For using the native EJS syntax see Templating with EJS.
For using the Handlebars see Templating with Handlebars.
For other templates see Template engines.
For custom templates, you can use the preprocessor option to handle any template engine.
| Simple example SPA |

|
| Automatically processing many HTML templates |
|
| Create multiple HTML pages |
See boilerplate
|
Table of Contents
- Features
- Install and Quick start
- Webpack options
- Build-in Plugins
- Third-party Plugins
- Hooks & Callbacks
- Plugin options
- Loader options
- Using template engines
- Using template in JavaScript
- Setup Live Reload
- Recipes
- Problems & Solutions
-
Demo sites
-
Usage examples
Features
- HTML template is the entry point for all resources
- extracts JS from the source script filename specified in HTML via a
<script> tag - extracts CSS from the source style filename specified in HTML via a
<link> tag - importing style files in JavaScript
- resolves source asset files in HTML attributes and in the CSS
url(), without using resolve-url-loader - supports styles used in
*.vue files - generated HTML contains output filenames
- supports the module types
asset/resource asset/inline asset asset/source (*) - inline CSS in HTML
- inline JavaScript in HTML
- inline image as
base64 encoded data-URL for PNG, JPG, etc. in HTML and CSS - inline SVG as SVG tag in HTML, e.g.:
<svg>...</svg> - inline SVG as
utf-8 data-URL in CSS, e.g.: url("data:image/svg+xml,<svg>...</svg>") - auto generation of
<link rel="preload"> to preload assets - supports the
auto publicPath - enable/disable extraction of comments to
*.LICENSE.txt file - supports template engines such as Eta, EJS, Handlebars, Nunjucks, Pug, TwigJS, LiquidJS and others
- supports a template function for usage in JS on the client-side
- supports both
async and sync preprocessor - auto processing multiple HTML templates using the entry path
- pass data into template from the plugin config
- dynamically loading template variables using the data option, change data w/o restarting
- generates the
integrity hashes and adds the integrity attribute to the link and script tags - minification of generated HTML
- allows extending base functionality using hooks & callbacks
- generates favicons of different sizes for various platforms and injects them into HTML
(*) - asset/source works currently for SVG only, in a next version will work for other files too
Why do many developers switch from Webpack to other bundlers?
One of the reasons they cite is the complex configuration many different plugins and loaders for one simple thing - rendering an HTML page with assets.
The HTML bundler plugin "changes the rule of the game", making configuration very simple and clear.
Just one plugin replaces the functionality of the plugins and loaders:
Webpack options
Important Webpack options used to properly configure this plugin.
output.path
Type: string Default: path.join(process.cwd(), 'dist')
The root output directory for all processed files, as an absolute path.
You can omit this option, then all generated files will be saved under dist/ in your project directory.
output.publicPath
Type: string|function Default: auto
The value of the option is prefixed to every URL created by this plugin.
If the value is not the empty string or auto, then the option must end with /.
The possible values:
publicPath: 'auto' - automatically determines a path of an asset relative of their issuer.
The generated HTML page can be opened directly form the local directory and all js, css and images will be loaded in a browser.publicPath: '' - a path relative to an HTML page, in the same directory. The resulting path is different from a path generated with auto.publicPath: '/' - a path relative to document root directory on a serverpublicPath: '/assets/' - a sub path relative to document root directory on a serverpublicPath: '//cdn.example.com/' - an external URL with the same protocol (http:// or https://)publicPath: 'https://cdn.example.com/' - an external URL with the https:// protocol only
output.filename
Type: string|function Default: [name].js
The output name of a generated JS file.
Highly recommended to define the filename in the Plugin option js.filename.
The output name of a generated CSS file is determined in the Plugin option css.filename.
Define output JS and CSS filenames in the Plugin option, in one place:
const HtmlBundlerPlugin = require('html-bundler-webpack-plugin');
module.exports = {
plugins: [
new HtmlBundlerPlugin({
js: {
filename: 'js/[name].[contenthash:8].js',
},
css: {
filename: 'css/[name].[contenthash:8].css',
},
}),
],
};
entry
The starting point to build the bundle.
Note
Using this plugin an entry point is an HTML template.
All script and style source files must be specified in the HTML template.
You can use the Webpack entry option to define HTML templates,
but it is highly recommended to define all templates in plugin option entry,
because it has an additional data property (not available in the Webpack entry)
to pass custom variables into the HTML template.
For details see the plugin option entry.
Build-in Plugins
There are the most useful plugins available "out of the box".
The build-in plugins maintained by the HtmlBundlerPlugin.
All build-in plugins are in the /plugins subdirectory of the HtmlBundlerPlugin.
FaviconsBundlerPlugin
The FaviconsBundlerPlugin generates favicons for different devices and injects favicon tags into HTML head.
Install
This plugin requires the additional favicons package.
npm install favicons -D
Config
const HtmlBundlerPlugin = require('html-bundler-webpack-plugin');
const { FaviconsBundlerPlugin } = require('html-bundler-webpack-plugin/plugins');
module.exports = {
plugins: [
new HtmlBundlerPlugin({
entry: {
index: './src/views/index.html',
},
}),
new FaviconsBundlerPlugin({
enabled: 'auto',
faviconOptions: {
path: '/img/favicons',
icons: {
android: true,
appleIcon: true,
appleStartup: false,
favicons: true,
windows: false,
yandex: false,
},
},
}),
],
module: {
rules: [
{
test: /\.(png|jpe?g|ico|svg)$/,
type: 'asset/resource',
},
],
},
};
FaviconsBundlerPlugin options
enabled: boolean | 'auto'
if is 'auto' then generate favicons in production mode only,
in development mode will be used original favicon processed via webpack asset module.faviconOptions: FaviconOptions - options of the favicons module. See configuration options.
Usage
The source file of your favicon must be specified directly in HTML as the link tag with rel="icon" attribute.
If the FaviconsBundlerPlugin is disabled or as auto in development mode,
then the source favicon file will be processed via webpack.
If the FaviconsBundlerPlugin is enabled or as auto in production mode,
then the source favicon file will be processed via favicons module and
the original link tag with favicon will be replaced with generated favicon tags.
For example, there is the src/views/index.html
<!DOCTYPE html>
<html>
<head>
<link href="./myFavicon.png" rel="icon" />
</head>
<body>
<h1>Hello World!</h1>
</body>
</html>
The generated HTML when FaviconsBundlerPlugin is disabled:
<!DOCTYPE html>
<html>
<head>
<link href="assets/img/myFavicon.1234abcd.png" rel="icon" />
</head>
<body>
<h1>Hello World!</h1>
</body>
</html>
The generated HTML when FaviconsBundlerPlugin is enabled:
<!DOCTYPE html>
<html>
<head>
<link rel="apple-touch-icon" sizes="1024x1024" href="/img/favicons/apple-touch-icon-1024x1024.png">
<link rel="apple-touch-icon" sizes="114x114" href="/img/favicons/apple-touch-icon-114x114.png">
<link rel="apple-touch-icon" sizes="120x120" href="/img/favicons/apple-touch-icon-120x120.png">
<link rel="apple-touch-icon" sizes="144x144" href="/img/favicons/apple-touch-icon-144x144.png">
<link rel="apple-touch-icon" sizes="152x152" href="/img/favicons/apple-touch-icon-152x152.png">
<link rel="apple-touch-icon" sizes="167x167" href="/img/favicons/apple-touch-icon-167x167.png">
<link rel="apple-touch-icon" sizes="180x180" href="/img/favicons/apple-touch-icon-180x180.png">
<link rel="apple-touch-icon" sizes="57x57" href="/img/favicons/apple-touch-icon-57x57.png">
<link rel="apple-touch-icon" sizes="60x60" href="/img/favicons/apple-touch-icon-60x60.png">
<link rel="apple-touch-icon" sizes="72x72" href="/img/favicons/apple-touch-icon-72x72.png">
<link rel="apple-touch-icon" sizes="76x76" href="/img/favicons/apple-touch-icon-76x76.png">
<link rel="icon" type="image/png" sizes="16x16" href="/img/favicons/favicon-16x16.png">
<link rel="icon" type="image/png" sizes="32x32" href="/img/favicons/favicon-32x32.png">
<link rel="icon" type="image/png" sizes="48x48" href="/img/favicons/favicon-48x48.png">
<link rel="icon" type="image/x-icon" href="/img/favicons/favicon.ico">
<link rel="manifest" href="/img/favicons/manifest.webmanifest">
<meta name="apple-mobile-web-app-capable" content="yes">
<meta name="apple-mobile-web-app-status-bar-style" content="black-translucent">
<meta name="apple-mobile-web-app-title" content="My App">
<meta name="application-name" content="My App">
<meta name="mobile-web-app-capable" content="yes">
<meta name="theme-color" content="#fff">
</head>
<body>
<h1>Hello World!</h1>
</body>
</html>
Third-party Plugins
The third-party plugins not maintained by the HtmlBundlerPlugin.
It potentially does not have the same support, security policy or license as Build-in Plugins.
You can create own plugin using the plugin hooks.
As a reference plugin,
you can use the FaviconsBundlerPlugin.
If you have a useful plugin, create a PR with the link to you plugin.
The plugin name must end with -bundler-plugin, e.g. hello-world-bundler-plugin.
Currently there are no plugins yet. Be the first to create one.
Hooks & Callbacks
Using hooks and callbacks, you can extend the functionality of this plugin.
The hook can be defined in an external plugin.
The callback is defined as an option in the HTMLBundlerPlugin.
Most hooks have a callback with the same name.
Each callback is called after hook with the same name.
So with a callback, you can change the result of the hook.
When using callbacks
If you have small code just for your project or are doing debugging, you can use callbacks.
When using hooks
Using hooks you can create your own plugin.
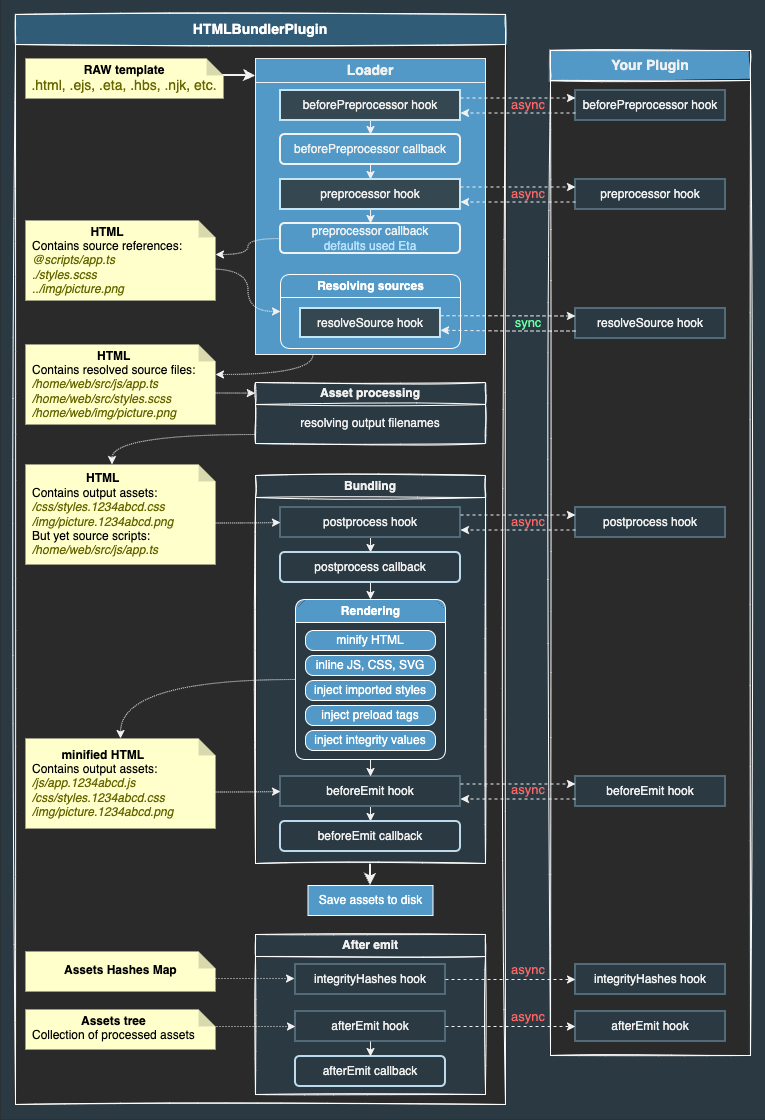
How the plugin works under the hood.
How to use hooks
The simplest way, add the { apply() { ... } } object to the array of the Webpack plugins:
const HtmlBundlerPlugin = require('html-bundler-webpack-plugin');
module.exports = {
plugins: [
new HtmlBundlerPlugin({
entry: {
index: './src/index.html',
},
}),
{
apply(compiler) {
const pluginName = 'MyPlugin';
compiler.hooks.compilation.tap(pluginName, (compilation) => {
const hooks = HtmlBundlerPlugin.getHooks(compilation);
hooks.beforeEmit.tap(pluginName, (content, { name, sourceFile, assetFile }) => {
return content.replace('something...', 'other...')
});
});
},
},
],
};
You can use this template as the basis for your own plugin:
const HtmlBundlerPlugin = require('html-bundler-webpack-plugin');
class MyPlugin {
pluginName = 'my-plugin';
options = {};
constructor(options = {}) {
this.options = options;
}
apply(compiler) {
const enabled = HtmlBundlerPlugin.option.toBool(this.options?.enabled, true, 'auto');
const outputPath = HtmlBundlerPlugin.option.getWebpackOutputPath();
if (!enabled) {
return;
}
const { pluginName } = this;
const { webpack } = compiler;
const fs = compiler.inputFileSystem.fileSystem;
compiler.hooks.compilation.tap(pluginName, (compilation) => {
const hooks = HtmlBundlerPlugin.getHooks(compilation);
hooks.<hookName>.tap(pluginName, (...arguments) => {
const result = 'your result';
return result;
});
hooks.<hookName>.tapAsync(pluginName, (...arguments, callback) => {
const result = 'your result';
callback(result);
});
hooks.<hookName>.tapPromise(pluginName, (...arguments) => {
const result = 'your result';
return Promise.resolve(result);
});
});
}
}
module.exports = MyPlugin;
Then add your plugin in the webpack config:
const HtmlBundlerPlugin = require('html-bundler-webpack-plugin');
const MyBundlerPlugin = require('my-bundler-plugin');
module.exports = {
plugins: [
new HtmlBundlerPlugin({
entry: {
index: './src/index.html',
},
}),
new MyBundlerPlugin({ enabled: true });
],
};
For an example implementation see FaviconsBundlerPlugin.
beforePreprocessor
AsyncSeriesWaterfallHook<[
  content: string,
  loaderContext: LoaderContext<Object> & { data: { [key: string]: any } | string }
]>;
For details on AsyncSeriesWaterfallHook see the hook interface.
For details on hook parameters, see in the beforePreprocessor callback option.
preprocessor
AsyncSeriesWaterfallHook<[
  content: string,
  loaderContext: LoaderContext<Object> & { data: { [key: string]: any } | string }
]>;
For details on AsyncSeriesWaterfallHook see the hook interface.
For details on hook parameters, see in the preprocessor callback option.
resolveSource
SyncWaterfallHook<[
  source: string,
  info: {
    type: 'style' | 'script' | 'asset';
    tag: string;
    attribute: string;
    value: string;
    resolvedFile: string;
    issuer: string
  },
]>;
no calback
Called after resolving of a source attribute defined by source loader option.
For details on SyncWaterfallHook see the hook interface.
Hook parameters:
source - a source of the tag where are parsed attributes, e.g. <link href="./favicon.png" rel="icon">info - an object with parsed information:
type - the type of the tagtag - the tag name, e.g. 'link', 'script', 'img', etc.attribute - the attribute name, e.g. 'src', 'href', etc.value - the attribute valueresolvedFile - the resolved file from the valueissuer - the template file
Return a string to override the resolved value of the attribute or undefined to keep the resolved value.
postprocess
AsyncSeriesWaterfallHook<[content: string, info: TemplateInfo]>;
For details on AsyncSeriesWaterfallHook see the hook interface.
For details on hook parameters, see in the postprocess callback option.
beforeEmit
AsyncSeriesWaterfallHook<[content: string, entry: CompileEntry]>;
For details on AsyncSeriesWaterfallHook see the hook interface.
For details on hook parameters, see in the beforeEmit callback option.
afterEmit
AsyncSeriesHook<[entries: CompileEntries]>;
For details on AsyncSeriesHook see the hook interface.
For details on hook parameters, see in the afterEmit callback option.
integrityHashes
AsyncSeriesHook<{
hashes: Map<string, string>;
}>;
Called after all assets have been processed and hashes have finite values and cannot be changed, at the afterEmit stage.
This can be used to retrieve the integrity values for the asset files.
For details on AsyncSeriesHook see the hook interface.
Callback Parameter: hashes is the map of the output asset filename to its integrity hash.
The map only contains JS and CSS assets that have a hash.
You can write your own plugin, for example, to extract integrity values into the separate file:
const fs = require('fs');
const path = require('path');
const HtmlBundlerPlugin = require('html-bundler-webpack-plugin');
module.exports = {
output: {
crossOriginLoading: 'anonymous',
},
plugins: [
new HtmlBundlerPlugin({
entry: {
index: './src/index.html',
},
js: {
filename: '[name].[contenthash:8].js',
chunkFilename: '[name].[contenthash:8].chunk.js',
},
css: {
filename: '[name].[contenthash:8].css',
chunkFilename: '[name].[contenthash:8].chunk.css',
},
integrity: 'auto',
}),
{
apply(compiler) {
compiler.hooks.compilation.tap('MyPlugin', (compilation) => {
const hooks = HtmlBundlerPlugin.getHooks(compilation);
hooks.integrityHashes.tapAsync(
'MyPlugin',
(hashes) => Promise.resolve().then(() => {
if (hashes.size > 0) {
const saveAs = path.join(__dirname, 'dist/integrity.json');
const json = Object.fromEntries(hashes);
fs.writeFileSync(saveAs, JSON.stringify(json, null, ' '));
console.log(hashes);
}
})
);
}
);
},
},
],
};
The content of the dist/integrity.json file looks like:
{
  "815.49b3d882.chunk.js": "sha384-dBK6nNrKKk2KjQLYmHZu6tuWwp7kBzzEvdX+4Ni11UzxO2VHvP4A22E/+mmeduul",
  "main.9c043cce.js": "sha384-AbfLh7mk6gCp0nhkXlAnOIzaHeJSB8fcV1/wT/FWBHIDV7Blg9A0sukZ4nS3xjtR"
  "main.dc4ea4af.chunk.css": "sha384-W/pO0vwqqWBj4lq8nfe+kjrP8Z78smCBttkCvx1SYKrVI4WEdJa6W6i0I2hoc1t7",
  "style.47f4da55.css": "sha384-gaDmgJjLpipN1Jmuc98geFnDjVqWn1fixlG0Ab90qFyUIJ4ARXlKBsMGumxTSu7E",
}
Plugin options
test
Type: RegExp Default: /\.(html|eta)$/
The test option allows to handel only those templates as entry points that match the name of the source file.
For example, if you have other templates, e.g. *.liquid, as entry points, then you can set the option to match custom template files: test: /\.(html|liquid)$/.
The test value is used in the default loader.
Note
Using the preprocessor options will be added the templating engine extensions in the test automatically.
Defaults preprocessor is Eta therefore is used the /\.(html|eta)$/ RegExp.
For example, if you define the preprocessor option as the handlebars, then will be used the /\.(html|hbs|handlebars)$/ RegExp automatically.
Why is it necessary to define it? Can't it be automatically processed?
This plugin is very powerful and has many experimental features not yet documented.
One of the next features will be the processing scripts and styles as entry points for library bundles without templates.
To do this, the plugin must differentiate between a template entry point and a script/style entry point.
This plugin can completely replace the functionality of mini-css-extract-plugin and webpack-remove-empty-scripts in future.
entry
Type: EntryObject | Array<EntryDescription> | string.
The EntryObject is identical to Webpack entry
plus additional data property to pass custom variables into the HTML template.
Specify template files as entry points in the entry option.
An HTML template is a starting point for collecting all the dependencies used in your web application.
Specify source scripts (JS, TS) and styles (CSS, SCSS, LESS, etc.) directly in HTML.
The plugin automatically extracts JS and CSS whose source files are specified in an HTML template.
type EntryObject = {
  [name: string]: EntryDescription | string;
};
The key of the EntryObject is the output filename without an extension, relative to the outputPath option.
Simple syntax
When the entry point value is a string, it must be an absolute or relative template file.
For example:
{
entry: {
index: path.join(__dirname, 'src/views/home/index.html'),
'news/sport': 'src/views/news/sport/index.html',
},
}
Advanced syntax
If you need to pass data to a template or want to dynamically generate an output filename regardless of the entry key,
you can define the value of an entry as an EntryDescription object.
type EntryDescription = {
import: string;
filename?: FilenameTemplate;
data?: { [key: string]: any } | string;
};
type FilenameTemplate =
| string
| ((pathData: import('webpack/Compilation').PathData, assetInfo?: import('webpack/Compilation').AssetInfo) => string);
import
The import is a path to a template file, absolute or relative to the Webpack context option.
filename
When the filename is defined as a string, it will be used as the output html filename.
In this case, the entry key can be any unique string.
For example:
{
entry: {
page01: {
import: 'src/views/news/sport/index.html',
filename: 'news/sport.html',
},
},
}
When the filename is defined as a template string,
then the entry key will be used as the [name] in the template string. Defaults, the filename is the [name].html template string.
For example:
{
entry: {
'news/sport': {
import: 'src/views/news/sport/index.html',
filename: '[name].html',
},
},
}
The example above is equivalent to the simple syntax:
{
  entry: {
    'news/sport': 'src/views/news/sport/index.html',
  },
}
data
The data is passed into preprocessor to render the template with variables.
When the data is an object, it will be loaded once with Webpack start.
After changing the data, you need to restart Webpack.
For example:
{
entry: {
index: {
import: 'src/views/index.html',
data: {
title: 'Home',
}
},
}
When the data is a string, it must be an absolute or relative path to a file.
The file can be a JSON file or a JS file that exports the data as an object.
Use the data as a file if you want to get dynamic data in a template.
The data file will be reloaded after changes, without restarting Webpack.
For example:
{
entry: {
index: {
import: 'src/views/index.html',
data: 'src/data/home.json',
},
},
}
The data file src/data/home.json:
{
  "title": "Home"
}
To pass global variables in all templates use the data loader option.
Note
You can define templates both in Webpack entry and in the entry option of the plugin. The syntax is identical.
But the data property can only be used in the entry option of the plugin.
Entry as an array
If the entry is the array of the EntryDescription then the filename property is required.
{
entry: [
{
filename: 'index.html',
import: 'src/views/index.html',
data: { title: 'Homepage' },
},
{
filename: 'about.html',
import: 'src/views/about.html',
data: { title: 'About' },
},
{
filename: 'news/sport.html',
import: 'src/views/news/sport.html',
data: { title: 'Sport' },
},
],
}
Entry as an object
The absolute equivalent to the example above using an object is:
{
entry: {
index: {
import: 'src/views/index.html',
data: { title: 'Homepage' },
},
about: {
import: 'src/views/about.html',
data: { title: 'About' },
},
'news/sport': {
import: 'src/views/news/sport.html',
data: { title: 'Sport' },
},
},
}
The difference between object and array notation:
- Using the object notation the output filename is the key of the entry item without the
.html file extension. - Using the array notation the output filename is the
filename property of the array item contained the file with .html file extension.
Entry as a path to templates
You can define the entry as a path to recursively detect all templates from that directory.
When the value of the entry is a string, it must be an absolute or relative path to the templates' directory.
Templates matching the test option are detected recursively from the path.
The output files will have the same folder structure as source template directory.
For example, there are files in the template directory ./src/views/
./src/views/index.html
./src/views/about/index.html
./src/views/news/sport/index.html
./src/views/news/sport/script.js
./src/views/news/sport/style.scss
...
Define the entry option as the relative path to pages:
new HtmlBundlerPlugin({
  entry: 'src/views/',
});
Files that are not matching to the test option are ignored.
The output HTML filenames keep their source structure in the output directory relative to the entry path:
./dist/index.html
./dist/about/index.html
./dist/news/sport/index.html
...
If you need to modify the output HTML filename, use the filename option as the function.
For example, we want keep a source structure for all pages,
while ./src/views/home/index.html should not be saved as ./dist/home/index.htm, but as ./dist/index.htm:
new HtmlBundlerPlugin({
entry: 'src/views/',
filename: ({ filename, chunk: { name } }) => {
if (name === 'home/index') {
return 'index.html';
}
return '[name].html';
},
});
Note
In serve/watch mode, you can add/delete/rename a template file in the entry path without restarting Webpack.
entryFilter
Filter to process only matching template files.
This option works only if the entry option is a path.
Type:
type entryFilter =
  | RegExp
  | Array<RegExp>
  | { includes?: Array<RegExp>; excludes?: Array<RegExp> }
  | ((file: string) => void | false);
Default value:
{
  includes: [
    /\.(html|eta)$/,
  ],
  excludes: []
}
The default includes property depends on the used preprocessor option.
Each preprocessor has its own filter to include from the entry path only relevant template files.
entryFilter as RegExp
The filter works as include only files that match the regular expressions.
For example:
new HtmlBundlerPlugin({
entry: 'src/views/pages/',
entryFilter: /index\.html$/,
})
entryFilter as Array<RegExp>
The filter works as include only files that match one of the regular expressions.
For example:
new HtmlBundlerPlugin({
entry: 'src/views/pages/',
entryFilter: [
/index\.html$/,
/contact\.html$/,
/about\.html$/,
],
})
entryFilter as { includes: Array<RegExp>, excludes: Array<RegExp> }
The filter includes only files that match one of the regular expressions, except excluded files.
For example:
new HtmlBundlerPlugin({
entry: 'src/views/pages/',
entryFilter: {
includes: [/\.(html|eta)$/,],
excludes: [/partial/],
},
})
entryFilter as callback
In addition to the default includes filter, this filter works as exclude a file if it returns false.
If the callback returns true or nothing, then the file will be processed.
For example:
new HtmlBundlerPlugin({
entry: 'src/views/pages/',
entryFilter: (file) => {
if (/partial/.test(file)) return false;
},
})
The file argument is the absolute path of a template file.
outputPath
Type: string Default: webpack output.path
The output directory for generated HTML files only.
This directory can be absolute or relative to webpack output.path.
For example, here are html and js files:
src/index.html
src/main.js
src/index.html
<!doctype html>
<html>
  <head>
    <script src="./main.js"></script>
  </head>
  <body>
    <h1>Hello World!</h1>
  </body>
</html>
There is webpack config:
const path = require('path');
const HtmlBundlerPlugin = require('html-bundler-webpack-plugin');
module.exports = {
output: {
path: path.join(__dirname, 'dist/'),
},
plugins: [
new HtmlBundlerPlugin({
outputPath: path.join(__dirname, 'dist/example/'),
entry: {
index: './src/index.html',
},
js: {
filename: '[name].bundle.js',
outputPath: 'assets/js/',
},
}),
],
};
The processed files in the output directory:
dist/example/index.html
dist/assets/js/main.bundle.js
The generated dist/example/index.html:
<!doctype html>
<html>
  <head>
    <script src="../assets/js/main.bundle.js"></script>
  </head>
  <body>
    <h1>Hello World!</h1>
  </body>
</html>
Warning
The outputPath is NOT used for output assets (js, css, images, etc.).
filename
Type: string | Function Default: [name].html
The HTML output filename relative to the outputPath option.
If type is string then following substitutions (see output.filename for chunk-level) are available in template string:
[id] The ID of the chunk.[name] The filename without extension or path.[contenthash] The hash of the content.[contenthash:nn] The nn is the length of hashes (defaults to 20).
If type is Function then following arguments are available in the function:
@param {PathData} pathData has the useful properties (see the type PathData):
pathData.filename the absolute path to source filepathData.chunk.name the name of entry key
@return {string} The name or template string of output file.
js
Type:
type JsOptions = {
  filename?: FilenameTemplate;
  chunkFilename?: FilenameTemplate;
  outputPath?: string;
  inline?: 'auto' | boolean | JsInlineOptions;
};

type JsInlineOptions = {
  enabled?: 'auto' | boolean;
  chunk?: RegExp | Array<RegExp>;
  source?: RegExp | Array<RegExp>;
  attributeFilter?: (props: {
    attribute: string;
    value: string;
    attributes: { [attributeName: string]: string };
  }) => boolean | void;
};
Default properties:
{
  filename: '[name].js',
  chunkFilename: '[id].js',
  outputPath: null,
  inline: false,
}
filename - an output filename of JavaScript. Details see by filename option.chunkFilename - an output filename of non-initial chunk files. Details see by chunkFilename.outputPath - an output path of JavaScript. Details see by outputPath option.
The inline property allows to inline compiled JavaScript chunks into HTML.
If inline is 'auto' or boolean, available values:
false - stores JavaScript in an output file (defaults)true - adds JavaScript to the DOM by injecting a <script> tag'auto' - in development mode - adds to DOM, in production mode - stores as a file
If inline is an object:
-
enabled - has the values: true (defaults), false or 'auto', descriptsion see above,
if the enabled is undefined, then using the inline as the object, the value is true
-
chunk - inlines the single chunk when output chunk filename matches a regular expression(s)
-
source - inlines all chunks when source filename matches a regular expression(s)
-
attributeFilter - filter function to keep/remove attributes for inlined script tag. If undefined, all attributes will be removed.
Destructed arguments:
attribute - attribute namevalue - attribute valueattributes - all attributes of the script tag
Return:
true - keep the attribute in the inlined script tagfalse or undefined - remove the attribute
You can use both the chunk and the source options,
then there will be inlined chunks matching regular expressions with OR logic.
For example, there is used the optimization.splitChunks and we want to inline only the small webpack runtime chunk
but other JS chunks of the same split app.js file should be saved to chunk files, then use the following inline option:
js: {
  filename: 'js/[name].[contenthash:8].js',
  inline: {
    chunk: [/runtime.+[.]js/],
  },
},
Then the app.js file will be split to many output chunks in the dist/ directory, e.g.:
js/325.xxxxxxxx.js  -> save as file
js/545.xxxxxxxx.js  -> save as file
js/app.xxxxxxxx.js  -> save as file
runtime.xxxxxxxx.js        -> inline the chunk into HTML and NOT save as file
The single runtime.xxxxxxxx.js chunk will be injected into HTML, other chunks will be saved to output directory.
Note
The filename and chunkFilename options are the same as in Webpack output options, just defined in one place along with other relevant plugin options.
You don't need to define them in the in Webpack output options anymore. Keep the config clean & clear.
To keep some original script tag attributes in the inlined script tag, use the attributeFilter.
For example, there is a script tag with attributes:
<script id="js-main" src="./main.js" defer></script>
Use the attributeFilter:
new HtmlBundlerPlugin({
js: {
inline: {
attributeFilter: ({ attributes, attribute, value }) => {
if (attribute === 'id') return true;
},
},
},
}
The inlined tag contains the id attribute, but the src and defer are removed:
<script id="js-main">
</script>
All source script files specified in <script src="..."> are automatically resolved,
and JS will be extracted to output file. The source filename will be replaced with the output filename.
For example:
<script src="./main.js"></script>
The default JS output filename is [name].js.
You can specify your own filename using webpack filename substitutions:
const HtmlBundlerPlugin = require('html-bundler-webpack-plugin');
module.exports = {
  plugins: [
    new HtmlBundlerPlugin({
      js: {
        filename: 'js/[name].[contenthash:8].js',
      },
    }),
  ],
};
The [name] is the base filename script.
For example, if source file is main.js, then output filename will be js/main.1234abcd.js.
If you want to have a different output filename, you can use the filename options as the function.
The chunkFilename option only takes effect if you have the optimization.splitChunks option.
For example:
const HtmlBundlerPlugin = require('html-bundler-webpack-plugin');
module.exports = {
plugins: [
new HtmlBundlerPlugin({
entry: {
index: 'src/views/index.html',
},
js: {
filename: 'js/[name].[contenthash:8].js',
chunkFilename: 'js/[id].[contenthash:8].js',
},
}),
],
optimization: {
splitChunks: {
cacheGroups: {
scripts: {
test: /\.(js|ts)$/,
chunks: 'all',
},
},
},
},
};
Warning
Webpack tries to split and concatenate chunks of all files (templates, styles, scripts) into jumbles.
Therefore, the test option MUST be specified to match only source JS files, otherwise Webpack will generate invalid output files.
Also see How to keep package name for split chunks from node_modules.
css
Type:
type CssOptions = {
  test?: RegExp;
  filename?: FilenameTemplate;
  chunkFilename?: FilenameTemplate;
  outputPath?: string;
  inline?: 'auto' | boolean;
};
Default properties:
{
  test: /\.(css|scss|sass|less|styl)$/,
  filename: '[name].css',
  chunkFilename: '[name].css',
  outputPath: null,
  inline: false,
}
test - an RegEpx to process all source styles that pass test assertionfilename - an output filename of extracted CSS. Details see by filename option.chunkFilename - an output filename of non-initial chunk files, e.g., a style file imported in JavaScript.outputPath - an output path of extracted CSS. Details see by outputPath option.inline - inlines extracted CSS into HTML, available values:
false - stores CSS in an output file (defaults)true - adds CSS to the DOM by injecting a <style> tag'auto' - in development mode - adds to DOM, in production mode - stores as a file
All source style files specified in <link href="..." rel="stylesheet"> are automatically resolved,
and CSS will be extracted to output file. The source filename will be replaced with the output filename.
For example:
<link href="./style.scss" rel="stylesheet" />
Warning
Don't import source styles in JavaScript. Styles should be specified directly in HTML.
Don't define source JS files in Webpack entry. Scripts must be specified directly in HTML.
The default CSS output filename is [name].css.
You can specify your own filename using webpack filename substitutions:
const HtmlBundlerPlugin = require('html-bundler-webpack-plugin');
module.exports = {
  plugins: [
    new HtmlBundlerPlugin({
      css: {
        filename: 'css/[name].[contenthash:8].css',
      },
    }),
  ],
};
The [name] is the base filename of a loaded style.
For example, if source file is style.scss, then output filename will be css/style.1234abcd.css.
If you want to have a different output filename, you can use the filename options as the function.
Warning
Don't use mini-css-extract-plugin because the bundler plugin extracts CSS much faster than other plugins.
Don't use resolve-url-loader because the bundler plugin resolves all URLs in CSS, including assets from node modules.
Don't use style-loader because the bundler plugin can auto inline CSS.
data
Since the v2.5.0, the data plugin option is the reference to loaderOptions.data.
Now it is possible to define the data option directly in the plugin options to simplify the config.
The NEW syntactic "sugar":
new HtmlBundlerPlugin({
entry: {
index: './src/views/home.ejs',
},
data: {...},
}),
The old syntax is still valid and will never be deprecated:
new HtmlBundlerPlugin({
entry: {
index: './src/views/home.ejs',
},
loaderOptions: {
data: {...},
},
}),
Please see the details below under the data loader options.
beforePreprocessor
Reference to loaderOption.beforePreprocessor
The plugin option is the reference to loaderOptions.beforePreprocessor.
Type:
type BeforePreprocessor =
  | false
  | ((
      content: string,
      loaderContext: LoaderContext<Object> & { data: { [key: string]: any } | string }
    ) => string | undefined);
Default: false
The content is the raw content of a template.
The description of all loaderContext attributes see in the Webpack documentation.
Returns the modified template. If you are not changing the template, you should return undefined or not use return at all.
The callback function called right before the preprocessor.
This can be useful when using one of the predefined preprocessors and modifying the raw template or the data passed to the template.
For example:
new HtmlBundlerPlugin({
entry: {
index: 'src/views/pages/',
},
data: {
title: 'Welcome to [sitename] website',
},
beforePreprocessor: (content, { resourcePath, data }) => {
let sitename = 'Homepage';
if (resourcePath.includes('/about.html')) sitename = 'About';
data.title = data.title.replace('[sitename]', sitename);
return content.replaceAll('{{old_var}}', '{{new_var}}');
},
preprocessor: 'handlebars',
});
preprocessor (callback or string) and preprocessorOptions
The plugin options are the references to loaderOptions.preprocessor and loaderOptions.preprocessorOptions.
Now it is possible to define these options directly in the plugin options to simplify the config.
The NEW syntactic "sugar":
new HtmlBundlerPlugin({
entry: {
index: './src/views/home.ejs',
},
preprocessor: 'ejs',
preprocessorOptions: {...},
}),
The old syntax is still valid and will never be deprecated:
new HtmlBundlerPlugin({
entry: {
index: './src/views/home.ejs',
},
loaderOptions: {
preprocessor: 'ejs',
preprocessorOptions: {...},
},
}),
Please see the details below under the preprocessor and the preprocessorOptions loader options.
postprocess callback
Type:
type postprocess = (
  content: string,
  info: TemplateInfo,
  compilation: Compilation
) => string | undefined;

type TemplateInfo = {
  name: string;
  assetFile: string;
  sourceFile: string;
  resource: string;
  outputPath: string;
};
Default: null
Called after the template has been compiled, but not yet finalized, before injection of the split chunks and inline assets.
The postprocess have the following arguments:
content: string - a content of processed fileinfo: TemplateInfo - info about current filecompilation: Compilation - the Webpack compilation object
The TemplateInfo have the following properties:
name: string - the entry nameassetFile: string - the output asset filename relative to outputPathsourceFile: string - the absolute path of the source file, without a queryresource: string - the absolute path of the source file, including a queryoutputPath: string - the absolute path of the output directory
Return new content as a string.
If return undefined, the result processed via Webpack plugin is ignored and will be saved a result processed via the loader.
beforeEmit callback
Type:
type BeforeEmit = (
content: string,
entry: CompileEntry,
compilation: Compilation
) => string | undefined;
type CompileEntry = TemplateInfo & {
assets: Array<CompileAsset>;
};
Default: null
Called at the latest stage of the processAssets hook, before emitting.
This is the latest stage where you can change the html before it will be saved on the disk.
Callback parameters:
content: string - the final version html contententry: CompileEntry the information about the entry containing all dependent assets,
the description of the TemplateInfo see by postprocesscompilation: Compilation - the Webpack compilation object
Return new content as a string.
If return undefined then content will not be changed.
afterEmit callback
Type:
type AfterEmit = (
  entries: Array<CompileEntry>,
  compilation: Compilation
) => Promise<void> | void;
Default: null
Called after emitting assets to output directory.
This callback can be useful to create a manifest file containing source and output filenames.
Callback parameters:
entries: Array<CompileEntry> the collection of entries containing all dependent assets,
the description of the CompileEntry see by beforeEmitcompilation: Compilation - the Webpack compilation object
preload
Type:
type Preload = Array<{
  test: RegExp;
  as?: string;
  rel?: string;
  type?: string;
  attributes?: { [attributeName: string]: string | boolean };
}>;
Default: null
Generates and injects preload tags <link rel="preload"> in the head before all link or script tags for all matching source assets resolved in templates and styles.
The descriptions of the properties:
test - an RegEpx to match source asset files.as - a content type, one of audio document embed font image object script style track video workerrel - a value indicates how to load a resource, one of preload prefetch , defaults preloadtype - a MIME type of the content.
Defaults the type is detected automatically, for example:
picture.png as image/pngpicture.jpg as image/jpegpicture.svg as image/svg+xmlfilm.mp4 as video/mp4film.ogv as video/oggfilm.webm as video/webmsound.mp3 as audio/mpegsound.oga as audio/oggsound.weba as audio/webm- etc.
attributes - an object with additional custom attributes like crossorigin media etc.,
e.g. attributes: { crossorigin: true }, attributes: { media: '(max-width: 900px)' }.
Defaults {}.
If you define the attributes than you can write the as, rel and type properties in the attributes.
For example:
{
  test: /\.(ttf|woff2?)$/,
  attributes: { as: 'font', rel: 'prefetch', crossorigin: true },
},
Preload styles
preload: [
  {
    test: /\.(css|scss|less)$/,
    as: 'style',
  },
],
The generated preload tag like the following:
<link rel="preload" href="css/style.1f4faaff.css" as="style" />
Preload scripts
preload: [
  {
    test: /\.(js|ts)$/,
    as: 'script',
  },
],
The generated preload tag like the following:
<link rel="preload" href="js/main.c608b1cd.js" as="script" />
Preload images
To preload all images use the options:
preload: [
  {
    test: /\.(png|jpe?g|webp|svg)$/,
    as: 'image',
  },
],
The generated preload tags like the following:
<link rel="preload" href="img/apple.697ef306.png" as="image" type="image/png" />
<link rel="preload" href="img/lemon.3666c92d.svg" as="image" type="image/svg+xml" />
You can preload images with a URL query, e.g. image.png?size=640, using the media attribute:
preload: [
  {
    test: /\.(png|jpe?g|webp)\?.*size=480/,
    attributes: { as: 'image', media: '(max-width: 480px)' },
  },
  {
    test: /\.(png|jpe?g|webp)\?.*size=640/,
    attributes: { as: 'image', media: '(max-width: 640px)' },
  },
],
Note
The media attribute be useful when used responsive-loader.
Preload fonts
preload: [
  {
    test: /\.(ttf|woff2?)$/,
    attributes: { as: 'font', crossorigin: true },
  },
],
Note
Font preloading requires the crossorigin attribute to be set.
See font preload.
Preload tags order
The generated preload tags are grouped by content type and sorted in the order of the specified preload options.
For example, there is an HTML template with specified source assets:
<html>
  <head>
    <script src="./main.js" defer></script>
    <link href="./style.scss" rel="stylesheet" />
  </head>
  <body>
    <img src="./apple.png" alt="apple" />
    <script src="./app.js"></script>
    <img src="./lemon.svg" alt="lemon" />
  </body>
</html>
Specify the order of preload tags:
preload: [
{
test: /\.(png|jpe?g|webp|svg)$/,
as: 'image',
},
{
test: /\.(css|scss)$/,
as: 'style',
},
{
test: /\.(js|ts)$/,
as: 'script',
},
],
The generated HTML contains the preload tags exactly in the order of preload options:
<html>
<head>
<link rel="preload" href="img/apple.697ef306.png" as="image" type="image/png" />
<link rel="preload" href="img/lemon.3666c92d.svg" as="image" type="image/svg+xml" />
<link rel="preload" href="css/style.1f4faaff.css" as="style" />
<link rel="preload" href="js/main.c608b1cd.js" as="script" />
<link rel="preload" href="js/app.2c8d13ac.js" as="script" />
<script src="js/main.c608b1cd.js" defer></script>
<link href="css/style.1f4faaff.css" rel="stylesheet" />
</head>
<body>
<img src="img/apple.697ef306.png" alt="apple" />
<script src="js/app.2c8d13ac.js"></script>
<img src="img/lemon.3666c92d.svg" alt="lemon" />
</body>
</html>
minify
Type: 'auto'|boolean|Object Default: false
For minification generated HTML is used the html-minifier-terser with the following default options:
{
collapseWhitespace: true,
keepClosingSlash: true,
removeComments: true,
removeRedundantAttributes: false,
removeScriptTypeAttributes: true,
removeStyleLinkTypeAttributes: true,
useShortDoctype: true,
minifyCSS: true,
minifyJS: true,
}
Possible values:
false - disable minificationtrue - enable minification with default options'auto' - in development mode disable minification, in production mode enable minification with default options,
use minifyOptions to customize options{} - enable minification with custom options, this object are merged with default options
see options reference
minifyOptions
Type: Object Default: null
When the minify option is set to 'auto' or true, you can configure minification options using the minifyOptions.
Type: boolean Default: false
Whether comments shall be extracted to a separate file like the *.LICENSE.txt.
By default, the built-in Webpack plugin TerserWebpackPlugin extracts the license banner from node modules into a separate *.LICENSE.txt file,
although this is usually not necessary.
Therefore, by default, the Bundler Plugin does not allow extracting comments.
This has the same effect as explicitly defining the extractComments: false option of the TerserWebpackPlugin.
If you want to allow extraction of *.LICENSE.txt files, set this option to true.
integrity
Type: 'auto'|boolean|IntegrityOptions Default: false
The subresource integrity hash is a cryptographic value of the integrity attribute that used by a browser to verify that the content of an asset has not been manipulated.
If the asset has been manipulated, the browser will never load it.
The Bundler Plugin generates the integrity hashes and adds the integrity attribute to the link and script tags when generating HTML.
No additional plugins required. This plugin computes integrity hashes itself.
type IntegrityOptions = {
  enabled?: 'auto' | boolean;
  hashFunctions?: HashFunctions | Array<HashFunctions>;
};
type HashFunctions = 'sha256' | 'sha384' | 'sha512';
If the integrity option is an object, then default options are:
{
  enabled: 'auto',
  hashFunctions: 'sha384',
}
Note
The W3C recommends using the SHA-384 hash algorithm.
The integrity or integrity.enabled has one of values:
auto - enable the integrity when Webpack mode is production and disable it when mode is developmenttrue - enablefalse - disable
The hashFunctions option can be a string to specify a single hash function name,
or an array to specify multiple hash functions for compatibility with many browsers.
Warning
When used the integrity option:
- The
js.filename and css.filename options must contain the contenthash. - The
output.crossOriginLoading Webpack option must be specified as 'use-credentials' or 'anonymous'.
The bundler plugin adds the crossorigin attribute with the value defined in the crossOriginLoading.
The crossorigin attribute tells the browser to request the script with CORS enabled, which is necessary because the integrity check fails without CORS. - The
optimization.realContentHash Webpack option must be enabled, by default is enabled in production mode only.
This requirement is necessary to avoid the case where the browser tries to load a contents of a file from the local cache since the filename has not changed, but the integrity value has changed on the server.
In this case, the browser will not load the file because the integrity of the cached file computed by the browser will not match the integrity attribute computed on the server.
Add the integrity option in the Webpack config:
const HtmlBundlerPlugin = require('html-bundler-webpack-plugin');
module.exports = {
output: {
crossOriginLoading: 'anonymous',
},
plugins: [
new HtmlBundlerPlugin({
entry: {
index: 'src/views/index.html',
},
js: {
filename: '[name].[contenthash:8].js',
},
css: {
filename: '[name].[contenthash:8].js',
},
integrity: 'auto',
}),
],
};
The source HTML template src/views/index.html:
<html>
<head>
<link href="./style.scss" rel="stylesheet" />
<script src="./main.js" defer="defer"></script>
</head>
<body>
<h1>Hello World!</h1>
</body>
</html>
The generated HTML contains the integrity hashes:
<html>
  <head>
    <link
      href="style.1234abcd.css"
      rel="stylesheet"
      integrity="sha384-gaDmgJjLpipN1Jmuc98geFnDjVqWn1fixlG0Ab90qFyUIJ4ARXlKBsMGumxTSu7E"
      crossorigin="anonymous" />

    <script
      src="main.abcd1234.js"
      defer="defer"
      integrity="sha384-E4IoJ3Xutt/6tUVDjvtPwDTTlCfU5oG199UoqWShFCNx6mb4tdpcPLu7sLzNc8Pe"
      crossorigin="anonymous"></script>
  </head>
  <body>
    <h1>Hello World!</h1>
  </body>
</html>
integrityHashes hook
For details see the integrityHashes hook.
watchFiles
Type:
type WatchFiles = {
  paths?: Array<string>;
  includes?: Array<RegExp>;
  excludes?: Array<RegExp>;
};
Default:
watchFiles: {
paths: ['./src'],
includes: [/\.(html|ejs|eta)$/],
excludes: [
/[\\/](node_modules|dist|test)$/,
/[\\/]\..+$/,
/package(?:-lock)*\.json$/,
/webpack\.(.+)\.js$/,
/\.(je?pg|png|ico|webp|svg|woff2?|ttf|otf|eot)$/,
],
}
Allows to configure paths and files to watch file changes for rebuild in watch or serv mode.
Note
To watch changes with a live reload in the browser, you must additionally configure the watchFiles in devServer,
see setup live reload.
Properties:
-
paths - A list of relative or absolute paths to directories where should be watched includes.
The watching path for each template defined in the entry will be autodetect as the first level subdirectory of the template relative to the project's root path.
E.g., the template ./src/views/index.html has the watching path of ./src.
-
includes - Watch the files specified in paths, except excludes, that match the regular expressions.
Defaults, are watched only files that match the test plugin option.
-
excludes - Exclude the specified paths or files, that match the regular expressions.
This options does not override the default values, but extends them.
For example, all source files are in the ./src directory,
while some partials included in a template are in ./vendor/ directory, then add it to the paths:
watchFiles: {
  paths: ['vendor'],
},
If you want watch changes in some special files used in your template that are only loaded through the template engine,
add them to the includes property:
watchFiles: {
  paths: ['vendor'],
  includes: [
    /data\.(js|json)$/,
  ],
},
To exclude watching of files defined in paths and includes, you can use the excludes option.
This option has the priority over paths and files.
Note
To display all watched files, enable the verbose option.
hotUpdate
Type: boolean Default: false
If the value is true, then in the serve or watch mode, the hot-update.js file is injected into each generated HTML file to enable the live reloading.
Use this options only if you don't have a referenced source file of a script in html.
Note
The devServer.hot must be true.
If you already have a js file in html, this setting should be false as Webpack automatically injects the hot update code into the compiled js file.
Also see Setup Live Reload.
verbose
Type: 'auto'|boolean Default: false
The verbose option allows displaying in the console the processing information about extracted resources.
All resources are grouped by their issuers.
Possible values:
false - do not display informationtrue - display informationauto - in development mode enable verbose, in production mode disable verbose
Note
If you want to colorize the console output in your app, use the best Node.js lib ansis.
loaderOptions
This is the reference to the loader options.
You can specify loader options here in the plugin options to avoid explicitly defining the HtmlBundlerPlugin.loader in module.rules.
The HtmlBundlerPlugin.loader will be added automatically.
For example, both configurations are functionally identical:
1) the variant using the loaderOptions, recommended for common use cases:
const HtmlBundlerPlugin = require('html-bundler-webpack-plugin');
module.exports = {
plugins: [
new HtmlBundlerPlugin({
entry: {
index: 'src/views/index.ejs',
},
preprocessor: 'ejs',
loaderOptions: {
sources: [{ tag: 'img', attributes: ['data-src', 'data-srcset'] }],
},
}),
],
};
2) the low level variant using the module.rules:
const HtmlBundlerPlugin = require('html-bundler-webpack-plugin');
module.exports = {
  plugins: [
    new HtmlBundlerPlugin({
      entry: {
        index: 'src/views/index.ejs',
      },
    }),
  ],
  module: {
    rules: [
      {
        test: /.(html|ejs)$/,
        loader: HtmlBundlerPlugin.loader,
        options: {
          sources: [{ tag: 'img', attributes: ['data-src', 'data-srcset'] }],
          preprocessor: 'ejs',
        },
      },
    ],
  },
};
⚠️ Warning
If you don't know what it's for, don't define a module rule for template files.
The plugin automatically configures this rule.
Define this rule only for special cases, e.g. when you have templates with different templating engines.
An example see by How to use some different template engines.
Note
Options defined in module.rules take precedence over the same options defined in loaderOptions.
Loader options
The default loader:
{
  test: /\.(html)$/,
  loader: HtmlBundlerPlugin.loader,
}
You can omit the loader in Webpack modules.rules.
If the HtmlBundlerPlugin.loader is not configured, the plugin add it with default options automatically.
The default loader handles HTML files and EJS-like templates.
Note
It is recommended to define all loader options in the loaderOptions by the plugin options
to keep the webpack config clean and smaller.
Warning
The plugin works only with the own loader HtmlBundlerPlugin.loader.
Do not use another loader.
This loader replaces the functionality of html-loader and many other template loaders.
sources
Type:
type Sources =
  | boolean
  | Array<{
      tag?: string;
      attributes?: Array<string>;
      filter?: (props: {
        tag: string;
        attribute: string;
        value: string;
        parsedValue: Array<string>;
        attributes: { [attributeName: string]: string };
        resourcePath: string;
      }) => boolean | undefined;
    }>;
Default: true
The sources option allow to specify a tag attribute that should be resolved.
Default attributes
By default, resolves source files in the following tags and attributes:
| Tag | Attributes |
|---|
link | href for type="text/css" rel="stylesheet" as="style" as="script"
imagesrcset for as="image" |
script | src |
img | src srcset |
image | href xlink:href |
use | href xlink:href |
input | src (for type="image") |
source | src srcset |
audio | src |
track | src |
video | src poster |
object | data |
Warning
It is not recommended to use the deprecated xlink:href attribute by the image and use tags.
Note
Automatically are processed only attributes containing a relative path or Webpack alias:
src="./image.png" or src="image.png" - an asset in the local directorysrc="../../assets/image.png" - a relative path to parent directorysrc="@images/image.png" - an image directory as Webpack alias
Url values are not processed:
src="https://example.com/img/image.png"src="//example.com/img/image.png"src="/img/image.png" (not processed only if not defined the root option)
Others not filename values are ignored, e.g.:
src="data:image/png; ..."src="javascript: ..."
filter function
Using the filter function, you can enable/disable resolving of specific assets by tags and attributes.
The filter is called for all attributes of the tag defined as defaults and in sources option.
The argument is an object containing the properties:
The processing of an attribute can be ignored by returning false.
To disable the processing of all attributes, set the sources option as false.
Examples of using argument properties:
{
tag: 'img',
filter: ({ tag, attribute, value, attributes, resourcePath }) => {
if (attribute === 'src') return false;
if (value.endsWith('.webp')) return false;
if ('srcset' in attributes && attributes['srcset'] === '') return false;
if (resourcePath.indexOf('example')) return false;
},
}
The default sources can be extended with new tags and attributes.
For example, enable the processing for the non-standard data-src and data-srcset attributes in the img tag:
new HtmlBundlerPlugin({
  entry: {
    index: 'src/views/index.html',
  },
  loaderOptions: {
    sources: [
      {
        tag: 'img',
        attributes: ['data-src', 'data-srcset'],
      },
    ],
  },
});
You can use the filter function to allow the processing only specific attributes.
The filter function must return true or undefined to enable the processing of specified tag attributes.
Return false to disable the processing.
For example, allow processing only for images in content attribute of the meta tag:
<html>
<head>
<meta name="theme-color" content="#ffffff" />
<meta property="og:title" content="Frutis" />
<meta property="og:image:type" content="image/png" />
<meta property="og:video:type" content="video/mp4" />
<meta property="og:image" content="./frutis.png" />
<meta property="og:video" content="./video.mp4" />
</head>
<body>
<img src="./image.png" />
</body>
</html>
Use the filter function:
new HtmlBundlerPlugin({
entry: {
index: 'src/views/index.html',
},
loaderOptions: {
sources: [
{
tag: 'meta',
attributes: ['content'],
filter: ({ attributes }) => {
const attrName = 'property';
const attrValues = ['og:image', 'og:video'];
if (!attributes[attrName] || attrValues.indexOf(attributes[attrName]) < 0) {
return false;
}
},
},
],
},
});
The filter can disable an attribute of a tag.
For example, disable the processing of default attribute srcset of the img tag:
new HtmlBundlerPlugin({
  entry: {
    index: 'src/views/index.html',
  },
  loaderOptions: {
    sources: [
      {
        tag: 'img',
        filter: ({ attribute }) => attribute !== 'srcset',
      },
    ],
  },
});
root
Type: string|boolean Default: false
The root option allow to resolve an asset file with leading / root path.
Defaults is disabled because the file with leading / is a valide URL in the public path, e.g. dist/.
The files with leading / are not processed.
Define the root option as the absolute path to the source directory to enable the processing.
For example, there are project files:
./src/views/index.html
./src/styles/style.scss
./src/scripts/main.js
./src/images/apple.png
Define the root loader option:
new HtmlBundlerPlugin({
  entry: {
    index: 'src/views/index.html',
  },
  loaderOptions: {
    root: path.join(__dirname, 'src'),
  },
});
Now you can use the / root path for the source assets:
<html>
  <head>
    <link href="/styles/style.scss" rel="stylesheet" />
    <script src="/scripts/main.js" defer="defer"></script>
  </head>
  <body>
    <h1>Hello World!</h1>
    <img src="/images/apple.png" />
  </body>
</html>
beforePreprocessor
See the description in the beforePreprocessor.
Usage in loaderOptions:
new HtmlBundlerPlugin({
entry: {
index: 'src/views/pages/',
},
loaderOptions: {
beforePreprocessor: (content, { resourcePath, data }) => {
return content;
},
},
});
preprocessor
Type:
type Preprocessor =
  | false
  | 'eta'
  | 'ejs'
  | 'handlebars'
  | 'nunjucks'
  | 'pug'
  | 'twig'
  | ((
      content: string,
      loaderContext: LoaderContext<Object> & { data: { [key: string]: any } | string }
    ) => string | Promise<any> | undefined);
Default: 'eta'
You can use the preprocessor as a string for supported template engines,
or define your own preprocessor as a function to use any template engine.
Supported templating engines "out of the box"
type Preprocessor = 'eta' | 'ejs' | 'handlebars' | 'nunjucks' | 'pug' | 'twig';
The preprocessor is ready to use the most popular templating engines:
Eta, EJS, Handlebars, Nunjucks, Pug, Twig.
Defaults used the Eta templating engine,
because Eta has the EJS-like syntax, is only 2KB gzipped and is much fasted than EJS.
The npm package eta is already installed with this plugin.
You can pass a custom options of the templating engine using the preprocessorOptions.
For example, if you have EJS templates:
install npm package ejs
npm i -D ejs
define the preprocessor as the 'ejs' string
const HtmlBundlerPlugin = require('html-bundler-webpack-plugin');
module.exports = {
  plugins: [
    new HtmlBundlerPlugin({
      entry: {
        index: 'src/views/pages/home/index.ejs',
      },
      loaderOptions: {
        preprocessor: 'ejs',
      },
    }),
  ],
};
Note
Since the v2.2.0 is available new syntax, the preprocessor
and the preprocessorOptions should be defined directly in the plugin option
to simplify the config:
const HtmlBundlerPlugin = require('html-bundler-webpack-plugin');
module.exports = {
  plugins: [
    new HtmlBundlerPlugin({
      entry: {
        index: 'src/views/pages/home/index.ejs',
      },
      preprocessor: 'ejs',
      preprocessorOptions: {...}
    }),
  ],
};
Custom templating engine
To use any templating engine, you can define the preprocessor as a function.
type Preprocessor = (
  content: string,
  loaderContext: LoaderContext<Object> & { data: { [key: string]: any } | string }
) => string | Promise<any> | undefined;
The function arguments:
content - a raw content of a template file defined in the entry option.loaderContext - the Loader Context object contained useful properties:
mode: string - a Webpack mode: production, development, nonerootContext: string - a path to Webpack contextresource: string - a template file, including queryresourcePath: string - a template filedata: object|null - variables passed in entry.{page}.data and loader.data
The preprocessor is called for each entry file, before processing of the content.
The function can be used to compile the template with any template engine,
such as Eta, EJS, Handlebars, Mustache, Nunjucks, LiquidJS, etc.
Returns new content as a string for sync or Promise for async processing.
When the function returns undefined, the contents of the template will not change.
The example for your own sync render function:
{
  preprocessor: (content, { data }) => render(content, data);
}
The example of using Promise for your own async render function:
{
  preprocessor: (content, { data }) =>
    new Promise((resolve) => {
      const result = render(content, data);
      resolve(result);
    });
}
The default preprocessor is pre-configured as the following function:
const { Eta } = require('eta');
const eta = new Eta({
async: false,
useWith: true,
views: process.cwd(),
});
preprocessor = (content, { data }) => eta.renderString(content, data);
Note
The plugin supports EJS-like templates "out of the box" therefore the HtmlBundlerPlugin.loader can be omitted in the Webpack config.
Disable templating engine
You can use this plugin to resolve all source asset files in any HTML-like template used by server-side rendering.
In this case, disable the preprocessor.
The plugin resolves all source files and replaces them with the output filenames.
The original template remains unchanged except for the filenames being replaced.
{
  preprocessor: false,
}
See How to process a PHP template.
preprocessorOptions
Type: Object Default: {}
With the preprocessorOptions you can pass template engine options when used the preprocessor as the string: eta, ejs, handlebars, nunjucks, twig.
Each preprocessor has its own options, depend on using template engine.
This loader option is referenced as the preprocessorOptions plugin option to simplify the config.
Options for preprocessor: 'eta' (default)
{
preprocessor: 'eta',
preprocessorOptions: {
async: false,
useWith: true,
views: 'src/views',
},
},
For the complete list of options see here.
For example, there are a template page and partials:
src/views/page/home.html
src/views/includes/gallery.html
src/views/includes/teaser.html
src/views/partials/footer.html
src/views/partials/menu/nav.html
src/views/partials/menu/top/desktop.html
Include the partials in the src/views/page/home.html template with the include():
<%~ include('teaser.html') %>
<%~ include('menu/nav.html') %>
<%~ include('menu/top/desktop.html') %>
<%~ include('footer.html') %>
If partials have .eta extensions, then the extension can be omitted in the include argument.
Options for preprocessor: 'ejs'
{
preprocessor: 'ejs',
preprocessorOptions: {
async: false,
root: path.join(__dirname, 'src/views/'),
views: [
'src/views/includes',
path.join(__dirname, 'src/views/partials'),
],
},
},
For the complete list of options see here.
For example, there are template page and partials:
src/views/page/home.html
src/views/includes/gallery.html
src/views/includes/teaser.html
src/views/partials/footer.html
src/views/partials/menu/nav.html
src/views/partials/menu/top/desktop.html
Include the partials in the src/views/page/home.html template with the include():
<%- include('/includes/gallery.html') %>
<%- include('menu/top/desktop.html') %>
<%- include('menu/nav.html') %>
<%- include('teaser.html') %>
<%- include('footer.html') %>
If you have partials with .ejs extensions, then the extension can be omitted.
Options for preprocessor: 'handlebars'
The preprocessor has built-in include helper, to load a partial file directly in a template without registration of partials.
The include helper has the following de facto standard options:
{
preprocessor: 'handlebars',
preprocessorOptions: {
root: path.join(__dirname, 'src/views/'),
views: [
'src/views/includes',
path.join(__dirname, 'src/views/partials'),
],
},
},
For example, there are template page and partials:
src/views/page/home.html
src/views/includes/gallery.html
src/views/includes/teaser.html
src/views/partials/footer.html
src/views/partials/menu/nav.html
src/views/partials/menu/top/desktop.html
Include the partials in the src/views/page/home.html template with the include helper:
{{ include '/includes/gallery' }}
{{ include 'menu/top/desktop' }}
{{ include 'menu/nav' }}
{{ include 'teaser' }}
{{ include 'footer' }}
The include helper automatically resolves .html and .hbs extensions, it can be omitted.
The runtime option
The path to the handlebars runtime library. The path can be absolute or relative to node_modules directory.
Defaults runtime file is handlebars/runtime.
This options is used only by import templates in JavaScript, in compile mode.
The partials option
Type: Array<string>|Object Default: []
If you use the partials syntax {{> footer }} to include a file, then use the partials option.
Partials will be auto-detected in paths recursively and registered under their relative paths, without an extension.
{
preprocessor: 'handlebars',
preprocessorOptions: {
partials: [
'src/views/includes',
path.join(__dirname, 'src/views/partials'),
],
},
},
For example, if the partial path is the src/views/partials then the file src/views/partials/menu/top/desktop.html will have the partial name menu/top/desktop.
You can define all partials manually using the option as an object:
{
preprocessor: 'handlebars',
preprocessorOptions: {
partials: {
teaser: path.join(__dirname, 'src/views/includes/teaser.html'),
gallery: path.join(__dirname, 'src/views/includes/gallery.html'),
footer: path.join(__dirname, 'src/views/partials/footer.html'),
'menu/nav': path.join(__dirname, 'src/views/partials/menu/nav.html'),
'menu/top/desktop': path.join(__dirname, 'src/views/partials/menu/top/desktop.html'),
},
},
},
Include the partials in the src/views/page/home.html template:
{{> menu/top/desktop }}
{{> menu/nav }}
{{> teaser }}
{{> gallery }}
{{> footer }}
The helpers option
Type: Array<string>|Object Default: []
When the helpers is an array of relative or absolute paths to helpers,
then the name of a helper is the relative path to the helper file without an extension.
For example, there are helper files:
src/views/helpers/bold.js
src/views/helpers2/italic.js
src/views/helpers2/wrapper/span.js
The preprocessor options:
{
preprocessor: 'handlebars',
preprocessorOptions: {
helpers: [
'src/views/helpers',
'src/views/helpers2',
],
},
},
Usage of helpers:
{{#bold}}The bold text.{{/bold}} {{#italic}}The italic text.{{/italic}}
{{#[wrapper/span]}}The text wrapped with span tag.{{/[wrapper/span]}}
Note
- The helper located in a subdirectory, e.g.
wrapper/span.js will be available in template as [wrapper/span]. - When helper name contain the
/ slash, then the helper name must be wrapped with the [].
You can define helpers manually using name: function object:
{
preprocessor: 'handlebars',
preprocessorOptions: {
helpers: {
bold: (options) => new Handlebars.SafeString(`<strong>${options.fn(this)}</strong>`),
},
},
},
This plugin has own build-in helpers:
-
include - includes a template file relative to paths defined in views option, the default path is the project root path
{{include 'TEMPLATE_FILE'}}
-
assign - creates a new named variable or override old.
You can define many variables. The variables are available in included partials.
{{assign title='Homepage' header='Home'}}
{{> layout}}
layout.hbs
<title>{{title}}</title>
<h1>{{header}}</h1>
-
partial and block:
partial - defines the block content
{{#partial 'BLOCK_NAME'}}BLOCK_CONTENT{{/partial}}
block - outputs the block content, it can be used in another partial file, e.g. in a layout partial
{{#block 'BLOCK_NAME'}}default content or empty{{/block}}
For the complete list of Handlebars compile options see here.
Options for preprocessor: 'nunjucks'
{
preprocessor: 'nunjucks',
preprocessorOptions: {
views: [
'src/views/includes',
'src/views/partials',
],
async: false,
jinjaCompatibility: false,
autoescape: true,
},
},
For all available options, see the Nunjucks API configure.
Options for preprocessor: 'pug'
Note
The pug preprocessor based on the @webdiscus/pug-loader source code
and has the same options and features.
{
preprocessor: 'pug',
preprocessorOptions: {
embedFilters: {
escape: true,
code: {
className: 'language-',
},
highlight: {
use: 'prismjs',
verbose: true,
},
markdown: true,
markdown: {
highlight: {
use: 'prismjs',
verbose: true,
},
},
}
},
},
See the documentation and examples for the embedded filters.
See the pug compiler options.
Options for preprocessor: 'twig'
The TwigJS have few useful options:
async {boolean} defaults is 'false'.autoescape {boolean} defaults is 'false'. Escape dangerous characters.namespaces {Object} defaults is {}.
The key is a namespace (like Webpack alias) used in the template instead a relative path.
The value is an absolute a path relative to the project directory.
{
  preprocessor: 'twig',
  preprocessorOptions: {
    async: false,
    autoescape: false,
    namespaces: {
      layouts: 'src/views/layouts',
      partials: 'src/views/partials',
    },
  },
},
The used namespace must begin with the leading @ symbol:
{% extends "@layouts/default.twig" %}
{% include "@partials/articles/sidebar.twig" %}
You can use a relative path:
{% extends "../layouts/default.twig" %}
{% include "../partials/articles/sidebar.twig" %}
Warning
The dynamic including is not supported.
For example, passing myTemplate as a parameter does not work:
{# page.twig #}
{% extends myTemplate %}
Warning
The Twig template containing tabs will not be compiled into HTML.
Use the spaces as an indent in templates.
The tabs are not supported by TwigJS.
data
Type: Object|string Default: {}
Since v2.5.0 the data option is referenced in the plugin options.
The properties of the data option are available as global variables in all templates.
To pass variables to a specific template, use the entry.{name}.data option.
Data as an object
Type: Object
The data defined as an object are loaded once with Webpack start.
Data as file path
Type: string
The string value is an absolute or relative filename of a JSON or JS file. The JS file must export an object.
The data file will be reloaded after changes.
Note
Use the data as a path to dynamically update variables in a template without restarting Webpack.
Warning
The entry.{name}.data property overrides the same property defined in the loader data.
For example, there are variables defined in both the entry property and the loader option:
const HtmlBundlerPlugin = require('html-bundler-webpack-plugin');
module.exports = {
plugins: [
new HtmlBundlerPlugin({
entry: {
index: {
import: 'src/views/home.html',
data: {
title: 'Home',
headline: 'Homepage',
},
data: 'src/data/home.json',
},
about: 'src/views/about.html',
},
data: {
title: 'Default Title',
globalData: 'Global Data',
},
data: 'src/data/global.js',
}),
],
};
JSON data file src/data/home.json
{
  "title": "Home",
  "headline": "Homepage"
}
JS data file src/data/global.js
module.exports = {
  title: 'Default Title',
  globalData: 'Global Data',
};
In the ./src/views/home.html template are available following variables:
{
  title: 'Home',
  headline: 'Homepage',
  globalData: 'Global Data',
}
In the ./src/views/about.html template are available following variables:
{
  title: 'Default Title',
  globalData: 'Global Data',
}
Template engines
Using the preprocessor, you can compile any template with a template engine such as:
Using the Eta
Supported "out of the box"
Eta is compatible* with EJS syntax, is smaller and faster than EJS.
For example, there is the template src/views/page/index.eta
<html>
  <body>
    <h1><%= headline %></h1>
    <ul class="people">
      <% for (let i = 0; i < people.length; i++) {%>
      <li><%= people[i] %></li>
      <% } %>
    </ul>
    <%~ include('/src/views/partials/footer') %>
  </body>
</html>
The minimal Webpack config:
const HtmlBundlerPlugin = require('html-bundler-webpack-plugin');
module.exports = {
plugins: [
new HtmlBundlerPlugin({
entry: {
index: {
import: './src/views/page/index.eta',
data: {
headline: 'Breaking Bad',
people: ['Walter White', 'Jesse Pinkman'],
},
},
},
}),
],
};
The default preprocessor is eta, you can omit it:
new HtmlBundlerPlugin({
entry: {
index: './src/views/page/index.eta',
},
});
See the eta preprocessor options.
Warning
For compatibility the Eta compiler with the EJS templates, the default preprocessor use the useWith: true Eta option
to use variables in template without the Eta-specific it. scope.
Using the EJS
You need to install the ejs package:
npm i -D ejs
For example, there is the template src/views/page/index.ejs
<html>
  <body>
    <h1><%= headline %></h1>
    <ul class="people">
      <% for (let i = 0; i < people.length; i++) {%>
      <li><%= people[i] %></li>
      <% } %>
    </ul>
    <%- include('/src/views/partials/footer.html'); %>
  </body>
</html>
Define the preprocessor as ejs:
const HtmlBundlerPlugin = require('html-bundler-webpack-plugin');
module.exports = {
plugins: [
new HtmlBundlerPlugin({
entry: {
index: {
import: './src/views/page/index.ejs',
data: {
headline: 'Breaking Bad',
people: ['Walter White', 'Jesse Pinkman'],
},
},
},
preprocessor: 'ejs',
}),
],
};
See the ejs preprocessor options.
Using the Handlebars
You need to install the handlebars package:
npm i -D handlebars
For example, there is the template src/views/page/home.hbs
<!DOCTYPE html>
<html>
<head>
  <title>{{ title }}</title>
</head>
<body>
  {{> header }}
  <div class="container">
    <h1>Handlebars</h1>
    <div>{{ arraySize persons }} persons:</div>
    <ul class="person">
      {{#each persons}}
        {{> person person=.}}
      {{/each}}
    </ul>
  </div>
  {{> footer }}
</body>
</html>
Where the {{> header }}, {{> person person=.}} and {{> footer }} are partials.
Define the preprocessor as handlebars:
const HtmlBundlerPlugin = require('html-bundler-webpack-plugin');
module.exports = {
plugins: [
new HtmlBundlerPlugin({
entry: {
index: {
import: 'src/views/pages/home.hbs',
data: 'src/views/pages/homeData.js',
},
},
preprocessor: 'handlebars',
preprocessorOptions: {
partials: ['src/views/partials'],
helpers: {
arraySize: (array) => array.length,
},
},
}),
],
};
See the handlebars preprocessor options.
Source code
Using the Mustache
You need to install the mustache package:
npm i -D mustache
For example, there is the template src/views/page/index.mustache
<html>
  <body>
    <h1>{{ headline }}</h1>
    <ul class="people">
      {{#people}}
      <li>{{.}}</li>
      {{/people}}
    </ul>
  </body>
</html>
Add the template compiler to preprocessor:
const HtmlBundlerPlugin = require('html-bundler-webpack-plugin');
const Mustache = require('mustache');
module.exports = {
plugins: [
new HtmlBundlerPlugin({
test: /\.(html|mustache)$/,
index: {
import: './src/views/page/index.mustache',
data: {
headline: 'Breaking Bad',
people: ['Walter White', 'Jesse Pinkman'],
},
},
preprocessor: (content, { data }) => Mustache.render(content, data),
}),
],
};
Using the Nunjucks
You need to install the nunjucks package:
npm i -D nunjucks
For example, there is the template src/views/page/index.njk
<html>
  <body>
    <h1>{{ headline }}!</h1>
    <ul class="people">
      {% for name in people %}
      <li class="name">{{ name }}</li>
      {% endfor %}
    </ul>
  </body>
</html>
Define the preprocessor as nunjucks:
const HtmlBundlerPlugin = require('html-bundler-webpack-plugin');
module.exports = {
plugins: [
new HtmlBundlerPlugin({
entry: {
index: {
import: './src/views/page/index.njk',
data: {
headline: 'Breaking Bad',
people: ['Walter White', 'Jesse Pinkman'],
},
},
},
preprocessor: 'nunjucks',
}),
],
};
See the nunjucks preprocessor options.
Using the Pug
You need to install the pug package:
npm i -D pug
For example, there is the layout template src/views/layout/default.pug
html
  head
    title= title
    script(src="@scripts/main.js" defer="defer")
  body
    h1= headline
    block content
    include @partials/footer
The page template src/views/pages/home.pug can be extended from the layout:
extends @layouts/default

block content
  ul#people
    each item in people
      li= item
Define the preprocessor as pug:
const path = require('path');
const HtmlBundlerPlugin = require('html-bundler-webpack-plugin');
module.exports = {
resolve: {
alias: {
'@scripts': path.join(__dirname, 'src/scripts/'),
'@layouts': path.join(__dirname, 'src/views/layouts/'),
'@partials': path.join(__dirname, 'src/views/partials/'),
},
},
plugins: [
new HtmlBundlerPlugin({
entry: {
index: {
import: 'src/views/page/home.pug',
data: {
title: 'Strartpage',
headline: 'Breaking Bad',
people: ['Walter White', 'Jesse Pinkman'],
},
},
},
preprocessor: 'pug',
preprocessorOptions: {
},
}),
],
};
See the pug options.
Using the TwigJS
You need to install the twig package:
npm i -D twig
For example, there is the layout template src/views/layout/default.twig
<!DOCTYPE html>
<html>
  <head>
    <title>{{ title }}</title>
    <script src="@scripts/main.js" defer="defer"></script>
  </head>
  <body>
    <h1>{{ headline }}!</h1>
    <div id="content">{% block content %}{% content %}</div>
    {% include "@partials/footer.twig" %}
  </body>
</html>
The page template src/views/pages/home.twig can be extended from the layout:
{% extends '@layouts/default.twig' %}

{% block content %}
  <ul id="people">
    {% for item in people %}
        <li>{{ item }}</li>
    {% endfor %}
  </ul>
{% endblock %}
Define the preprocessor as twig:
const path = require('path');
const HtmlBundlerPlugin = require('html-bundler-webpack-plugin');
module.exports = {
resolve: {
alias: {
'@scripts': path.join(__dirname, 'src/scripts/'),
},
},
plugins: [
new HtmlBundlerPlugin({
entry: {
index: {
import: 'src/views/page/home.twig',
data: {
title: 'Strartpage',
headline: 'Breaking Bad',
people: ['Walter White', 'Jesse Pinkman'],
},
},
},
preprocessor: 'twig',
preprocessorOptions: {
namespaces: {
layouts: 'src/views/layout/',
partials: 'src/views/partials/',
},
},
}),
],
};
See the twig preprocessor options.
Using the LiquidJS
You need to install the liquidjs package:
npm i -D liquidjs
For example, there is the template src/views/page/index.liquid
<html>
  <body>
    <h1>{{ headline }}!</h1>
    <ul class="people">
      {% for name in people %}
      <li class="name">{{ name }}</li>
      {% endfor %}
    </ul>
  </body>
</html>
Add the template compiler to preprocessor:
const HtmlBundlerPlugin = require('html-bundler-webpack-plugin');
const { Liquid } = require('liquidjs');
const LiquidEngine = new Liquid();
module.exports = {
plugins: [
new HtmlBundlerPlugin({
test: /\.(html|liquid)$/,
entry: {
index: {
import: './src/views/page/index.liquid',
data: {
headline: 'Breaking Bad',
people: ['Walter White', 'Jesse Pinkman'],
},
},
},
preprocessor: (content, { data }) => LiquidEngine.parseAndRender(content, data),
}),
],
};
Using template in JavaScript
The preprocessor works in two modes: render and compile.
Render mode
The render is the default mode for the template defined in the entry option.
The rendered template is an HTML string, which is saved as an HTML file.
You can import the template file as a generated HTML string in JS using the ?render query.
To pass simple variables into the imported template you can use query parameters, e.g.: ?render&name=Arnold&age=25.
To pass complex variables such as an array or an object use the global data option.
Note
At runtime in JavaScript will be used the already rendered HTML from the template.
For example:
import html from './partials/star-button.html?render&buttonText=Star';

document.getElementById('star-button').innerHTML = html;
./partials/star-button.html
<button class="btn-star">
<img src="@images/star.svg">
<span><%= buttonText %></span>
</button>
Compile mode
The compile is the default mode for the template imported in JavaScript file.
The compiled template is a template function,
which can be executed with passed variables in the runtime on the client-side in the browser.
For example:
import tmpl from './partials/people.ejs';
const locals = {
people: [
'Walter White',
'Jesse Pinkman',
],
};
document.getElementById('people').innerHTML = tmpl(locals);
./partials/people.ejs
<img src="@images/people.png">
<ul class="people">
<% for (let i = 0; i < people.length; i++) {%>
<li><%= people[i] %></li>
<% } %>
</ul>
Warning
Not all template engines can generate a template function that can be executed with local variables at runtime.
Template engines that do support the template function on client-side
- eta - generates a template function with runtime (~3KB)
include is supported - ejs - generates a fast smallest pure template function w/o runtime (recommended for use on client-side)
include is supported - handlebars - generates a precompiled template with runtime (~18KB)
include is NOT supported (yet) - nunjucks - generates a precompiled template with runtime (~41KB)
include is supported - twig - generates a precompiled template with runtime (~110KB)
include is supported - pug - generates a small pure template function
Template engines that do NOT support the template function on client-side
Setup Live Reload
To enable reloading of the browser after changes, add the devServer option to the Webpack config:
module.exports = {
devServer: {
static: path.join(__dirname, 'dist'),
watchFiles: {
paths: ['src/**/*.*'],
options: {
usePolling: true,
},
},
},
};
Warning
If you don't have a referenced source script file in HTML, then set the hotUpdate option to true to enable live reload.
Besides, the devServer.hot must be true (defaults).
How to keep source directory structure for HTML
Define the entry option as a path to templates. The output path will have the same directory structure.
For details, see the entry path.
How to keep source directory structure for assets
Define the filename as a function.
For example, we want to keep original directory structure for fonts, which can be in the source or in the node_modules directory:
node_modules/material-icons/iconfont/material-icons-sharp.woff2
node_modules/material-symbols/material-symbols-sharp.woff2
src/assets/fonts/Roboto/Roboto-Regular.woff2
Use the following function:
{
test: /[\\/]fonts|node_modules[\\/].+(woff(2)?|ttf|otf|eot|svg)$/i,
type: 'asset/resource',
generator: {
filename: ({ filename }) => {
const srcPath = 'src/assets/fonts';
const regExp = new RegExp(`[\\\\/]?(?:${path.normalize(srcPath)}|node_modules)[\\\\/](.+?)$`);
const assetPath = path.dirname(regExp.exec(filename)[1].replace('@', '').replace(/\\/g, '/'));
return `fonts/${assetPath}/[name][ext][query]`;
},
},
},
The destructed filename argument of the function is a source file. It can be absolute or relative.
The output directory dist/ will have the same structure:
dist/fonts/material-icons/iconfont/material-icons-sharp.woff2
dist/fonts/material-symbols/material-symbols-sharp.woff2
dist/fonts/Roboto/Roboto-Regular.woff2
The example to keep original directory structure for images:
{
test: /[\\/]images|node_modules[\\/].+(png|jpe?g|webp|ico|svg)$/i,
type: 'asset/resource',
generator: {
filename: ({ filename }) => {
const srcPath = 'src/assets/images';
const regExp = new RegExp(`[\\\\/]?(?:${path.normalize(srcPath)}|node_modules)[\\\\/](.+?)$`);
const assetPath = path.dirname(regExp.exec(filename)[1].replace('@', '').replace(/\\/g, '/'));
return `images/${assetPath}/[name].[hash:8][ext]`;
},
},
},
Note
For images, it is recommended to use the hashed output filename.
How to use source image files in HTML
Add to Webpack config the rule:
module: {
  rules: [
    {
      test: /\.(png|jpe?g|ico|svg)$/,
      type: 'asset/resource',
      generator: {
        filename: 'assets/img/[name].[hash:8][ext]',
      },
    },
  ],
}
Add a source file using a relative path or Webpack alias in HTML:
<html>
  <head>
    <link href="./favicon.ico" rel="icon" />
  </head>
  <body>
    <img src="./apple.png" srcset="./apple1.png 320w, ./apple2.png 640w" alt="apple" />
    <picture>
      <source srcset="./fig1.jpg, ./fig2.jpg 320w, ./fig3.jpg 640w" />
    </picture>
  </body>
</html>
The generated HTML contains hashed output images filenames:
<html>
  <head>
    <link href="/assets/img/favicon.05e4dd86.ico" rel="icon" />
  </head>
  <body>
    <img
      src="/assets/img/apple.f4b855d8.png"
      srcset="/assets/img/apple1.855f4bd8.png 320w, /assets/img/apple2.d8f4b855.png 640w"
      alt="apple" />
    <picture>
      <source
        srcset="
          /assets/img/fig1.605e4dd8.jpg,
          /assets/img/fig2.8605e4dd.jpg 320w,
          /assets/img/fig3.e4605dd8.jpg 640w
        " />
    </picture>
  </body>
</html>
How to resize and generate responsive images
To resize or generate responsive images is recommended to use the responsive-loader.
Install additional packages:
npm i -D responsive-loader sharp
To resize an image use the query parameter size:
<img src="./image.png?size=640" />
To generate responsible images use in srcset attribute the query parameter sizes als JSON5 to avoid parsing error,
because many images must be separated by commas , but we use the comma to separate sizes for one image:
<img src="./image.png?size=480" srcset="./image.png?{sizes:[320,480,640]}" />
You can convert source image to other output format.
For example, we have original image 2000px width as PNG and want to resize to 640px and save as WEBP:
<img src="./image.png?size=640&format=webp" />
You can create a small inline image placeholder. To do this, use the following query parameters:
placeholder=true - enable to generate the placeholderplaceholderSize=35 - the size of the generating placeholderprop=placeholder - the plugin-specific prop parameter retrieves the property from the object generated by responsive-loader
<img
  src="./image.png?placeholder=true&placeholderSize=35&prop=placeholder"
  srcset="./image.png?{sizes:[320,480,640]}" />
The generated HTML:
<img
  src="data:image/png;base64,iVBORw0K ..."
  srcset="/img/image-320w.png 320w, /img/image-480w.png 480w, /img/image-640w.png 640w" />
Add to Webpack config the rule for responsive images:
module.exports = {
module: {
rules: [
{
test: /\.(png|jpe?g|webp)$/,
type: 'asset/resource',
use: {
loader: 'responsive-loader',
options: {
name: 'assets/img/[name]-[width]w.[ext]',
sizes: [640],
},
},
},
],
},
};
How to preload fonts
To preload resources such as fonts, use the preload plugin option.
For example, there is the style used a font that should be preloaded:
styles.scss
@font-face {
font-family: 'MyFont';
src:
local(MyFont Regular),
url('@fonts/myfont.woff2') format('woff2'),
url('@fonts/myfont.woff') format('woff');
}
body {
font-family: 'MyFont', serif;
}
The template index.html where is loaded the source style:
<html>
<head>
<title>Demo</title>
<link href="./style.scss" rel="stylesheet" />
</head>
<body>
<h1>Hello World!</h1>
</body>
</html>
Use the minimal Webpack config:
const HtmlBundlerPlugin = require('html-bundler-webpack-plugin');
module.exports = {
resolve: {
alias: {
'@fonts': path.join(__dirname, 'src/assets/fonts/'),
},
},
plugins: [
new HtmlBundlerPlugin({
entry: {
index: 'src/views/index.html',
},
css: {
filename: 'css/[name].[contenthash:8].css',
},
preload: [
{
test: /\.(woff2|woff)$/,
attributes: { as: 'font', crossorigin: true },
},
],
}),
],
module: {
rules: [
{
test: /\.(css|sass|scss)$/,
use: ['css-loader', 'sass-loader'],
},
{
test: /\.(woff2|woff)$/,
type: 'asset/resource',
generator: {
filename: 'fonts/[name][ext]',
},
},
],
},
};
Note
Font preloading requires the crossorigin attribute to be set.
See font preload.
The generated HTML contains the preload tag with the font:
<html>
<head>
<title>Demo</title>
<link rel="preload" href="fonts/myfont.woff2" as="font" type="font/woff2" crossorigin="true" />
<link rel="preload" href="fonts/myfont.woff" as="font" type="font/woff" crossorigin="true" />
<link href="css/style.1f4faaff.css" rel="stylesheet" />
</head>
<body>
<h1>Hello World!</h1>
</body>
</html>
Note
You don't need a plugin to copy files from source directory to public.
All source fonts will be coped to output directory automatically.
How to inline CSS in HTML
There are two ways to inline CSS in HTML:
- inline all CSS globally with
css.inline option - inline single CSS with
?inline query added to a filename
The inline option can take the following values: false, true and 'auto'.
For details see the inline option.
Note
The individual ?inline query parameter takes precedence over the globally css.inline option.
For example, if css.inline = true and in HTML a single file has the ?inline=false query,
this file will be extracted in an output file, while all other styles will be inlined.
For example, there are two SCSS files:
main.scss
$bgColor: steelblue;
body {
  background-color: $bgColor;
}
styles.scss:
$color: red;
h1 {
  color: $color;
}
There is the ./src/views/index.html with both style files:
<html>
  <head>
    <link href="./main.scss" rel="stylesheet" />
    <link href="./style.scss" rel="stylesheet" />
  </head>
  <body>
    <h1>Hello World!</h1>
  </body>
</html>
To inline all CSS globally add the css.inline option:
const HtmlBundlerPlugin = require('html-bundler-webpack-plugin');
module.exports = {
plugins: [
new HtmlBundlerPlugin({
entry: {
index: 'src/views/index.html',
},
css: {
inline: true,
filename: 'css/[name].[contenthash:8].css',
},
}),
],
module: {
rules: [
{
test: /\.(css|sass|scss)$/,
use: ['css-loader', 'sass-loader'],
},
],
},
};
The generated HTML contains inlined CSS:
<html>
  <head>
    <style>
      body {
        background-color: steelblue;
      }
    </style>
    <style>
      h1 {
        color: red;
      }
    </style>
  </head>
  <body>
    <h1>Hello World!</h1>
  </body>
</html>
To inline a single CSS, add the ?inline query to a style file which you want to inline:
<html>
<head>
<link href="./main.scss" rel="stylesheet" />
<link href="./style.scss?inline" rel="stylesheet" />
</head>
<body>
<h1>Hello World!</h1>
</body>
</html>
The generated HTML contains inline CSS already processed via Webpack:
<html>
<head>
<link href="/css/main.05e4dd86.css" rel="stylesheet" />
<style>
h1 {
color: red;
}
</style>
</head>
<body>
<h1>Hello World!</h1>
</body>
</html>
Note
To enable the source map in inline CSS set the Webpack option devtool.
How to inline JS in HTML
There are two ways to inline CSS in HTML:
- inline all JS globally with
js.inline option - inline single JS with
?inline query added to a filename
The inline option can take the following values: false, true and 'auto'.
For details see the inline option.
Note
The individual ?inline query parameter takes precedence over the globally js.inline option.
For example, if js.inline = true and in HTML a single file has the ?inline=false query,
this file will be extracted in an output file, while all other scripts will be inlined.
For example, there are two JS files:
main.js
console.log('>> main.js');
script.js
console.log('>> script.js');
There is the ./src/views/index.html with both script files:
<html>
  <head>
    <script src="./main.js" defer="defer"></script>
  </head>
  <body>
    <h1>Hello World!</h1>
    <script src="./script.js"></script>
  </body>
</html>
To inline all JS globally add the js.inline option:
const HtmlBundlerPlugin = require('html-bundler-webpack-plugin');
module.exports = {
plugins: [
new HtmlBundlerPlugin({
entry: {
index: 'src/views/index.html',
},
js: {
inline: true,
filename: 'js/[name].[contenthash:8].js',
},
}),
],
};
The generated HTML contains inlined JS scripts:
<html>
  <head>
    <script>
      (() => {
        'use strict';
        console.log('>> main.js');
      })();
    </script>
  </head>
  <body>
    <h1>Hello World!</h1>
    <script>
      (() => {
        'use strict';
        console.log('>> script.js');
      })();
    </script>
  </body>
</html>
To inline a single JS file, add the ?inline query to a script file which you want to inline:
<html>
<head>
<script src="./main.js" defer="defer"></script>
<script src="./script.js?inline"></script>
</head>
<body>
<h1>Hello World!</h1>
</body>
</html>
The generated HTML contains inline JS already compiled via Webpack:
<html>
<head>
<script src="js/main.992ba657.js" defer="defer"></script>
<script>
(() => {
'use strict';
console.log('>> script.js');
})();
</script>
</head>
<body>
<h1>Hello World!</h1>
</body>
</html>
Note
If Webpack is started as serve or watch,
the inlined JS code will contain additional HMR code.
Don't worry it is ok, so works Webpack live reload.
To enable the source map in inline JS set the Webpack option devtool.
How to inline SVG, PNG images in HTML
You can inline the images in two ways:
- force inline image using
?inline query - auto inline by image size
Add to Webpack config the rule:
module: {
rules: [
{
test: /\.(png|jpe?g|svg|webp|ico)$/i,
oneOf: [
{
resourceQuery: /inline/,
type: 'asset/inline',
},
{
type: 'asset',
parser: {
dataUrlCondition: {
maxSize: 1024,
},
},
generator: {
filename: 'assets/img/[name].[hash:8][ext]',
},
},
],
},
],
}
The plugin automatically inlines images smaller then maxSize.
How to inline all resources into single HTML file
The bundler plugin can generate a single HTML file included all embedded dependencies
such as JS, CSS, fonts, images (PNG, SVG, etc..).
The fonts and images used in CSS will be inlined into CSS.
The generated CSS including inlined images will be inlined into HTML.
Just use the following config:
const path = require('path');
const HtmlBundlerPlugin = require('html-bundler-webpack-plugin');
module.exports = {
mode: 'production',
output: {
path: path.join(__dirname, 'dist/'),
},
plugins: [
new HtmlBundlerPlugin({
entry: {
index: './src/views/index.html',
},
css: {
inline: true,
},
js: {
inline: true,
},
}),
],
module: {
rules: [
{
test: /\.(css|sass|scss)$/,
use: ['css-loader', 'sass-loader'],
},
{
test: /\.(png|jpe?g|webp|svg|woff2?)$/i,
type: 'asset/inline',
},
],
},
performance: false,
};
How to resolve source assets in an attribute containing JSON value
For example, source images should be defined in the custom data-image attribute of the a tag:
<a data-image='{ "imgSrc": "./pic1.png", "bgImgSrc": "./pic2.png" }' href="#" >
  ...
</a>
To resolve such files, just use the require() function:
<a data-image='{ "imgSrc": require("./pic1.png"), "bgImgSrc": require("./pic2.png") }' href="#" >
  ...
</a>
Add to sources loader option the data-image attribute for the a tag:
new HtmlBundlerPlugin({
entry: {
index: './src/index.html',
},
loaderOptions: {
sources: [
{
tag: 'a',
attributes: ['data-image'],
},
],
},
}),
The custom attribute will contains in the generated HTML the resolved output assets filenames:
<a data-image='{ "imgSrc": "img/pic1.da3e3cc9.png", "bgImgSrc": "img/pic2.e3cc9da3.png" }' href="#" >
  ...
</a>
How to resolve source image in the style attribute
For example, there is the source image file defined in the style attribute as the background of the div tag:
<div style="background-image: url(./pic1.png);"></div>
The source image file can be a file relative to the template or you can use a webpack alias to the image directory.
Note
This is BAD practice. Use it only in special cases.
The background image should be defined in CSS.
By default, the style attribute is not parsed and therefore needs to be configured:
new HtmlBundlerPlugin({
entry: {
index: './src/index.html',
},
loaderOptions: {
sources: [
{
tag: 'div',
attributes: ['style'],
},
],
},
}),
The plugin resolves the url() value and replaces it in the generated HTML with the output filename:
<div style="background-image: url(assets/img/pic1.d4711676.png);"></div>
How to load CSS file dynamically
For dynamic file loading, we need the output filename of extracted CSS from a source style file.
To get the CSS output filename in JavaScript, you can use the url query:
import cssUrl from './style.scss?url';
const cssUrl = require('./style.scss?url');
Where the ./style.scss is the source SCSS file relative to the JavaScript file.
To load a CSS file dynamically, you can use following function:
import cssUrl from './style.scss?url';

function loadCSS(url) {
  const style = document.createElement('link');
  style.href = url;
  style.rel = 'stylesheet';
  document.head.appendChild(style);
}

loadCSS(cssUrl);
The CSS will be extracted into separate file and the cssUrl variable will contains the CSS output filename.
Since 2023, many browsers support the modern way to add the stylesheets into DOM without creating the link tag.
import cssUrl from './style.scss?url';

async function loadCSS(url) {
  const response = await fetch(url);
  const css = await response.text();
  const sheet = new CSSStyleSheet();
  sheet.replaceSync(css);
  document.adoptedStyleSheets = [sheet];
}

loadCSS(cssUrl);
See the browser compatibility.
How to import CSS class names in JS
Required: css-loader >= 7.0.0
To import style class names in JS, add in the webpack config the modules option into css-loader:
{
  test: /\.(css)$/,
  use: [
    {
      loader: 'css-loader',
      options: {
        modules: {
          localIdentName: '[name]__[local]--[hash:base64:5]',
          exportLocalsConvention: 'camelCase',
        },
      },
    },
  ],
},
For example there is ./style.css file:
.error-message {
color: red;
}
In ./main.js file you can use the class name with camelCase:
import styles from './style.css';
element.innerHTML = `<div class="${styles.errorMessage}">`;
The imported styles object contains generated class names like followings:
{
errorMessage: 'main__error-message--gvFM4',
}
Read more information about CSS Modules.
How to import CSS stylesheet in JS
Using the css-loader option exportType as css-style-sheet
you can import the CSS stylesheets as the instance of the CSSStyleSheet object.
Import a CSS module script and apply it to a document or a shadow root like this:
import sheet from './style.scss?sheet';
document.adoptedStyleSheets = [sheet];
shadowRoot.adoptedStyleSheets = [sheet];
You can use the ?sheet URL query to import a style file as stylesheets.
The query must be configured in the webpack config:
module.exports = {
plugins: [
new HtmlBundlerPlugin({
entry: {
index: './src/index.html',
},
js: {
filename: '[name].[contenthash:8].js',
},
css: {
filename: '[name].[contenthash:8].css',
},
}),
],
module: {
rules: [
{
test: /\.(s?css)$/,
oneOf: [
{
resourceQuery: /sheet/,
use: [
{
loader: 'css-loader',
options: {
exportType: 'css-style-sheet',
},
},
{
loader: 'sass-loader',
},
],
},
{
use: [
'css-loader',
'sass-loader',
],
}
],
}
],
},
};
Using the universal configuration above you can apply CSS stylesheets in JS and extract CSS into separate file or inject CSS into HTML:
import sheet from './style.scss?sheet';
import './style2.scss?inline';
import './style3.scss';
document.adoptedStyleSheets = [sheet];
shadowRoot.adoptedStyleSheets = [sheet];
This is useful for custom elements and shadow DOM.
More information:
How to load JS and CSS from node_modules in template
Some node modules specifies compiled bundle files for the browser in package.json.
For example:
- the material-icons specifies the
browser ready CSS file. - the bootstrap specifies the
browser ready JS and CSS files.
You can use only the module name, the plugin automatically resolves browser ready files for script and style:
<html>
<head>
<link href="bootstrap" rel="stylesheet">
<script src="bootstrap" defer="defer"></script>
</head>
<body>
<h1>Hello World!</h1>
</body>
</html>
If you need to load a specific version of a file, use the module name and the path to that file:
<html>
<head>
<link href="bootstrap/dist/css/bootstrap.rtl.css" rel="stylesheet">
<script src="bootstrap/dist/js/bootstrap.bundle.js" defer="defer"></script>
</head>
<body>
<h1>Hello World!</h1>
</body>
</html>
Warning
Don't use a relative path to node_modules, like ../node_modules/bootstrap. The plugin resolves node module path by the name automatically.
How to import CSS or SCSS from node_modules in SCSS
The plugin resolves default style files defined in node_modules automatically.
For example, import source styles of material-icons:
@use 'material-icons';
.mat-icon {
@extend .material-icons-outlined;
}
You can import a file from a module using the module name and the path to the file:
@use 'MODULE_NAME/path/to/style';
Warning
The file extension, e.g. .scss, .css, must be omitted.
Warning
Use the @use instead of @import, because it is deprecated.
For example, import the style theme tomorrow from the prismjs module:
@use 'prismjs/themes/prism-tomorrow.min';
Warning
Don't use resolve-url-loader!
The HTML bundler plugin resolves styles faster than resolve-url-loader and don't requires using the source map in sass-loader options.
How to process a PHP template (.phtml)
The plugin can replace the source filenames of scripts, styles, images, etc. with their output filenames in a template.
For example, there is the PHP template src/views/index.phtml:
<?php
$title = 'Home';
?>
<html>
<head>
<title><?= $title ?></title>
<link href="./style.css" rel="stylesheet">
<script src="./main.js" defer="defer"></script>
</head>
<body>
<h1>Hello World!</h1>
</body>
</html>
The PHP template should not be compiled into pure HTML, but only should be processed the source assets.
In this case, the preprocessor must be disabled.
module.exports = {
output: {
path: path.join(__dirname, 'dist/'),
},
plugins: [
new HtmlBundlerPlugin({
test: /\.(php|phtml)$/i,
filename: '[name].phtml',
entry: {
index: './src/views/index.phtml',
},
js: {
filename: 'js/[name].[contenthash:8].js',
},
css: {
filename: 'css/[name].[contenthash:8].css',
},
preprocessor: false,
}),
],
};
The processed PHP template dist/index.phtml:
<?php
$title = 'Home';
?>
<html>
<head>
<title><?= $title ?></title>
<link href="css/style.026fd625.css" rel="stylesheet">
<script src="js/main.3347618e.js" defer="defer"></script>
</head>
<body>
<h1>Hello World!</h1>
</body>
</html>
How to pass data into multiple templates
You can pass variables into template using a template engine, e.g. Handlebars.
For multiple page configuration, better to use the Nunjucks template engine maintained by Mozilla.
For example, you have several pages with variables.
Both pages have the same layout src/views/layouts/default.html
<!doctype html>
<html>
<head>
<title>{{ title }}</title>
{% block styles %}{% endblock %}
{% block scripts %}{% endblock %}
</head>
<body>
<main class="main-content">
{% block content %}{% endblock %}
</main>
</body>
</html>
src/views/pages/home/index.html
{% extends "src/views/layouts/default.html" %} {% block styles %}
<link href="./home.scss" rel="stylesheet" />
{% endblock %} {% block scripts %}
<script src="./home.js" defer="defer"></script>
{% endblock %} {% block content %}
<h1>{{ filmTitle }}</h1>
<p>Location: {{ location }}</p>
<img src="@images/{{ imageFile }}" />
{% endblock %}
src/views/pages/about/index.html
{% extends "src/views/layouts/default.html" %} {% block styles %}
<link href="./about.scss" rel="stylesheet" />
{% endblock %} {% block scripts %}
<script src="./about.js" defer="defer"></script>
{% endblock %} {% block content %}
<h1>Main characters</h1>
<ul>
{% for item in actors %}
<li class="name">{{ item.firstname }} {{ item.lastname }}</li>
{% endfor %}
</ul>
{% endblock %}
Webpack config
const HtmlBundlerPlugin = require('html-bundler-webpack-plugin');
const Nunjucks = require('nunjucks');
const entryData = {
home: {
title: 'Home',
filmTitle: 'Breaking Bad',
location: 'Albuquerque, New Mexico',
imageFile: 'picture.png',
},
about: {
title: 'About',
actors: [
{
firstname: 'Walter',
lastname: 'White, "Heisenberg"',
},
{
firstname: 'Jesse',
lastname: 'Pinkman',
},
],
},
};
module.exports = {
resolve: {
alias: {
'@images': path.join(__dirname, 'src/assets/images'),
},
},
plugins: [
new HtmlBundlerPlugin({
entry: {
index: {
import: 'src/views/pages/home/index.html',
data: entryData.home,
},
about: {
import: 'src/views/pages/about/index.html',
data: entryData.about,
},
},
js: {
filename: 'js/[name].[contenthash:8].js',
},
css: {
filename: 'css/[name].[contenthash:8].css',
},
preprocessor: 'nunjucks',
}),
],
module: {
rules: [
{
test: /\.(css|sass|scss)$/,
use: ['css-loader', 'sass-loader'],
},
{
test: /\.(png|svg|jpe?g|webp)$/i,
type: 'asset/resource',
generator: {
filename: 'assets/img/[name].[hash:8][ext]',
},
},
],
},
};
The generated dist/index.html
<!doctype html>
<html>
<head>
<title>Home</title>
<link href="css/home.2180238c.css" rel="stylesheet" />
<script src="js/home.790d746b.js" defer="defer"></script>
</head>
<body>
<main class="main-content">
<h1>Breaking Bad</h1>
<p>Breaking Bad is an American crime drama</p>
<p>Location: Albuquerque, New Mexico</p>
<img src="assets/img/picture.697ef306.png" alt="location" />
</main>
</body>
</html>
The generated dist/about.html
<!doctype html>
<html>
<head>
<title>About</title>
<link href="css/about.2777c101.css" rel="stylesheet" />
<script src="js/about.1.c5e03c0e.js" defer="defer"></script>
</head>
<body>
<main class="main-content">
<h1>Main characters</h1>
<ul>
<li class="name">Walter White, "Heisenberg"</li>
<li class="name">Jesse Pinkman</li>
</ul>
</main>
</body>
</html>
How to use some different template engines
When you have many templates with different syntax, you can use a separate module rules for each template engine.
For example, in your project are mixed templates with EJS and Handlebars syntax.
- src/views/ejs/home.ejs
- src/views/hbs/about.hbs
To handle different templates, define the test plugin option that must match those templates and
add a preprocessor for each template type in the module rules.
const HtmlBundlerPlugin = require('html-bundler-webpack-plugin');
const ejs = require('ejs');
const Handlebars = require('handlebars');
module.exports = {
plugins: [
new HtmlBundlerPlugin({
test: /\.(ejs|hbs)$/,
entry: {
index: 'src/views/ejs/home.ejs',
about: 'src/views/hbs/about.hbs',
},
}),
],
module: {
rules: [
{
test: /\.ejs$/,
loader: HtmlBundlerPlugin.loader,
options: {
preprocessor: 'ejs',
preprocessorOptions: {
views: [path.join(__dirname, 'src/views/ejs/partials')],
},
},
},
{
test: /\.hbs$/,
loader: HtmlBundlerPlugin.loader,
options: {
preprocessor: 'handlebars',
preprocessorOptions: {
views: [path.join(__dirname, 'src/views/hbs/partials')],
},
},
},
],
},
};
How to config splitChunks
Webpack tries to split every entry file, include template files, which completely breaks the compilation process in the plugin.
To avoid this issue, you must specify which scripts should be split, using optimization.splitChunks.cacheGroups:
module.exports = {
optimization: {
splitChunks: {
cacheGroups: {
scripts: {
test: /\.(js|ts)$/,
chunks: 'all',
},
},
},
},
};
Note
In the test option must be specified all extensions of scripts which should be split.
See details by splitChunks.cacheGroups.
For example, in a template are used the scripts and styles from node_modules:
<html>
<head>
<title>Home</title>
<link href="bootstrap/dist/css/bootstrap.min.css" rel="stylesheet" />
<script src="bootstrap/dist/js/bootstrap.min.js" defer="defer"></script>
</head>
<body>
<h1>Hello World!</h1>
<script src="./main.js"></script>
</body>
</html>
Note
In the generated HTML, all script tags remain in their original places, and the split chunks will be added there
in the order in which Webpack generated them.
In this use case the optimization.cacheGroups.{cacheGroup}.test option must match exactly only JS files from node_modules:
module.exports = {
optimization: {
runtimeChunk: 'single',
splitChunks: {
cacheGroups: {
vendor: {
test: /[\\/]node_modules[\\/].+\.(js|ts)$/,
name: 'vendor',
chunks: 'all',
},
},
},
},
};
Warning
If you will to use the test as /[\\/]node_modules[\\/], without extension specification,
then Webpack concatenates JS code together with CSS in one file and Webpack compilation will failed or generate files with a wrong content.
Webpack can't differentiate CSS module from JS module, therefore you MUST match only JS files.
How to keep package name for split chunks from node_modules
To save split chunks under a custom name use optimization.cacheGroups.{cacheGroup}.name as function.
For example, many node modules are imported in the main.js:
import { Button } from 'bootstrap';
import _, { map } from 'underscore';
There is a template used the main.js ./src/views/index.html:
<html>
<head>
<script src="./main.js" defer="defer"></script>
</head>
<body>
<h1>Hello World!</h1>
</body>
</html>
Then, use the optimization.splitChunks.cacheGroups.{cacheGroup}.name as following function:
const HtmlBundlerPlugin = require('html-bundler-webpack-plugin');
module.exports = {
plugins: [
new HtmlBundlerPlugin({
entry: {
index: 'src/views/index.html',
},
js: {
filename: 'js/[name].[contenthash:8].js',
chunkFilename: 'js/[id].[contenthash:8].js',
},
}),
],
optimization: {
runtimeChunk: true,
splitChunks: {
maxSize: 1000000,
cacheGroups: {
app: {
test: /\.(js|ts)$/,
chunks: 'all',
name({ context }, chunks, groupName) {
if (/[\\/]node_modules[\\/]/.test(context)) {
const moduleName = context.match(/[\\/]node_modules[\\/](.*?)(?:[\\/]|$)/)[1].replace('@', '');
return `npm.${moduleName}`;
}
return groupName;
},
},
},
},
},
};
Warning
The group name MUST be different from the script names used in the template.
Otherwise, a chunk name conflict occurs.
For example,
if you are already using main.js in the template, the group name should not be main.
Take another name, e.g. app.
The split files will be saved like this:
dist/js/runtime.9cd0e0f9.js
dist/js/npm.popperjs/core.f96a1152.js <- split chunks of node modules
dist/js/npm.bootstrap.f69a4e44.js
dist/js/npm.underscore.4e44f69a.js
dist/js/main.3010da09.js <- base code of main script
dist/js/app-5fa74877.7044e96a.js <- split chinks of main script
dist/js/app-d6ae2b10.92215a4e.js
dist/js/app-5fa74877.1aceb2db.js
How to split CSS files
Warning
Splitting CSS to many chunks is principally impossible. Splitting works only for JS files.
Using the bundler plugin, all your style source files should be specified directly in the template.
You can import style files in JavaScript, like it works using the mini-css-extract-plugin and html-webpack-plugin,
but it is a bad practice and processing is slower.
You can separate the styles into multiple bundles yourself.
For example, there are style files used in your app:
- components/banner/style.scss 150 KB
- components/button/style.scss 50 KB
- components/menu/style.scss 50 KB
- components/modal/style.scss 100 KB
- components/panel/style.scss 100 KB
- styles/main.scss 250 KB
We want to have a bundle file ~250 KB, then create the bundles manually:
styles/bundle01.scss 200 KB
@use '../components/banner/style.scss';
@use '../components/button/style.scss';
styles/bundle02.scss 250 KB
@use '../components/menu/style.scss';
@use '../components/modal/style.scss';
@use '../components/panel/style.scss';
Add the bundles in the template:
<html>
<head>
<title>Home</title>
<link href="./styles/bundle01.scss" rel="stylesheet" />
<link href="./styles/bundle02.scss" rel="stylesheet" />
<link href="./styles/main.scss" rel="stylesheet" />
</head>
<body>
<h1>Hello World!</h1>
</body>
</html>
If you use vendor styles in your style file, then vendor styles will not be saved to a separate file, because sass-loader generates one CSS bundle code.
styles.scss
@use 'bootstrap/scss/bootstrap';
body {
color: bootstrap.$primary;
}
If you want save module styles separate from your styles, then load them in a template separately:
<html>
<head>
<title>Home</title>
<link href="bootstrap/dist/css/bootstrap.min.css" rel="stylesheet" />
<link href="./style.scss" rel="stylesheet" />
</head>
<body>
<h1>Hello World!</h1>
<script src="./main.js"></script>
</body>
</html>
Problems & Solutions
Automatic resolving of file extensions
Defaults, the Webpack resolves the omitted .js extension.
If you use the TypeScript, you can add the .ts extension to be resolved.
For example, you have the files:
- moduleA.js
- moduleB.ts
- app.ts
- app.scss
The file extensions can be omitted:
app.ts
import moduleA from './moduleA';
import moduleB from './moduleB';
To allow this magic, you should configure the resolve.extensions Webpack option.
module.exports = {
resolve: {
extensions: ['.js', '.ts'],
},
};
Problem with styles
If you import style files in your script and want automatically to resolve the .css, .scss extensions, e.g., as the following:
app.ts
import moduleA from './moduleA';
import moduleB from './moduleB';
import './app';
module.exports = {
resolve: {
extensions: ['.js', '.ts', '.scss'],
},
};
If you use as above, it won't work.
Solution
To import styles in a script, you MUST use a style extension and not add a style extension to the resolve.extensions option.
app.ts
import moduleA from './moduleA';
import moduleB from './moduleB';
import './app.scss';
How to use @import url() in CSS
Warning
Don't use @import in CSS. It's very bad practice.
Bad example, main.css:
@import 'path/to/style.css';
The plugin does not support handling of @import url() in CSS. Imported url will be passed 1:1 into resulting CSS.
Problem: defaults, css-loader handles @import at-rule, which causes an issue in the plugin.
Solution: add the import: false into css-loader options:
{
test: /\.(css)$/i,
loader: 'css-loader',
options: {
import: false,
},
},
Warning
The *.css files imported in CSS are not handled, therefore these files must be manually copied to the dist/ folder using the copy-webpack-plugin.
In default attributes, files will be resolved automatically, regardless of whether the tag is commented out or not.
This is not a bug, it is a feature for very fast attribute parsing.
If you commented out a tag and don't want to resolve files in the tag's attributes, rename the attribute.
For example: href -> x-href or src -> x-src.
If used any template engine (defaults is Eta)
then can be used templating comments <%/* ... */%>.
<%/* <link rel="stylesheet href="./style.scss" /> Single line comment w/o resolving */%>
<%/*
Multiline comment w/o resolving of files in attributes
<img src="./image1.png" />
<img src="./image2.png" />
*/%>
The generated HTML will not contain templating comments.
Also See
- ansis - The Node.js lib for ANSI color styling of text in terminal
- pug-loader The Pug loader for Webpack
- pug-plugin The Pug plugin for Webpack
License
ISC


