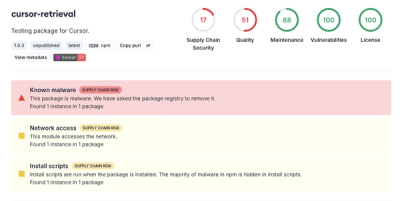
Security News
The Risks of Misguided Research in Supply Chain Security
Snyk's use of malicious npm packages for research raises ethical concerns, highlighting risks in public deployment, data exfiltration, and unauthorized testing.
Mini Node Script Server - Simple API Server with auto-loading, abstraction and configuration handling for IoT automation.
This is a small yet powerful server based on node.js and express.
It's designed to simple create and serve usable APIs for automatising things, like with the Raspberry Pi or whenever it's needed to easily execute scripts.
Minoss is very easy to extend for your needs.
Build in it has a automatically file loading, handling abstractions and configurations on many levels. Just place the files on the right place and the Server will handle anything else.
Minoss can easily be installed with npm.
$ npm install minoss
If installed this way, it's only needed to require minoss in the starting script file.
Like in an own server.js file:
require('minoss');
Another way is, inside a folder where wanted to install Minoss, just to download the project files.
It's possible to download the zip archive from GitHub or use git to download the latest files.
With this way the core files of Minoss are stored inside the root folder.
$ git clone https://github.com/eisbehr-/minoss.git .
If you want to use other public modules, the easiest way to install them is to use npm. For example:
$ npm install minoss-example
Minoss itself only has a very small configuration.
You will find anything with a description inside the config/server.js file.
Change the options as you like.
| name | default | description |
|---|---|---|
| debug | false | enable debug mode to have a verbose console output |
| port | 8080 | port number to listen on after start |
| xmlRootTag | root | name of the xml root tag |
The routes.js configuration allows you to add own routes to the server.
Because Minoss is based on express you can use it's full routing functions.
module.exports = app => {
    app.get('/example', (req, res) => {
        res.send("example response");
    });
}
The server can be started one time by using npm start or manually by node server.js inside the directory where you installed it.
$ node server.js
After start a message should notice about where the server is listening by now.
Minoss now listening on http://localhost:8080 ...
You may want to let the server running forever and automatically start it after reboot or crash.
Therefore you could use pm2, a process manager for node.js.
If you didn't use pm2 already, you can install it globally.
$ npm install -g pm2
Once installed you can add Minoss execution to the handling of pm2:
$ pm2 startup
$ pm2 start server.js --name minoss
$ pm2 save
And that's it, your server will now run automatically on every boot, pm2 will even restart Minoss when it crashes.
If you want to stop it with pm2 stop minoss.
You call and execute a script always by module and script name.
Minoss will do anything else for you.
Minoss supports three different output types by default: json, xml and plain text, while json is the default.
You can switch between them every time.
Just put the wanted output format before the module and script name, or append it as get parameter.
Possible calls:
http://localhost:8080/module/script
http://localhost:8080/**json**/module/script
http://localhost:8080/module/script?output=**json**
Will output something like:
{
  "success": true
}
Possible calls:
http://localhost:8080/**xml**/module/script
http://localhost:8080/module/script?output=**xml**
Will output something like:
<?xml version='1.0'?>
<minoss>
  <success>true</success>
</minoss>
Possible calls:
http://localhost:8080/**text**/module/script
http://localhost:8080/module/script?output=**text**
The text output format will return 1 on success and 0 on failure.
If an error message is available it will be return just the message itself.
So in short, everything not 1 is an error.
There are currently only a few modules available by myself. Feel free to create own Modules on your own or spread some new ones with other.
Creating a module is just creating a new folder in the Minoss root directory. The name of the directory is the name of the module. Inside this directory all executable scripts takes place. The name of the Files are also the name of the script.
For example, when creating a folder and file named example/test.js, the module is named example and the dcript is named test.
So the URl would be something like http://hostname:8080/example/test.
More details and a full example can be found inside the minoss-example repository.
A Script must always export a function.
This function has four parameters, which will be filled by Minoss on request of this script.
module.exports = (config, params, respond, error) => {
    respond(true);
};
| name | type | description |
|---|---|---|
| config | object | contains all configurations for this module |
| params | object | contains all parameters given by request url |
| respond | function | callback function for browser response |
| error | function | callback function for errors |
The config parameter is an object, containing all configuration data from this Module.
The properties inside this object are the config file names.
If there would be two config Files, named config/foo.js and config/bar.js, the object would be look like this:
let config = {
    foo: {
        // export of config/foo.js
    },
    bar: {
        // export of config/bar.js
    }
};
The params parameter is an object, containing all parameters given by URL on this request.
It will at least contain the module, script and output parameters.
Assuming a request URL like http://localhost:8080/example/test?mode=get&id=1 the object would be look like this:
let params = {
    module: 'example',
    script: 'test',
    output: 'json',
    mode: 'get',
    id: 1
};
The respond callback function is used to tell Minoss that your script is finished and for responding additional data.
It can handle true and false as parameter, for telling success or fail, or an object with more data.
There should be no further output after this has been called.
respond(true);  // shorthand for: {success: true}
respond(false); // shorthand for: {success: false}
respond({success: true, data: 'myData'});
The error callback is optional and can be used for responding errors.
It can be done with the respond callback too, but it is a shorthand for this task and would make your script more readable.
The only parameter of this function can be a message as string or an object with additional data.
There should be no further output after this has been called.
error('error message'); // shorthand for: {success: false, error: "error message"}
Many modules would need configuration files.
If you install modules with npm you would lost these or have to edit files in the node_modules folder.
Each is not quite usable.
Because of this you can place all your configurations inside the config/ folder of the Minoss root, or in a local module instance.
The sever will select these files then instead.
The order for overwriting configuration is: node installed module -> local module -> root 'config/' folder
To overwrite a configuration with a local instance, just create a sub-folder there, with the name of the module you want to override and place the configs there.
htdocs/
  |- hue/              <-- module name
    |- config/
      |- bridges.js    <-- overriding configuration
Another way, if you don't need a local module, is to place all configurations in the config/ directory of the root folder.
Just create a sub-folder with the name of the module you want to override.
htdocs/
  |- config/
    |- hue/            <-- module name
      |- bridges.js    <-- overriding configuration
    | - messages.js
    | - server.js
It is possible to override files of other modules, installed with npm.
There is no need to copy the whole module.
Just copy the script you want to change inside a local module folder.
htdocs/
  |- config/
  |- node_modules/
    |- minoss-example
      |- example.js      <-- the file you want to override
  |- src/
  |- .jshintrc
  |- gulpfile.js
  |- package.json
  |- README.md
  |- server.js
htdocs/
  |- config/
  |- example/
    |- example.js        <-- place it here to override
  |- node_modules/
    |- minoss-example
      |- example.js
  |- src/
  |- .jshintrc
  |- gulpfile.js
  |- package.json
  |- README.md
  |- server.js
You only need to change the require entries to the correct files, if used, and you're ready to go.
All other scripts will be loaded from node_modules/example/ like before.
Because you will not see all errors on blind execution of your scripts, there is a build in javascript validation with gulp and jshint.
You can execute this validation whenever you like, or let it watch for file changes, with the following commands:
$ gulp validateAll
$ gulp validate
$ gulp watch
Please report bugs and feel free to ask for new features directly on GitHub.
Minoss is dual-licensed under MIT and GPL-2.0 license.
You like to support me?
You appreciate my work?
You use it in commercial projects?
Feel free to make a little donation! :wink:
FAQs
Mini Node Script Server - Simple API Server with auto-loading, abstraction and configuration handling for IoT automation.
The npm package minoss receives a total of 5 weekly downloads. As such, minoss popularity was classified as not popular.
We found that minoss demonstrated a not healthy version release cadence and project activity because the last version was released a year ago. It has 1 open source maintainer collaborating on the project.
Did you know?

Socket for GitHub automatically highlights issues in each pull request and monitors the health of all your open source dependencies. Discover the contents of your packages and block harmful activity before you install or update your dependencies.

Security News
Snyk's use of malicious npm packages for research raises ethical concerns, highlighting risks in public deployment, data exfiltration, and unauthorized testing.

Research
Security News
Socket researchers found several malicious npm packages typosquatting Chalk and Chokidar, targeting Node.js developers with kill switches and data theft.

Security News
pnpm 10 blocks lifecycle scripts by default to improve security, addressing supply chain attack risks but sparking debate over compatibility and workflow changes.