react-native-router


This module is Navigator extension.you can manage all of route with configuration.
Install
npm install mkp-react-native-router --save
Support
IOS/Android
Quick Start
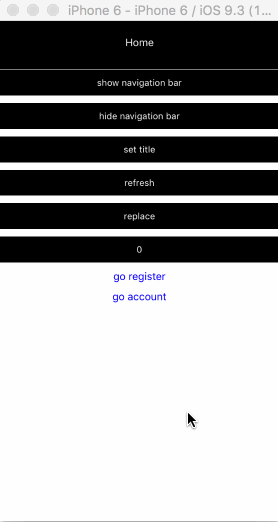
<Router ref="router"
        renderTitle={(route)=> {
            return <Text style={{color: "white"}}>{route.title}</Text>;
        }}
        renderLeftButton={(route, navigator, index)=> {
            if (index > 0) {
                return <Text style={{color: "white"}} onPress={event=> {
                    navigator.$pop();
                }}>back</Text>
            }
            return null;
        }}
        navigationBarStyle={{backgroundColor: "black"}}
        routes={[{
            path: "home",
            title: "Home",
            component: Home
        }, {
            path: "register",
            title: "Register-Step1",
            component: RegisterStep1,
            routes: [{
                path: "step2",
                title: "Register-Step2",
                hideNavigationBar: true,
                component: RegisterStep2
            }]
        }]}>
</Router>
Router Props
renderTitle(route:route,navigator:NavigatorEx,index:number,navState:route[])
Set title for navigation.
the default value will return a text node:
<Text>{route.title}</Text>
renderLeftButton(route:route,navigator:NavigatorEx,index:number,navState:route[])
Set back button or left button for navigation, null as default value.
navigationBarStyle
Set navigation style
routes
The first route as initial route
type route
- path:string
route path that is required.
- title:string
navigation title
- renderLeftButton(route:route,navigator:NavigatorEx,index:number,navState:route[]):function
set left button for navigation. if it is provided , the Router.renderLeftButton will be ignore.
- renderRightButton(route:route,navigator:NavigatorEx,index:number,navState:route[]):function
set right button for navigation.
- renderTitle(route:route,navigator:NavigatorEx,index:number,navState:route[]):function
if it is provided , the Router.renderTitle will be ignored.
- hideNavigationBar:boolean [hideNavigationBar=false]
whether hide navigation.
- routes:route[]
this is required.
- component:Component
- onEnter(route:route):function
invoke when navigator.$push,you can return a available path to redirect or nothing.
NOTE1:if you return a available path in here , you can access route.$previousRoute and route.$previousPath in new path.
NOTE2:don't be invoked when start app from initial route.
configureScene()
configure page transition, you can refer to React Native Navigator
the default value is Navigator.SceneConfigs.HorizontalSwipeJump.
onChange(type:string,route:route,path:string)
Invoke when navigator $push,$pop,$replace,$refreshNavBar
navigator methods
$push(path:string[,route:route])
router will push to target path.the parameter route will override route which find by path.
this.props.navigator.$push("register")
this.props.navigator.$push("register/register-step2");
this.props.navigator.$push("register",{
title:"Register"
});
in addition you can pass props through the second parameter.
this.props.navigator.$push("register",{
	tel:"13100000000"
})
$pop()
back to previous route.
$replace(path:string[,route:route])
replace current route with path. the second parameter is the same as $push
$refreshNavBar([route:route])
Refresh navigation's style.
this.props.navigator.$refreshNavBar({
    title:"test",
    renderLeftButton:()=>{},
    renderRightButton:()=>{}
})
NOTE:this method must't be calling in component's lifecycle, such as componentDidMount,only calling in sceneDidFocussceneDidFocus.
Router event
sceneDidFocus(route)
Refer to Navigator.onDidFocus
class TestComponent extends Component{
sceneDidFocus(){
}
}
sceneWillFocus(route)
Refer to Navigator.onWillFocus
class TestComponent extends Component{
sceneWillFocus(){
}
}
Authentication
Example
const routes = [{
	path: "home",
	title: "Home",
	component: Home
}, {
	path: "register",
	title: "Register-Step1",
	component: RegisterStep1,
	routes: [{
		path: "step2",
		title: "Register-Step2",
		hideNavigationBar: true,
		component: RegisterStep2
	}]
},{
	path: "login",
	title: "Login",
	component: Login
}, {
	path: "mine",
	title: "Mine",
	component: Mine,
	onEnter: ()=> {
		if (!isLogin) {
			return "login";
		}
	}
}];
after login success.
this.props.navigator.$replace(this.props.route.$previousPath);
or
this.props.navigator.$pop();
Async Authentication
More time we determine login state with token , but we can't get token value in sync ,
so we need a page to initial some data , such as token . after we can use these data in sync.
when you need to restore redux , the step is useful.
sample code following:
window.appData={
	token:""
};

class Init extends Component{

	componentDidMount(){
		getToken().then(value=>{
			if(value){
			    window.appData.token=value;
			    this.props.navigator.$replace("home");
			}
			else{
				this.props.navigator.$replace("login");
			}
		})
	}

}
you can get current net state or anything data in here except above.
How to use Router with Redux
import Router from "mkp-react-native-router";
import {connect, Provider} from "react-redux";

const RouterWithRedux = connect()(Router);

<Provider store={store}>
        <RouterWithRedux
            navigationBarStyle={navigationStyles.navigationBar}
            renderTitle={(route)=> {
                return (
                    <View style={[navigationStyles.base]}>
                        <Text style={[navigationStyles.title]}>{route.title}</Text>
                    </View>
                );
            }}
            renderLeftButton={(route, navigator, index)=> {
                if (index > 0) {
                    return (
                        <TouchableHighlight
                            style={[navigationStyles.base, navigationStyles.leftButton]}
                            onPress={event=> {
                                navigator.$pop();
                            }}>
                            <Image source={require("./themes/assets/icons/back-icon.png")}/>
                        </TouchableHighlight >
                    );
                }
                return null;
            }}
            routes={routes}></RouterWithRedux>
</Provider>
you can deal with some action that is 'SCENE_WILL_FOCUS' and 'SCENE_DID_FOCUS' in reducer. example following,
import {ActionTypes} from "mkp-react-native-router";
export function testReducer(state,action){
switch(action.type){
case ActionTypes.SCENE_WILL_FOCUS:
break;
case ActionTypes.SCENE_DID_FOCUS:
break;
default:
return state;
}
}
How to deal with hardware back event on android
Router provide two property currentRoute and navigator, you can do something through these property. following code:
class Test extends Component{
constructor(props){
super(props);
BackAndroid.addEventListener("hardwareBackPress",()=>{
let cur=this.refs.router.renderedElement._owner._renderedComponent._instance.currentRoute;
let navigator=this.refs.router.renderedElement._owner._renderedComponent._instance.navigator;
if(cur.path==="login" || cur.path==="home"){
confirm("确定要关闭应用吗?",ok=>{
if(ok){
BackAndroid.exitApp();
}
})
}
else{
navigator.$pop();
}
return true;
});
}
render(){
return (
<Router ref="router"></Router>
)
}
}
How to place navigation title in the middle on android?
<Router
    renderTitle={(route)=>{
    	return (
    		<View style={{flex:1,justifyContent:"center",alignItems:"center",...Platform.select({
    			android:{
    				width:Dimensions.get("window").width-72*2
    			}
    		})}}>
    		    <Text>{route.title}</Text>
    		</View>
    	);
    }}
    />