Product
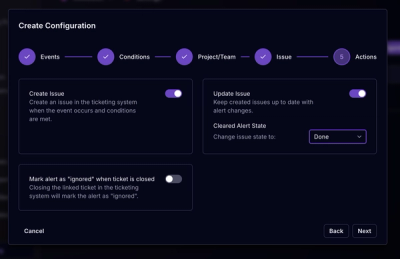
Socket for Jira Is Now Available
Socket for Jira lets teams turn alerts into Jira tickets with manual creation, automated ticketing rules, and two-way sync.
By Jeppe Hasseriis - Apr 20, 2026
msportalfx-test
Advanced tools
Generated on 2020-05-06
MsPortalFx-Test is an end-to-end test framework that runs tests against the Microsoft Azure Portal interacting with it as a user would.
3 layers of abstraction (note the names may change but the general idea should be the same). There may also be some future refactoring to easily differentiate between the layers.
Test layer
Action layer
Controls layer
Install Node.js if you have not done so. This will also install npm, which is the package manager for Node.js. We have only verified support for LTS Node versions 4.5 and 5.1 which can be found in the "previous downloads" section. Newer versions of Node are known to have compilation errors.
Install Node Tools for Visual Studio
Install TypeScript 1.8.10 or greater.
Verify that your:
node -vnpm -v. To update npm version use npm install npm -gOpen a command prompt and create a directory for your test files.
md e2etests
Switch to the new directory and install the msportalfx-test module via npm:
 cd e2etests
 npm install msportalfx-test --no-optional
The msportalfx-test module comes with some TypeScript definitions and its dependencies. To make them available to your tests, we recommend that you use the typings Typescript Definition Manager.
First install the typings Typescript Definition Manager globally:
npm install typings -g
Next copy the provided typings.json file and the msportalfx-test.d.ts file from the node_modules/msportalfx-test/typescript folder to your test root directory and use typings to install the provided definitions:
 *copy typings.json to your test root directory*
 *navigate to your test root directory*
 typings install
MsPortalFx-Test needs a WebDriver server in order to be able to drive the browser. Currently only ChromeDriver is supported, so downloaded it and place it in your machine's PATH or just install it from the chromedriver Node module. You may also need a C++ compiler (Visual Studio includes one):
npm install chromedriver
You'll need an existing cloud service for the test you'll write below, so if you don't have one please go to the Azure Portal and create a new cloud service. Write down the dns name of your cloud service to use it in your test.
We'll use the Mocha testing framework to layout the following test, but you could use any framework that supports Node.js modules and promises. Let's install Mocha and its typescript definitions:
npm install mocha
npm install @types/mocha
Now, create a portaltests.ts file in your e2etests directory and paste the following:
/// <reference path="./typings/index.d.ts" />

import assert = require('assert');
import testFx = require('MsPortalFx-Test');
import nconf = require('nconf');
import until = testFx.until;

describe('Cloud Service Tests', function () {
	this.timeout(0);

	it('Can Browse To A Cloud Service', () => {


        // Load command line arguments, environment variables and config.json into nconf
        nconf.argv()
            .env()
            .file(__dirname + "/config.json");

        //provide windows credential manager as a fallback to the above three
        nconf[testFx.Utils.NConfWindowsCredentialManager.ProviderName] = testFx.Utils.NConfWindowsCredentialManager;
        nconf.use(testFx.Utils.NConfWindowsCredentialManager.ProviderName);


		testFx.portal.portalContext.signInEmail = 'johndoe@outlook.com';
		testFx.portal.portalContext.signInPassword = nconf.get('msportalfx-test/johndoe@outlook.com/signInPassword');

		// Update this variable to use the dns name of your actual cloud service
		let dnsName = "mycloudservice";

		return testFx.portal.openBrowseBlade('microsoft.classicCompute', 'domainNames', "Cloud services (classic)").then((blade) => {
			return blade.filterItems(dnsName);
		}).then((blade) => {
            return testFx.portal.wait<testFx.Controls.GridRow>(() => {
                return blade.grid.rows.count().then((count) => {
                    return count === 1 ? blade.grid.rows.first() : null;
                });
            }, null, "Expected only one row matching '" + dnsName + "'.");
        }).then((row) => {
            return row.click();
		}).then(() => {
			let summaryBlade = testFx.portal.blade({ title: dnsName + " - Production" });
            return testFx.portal.wait(until.isPresent(summaryBlade));
		}).then(() => {
			return testFx.portal.quit();
		});
	});
});
cmdkey /generic:msportalfx-test/johndoe@outlook.com/signInPassword /user:johndoe@outlook.com /pass:somePassword
Remember to replace "mycloudservice" with the dns name of your actual cloud service.
In this test we start by importing the MsPortalFx-Test module. Then the credentials are specified for the user that will sign in to the Portal. These should be the credentials of a user that already has an active Azure subscription.
After that we can use the Portal object to drive a test scenario that opens the Cloud Services Browse blade, filters the list of cloud services, checks that the grid has only one row after the filter, selects the only row and waits for the correct blade to open. Finally, the call to quit() closes the browser.
Create a file named config.json next to portaltests.ts. Paste this in the file:
```json

	{
	"capabilities": {
		"browserName": "chrome"
	},
	"portalUrl": "https://portal.azure.com"
	}

```
This configuration tells MsPortalFx-Test that Google Chrome should be used for the test session and https://portal.azure.com should be the Portal under test.
Compile your TypeScript test file (note if you are using a newer version of TSC than 1.8 then you may need to pass in additional flags that aren't present in older versions of TSC):
(TSC 1.8) tsc portaltests.ts --module commonjs
(TSC 3+) tsc portaltests.ts --module commonjs --lib es2015 --moduleResolution classic
...and then run Mocha against the generated JavaScript file (note using an elevated command prompt may cause Chrome to crash. Use a non-elevated command prompt for best results):
node_modules\.bin\mocha portaltests.js
The following output will be sent to your console as the test progresses:
  Portal Tests
Opening the Browse blade for the microsoft.classicCompute/domainNames resource type...
Starting the ChromeDriver process...
Performing SignIn...
Waiting for the Portal...
Waiting for the splash screen to go away...
Applying filter 'mycloudservice'...
    √ Can Browse To A Cloud Service (37822ms)

  1 passing (38s)
If you run into a compilation error with node.d.ts, verify that the tsc version you are using matches the compilation command above. You can check the version by running:
tsc --version
If the version is incorrect, then you may need to adjust your path variables or directly call the correct version of tsc.exe. A version of tsc is usually included in the node_modules folder at node_modules/.bin/tsc that can be used.
If you see errors regarding duplicate identifiers due to some definitions being imported twice, you can try setting moduleResolution compiler option to classic in your tsconfig.json file.
In order to keep up to date with the latest changes, we recommend that you update whenever a new version of MsportalFx-Test is released. npm install will automatically pull the latest version of msportalfx-test.
Make sure to copy typescript definition files in your *typings\* folder from the updated version in *\node_modules\msportalfx-test\typescript*.
More examples can be found
If you don't have access, please follow the enlistment instructions below.
Install Node Tools for Visual Studio (Note that we recommend using the Node.js “LTS” versions rather than the “Stable” versions since sometimes NTVS doesn’t work with newer Node.js versions.)
Once that’s done, you should be able to open Visual Studio and then create new project: New -> Project -> Installed, Templates, TypeScript, Node.js -> From Existing Node.js code.


You can use MsPortalFx-Test to write end to end tests that side load your local extension in the Portal. You can do this by specifying additional options in the Portal object. If you have not done so, please take a look at the Installation section of this page to learn how to get started with MsPortalFx-Test.
We'll write a test that verifies that the Browse experience for our extension has been correctly implemented. But before doing that we should have an extension to test and something to browse to, so let's work on those first.
To prepare the target extension and resource:
Create a new Portal extension in Visual Studio following these steps and then hit CTRL+F5 to get it up and running. For the purpose of this example we named the extension 'LocalExtension' and we made it run in the default https://localhost:44300 address.
That should have taken you to the Portal, so sign in and then go to New --> Marketplace --> Local Development --> LocalExtension --> Create.
In the My Resource blade, enter theresource as the resource name, complete the required fields and hit Create.
Wait for the resource to get created.
To write a test verifies the Browse experience while side loading your local extension:
Create a new TypeScript file called localextensiontests.ts.
In the created file, import the MsPortalFx-Test module and layout the Mocha test:
/// <reference path="./typings/index.d.ts" />

import assert = require('assert');
import testFx = require('MsPortalFx-Test');
import until = testFx.until;

describe('Local Extension Tests', function () {
	this.timeout(0);

	it('Can Browse To The Resource Blade', () => {

	});
});
In the Can Browse To The Resource Blade test body, specify the credentials for the test session (replace with your actual Azure credentials):
// Hardcoding credentials to simplify the example, but you should never hardcode credentials
testFx.portal.portalContext.signInEmail = 'johndoe@outlook.com';
testFx.portal.portalContext.signInPassword = '12345';
Now, use the features option of the portal.PortalContext object to enable the canmodifyextensions feature flag and use the testExtensions option to specify the name and address of the local extension to load:
testFx.portal.portalContext.features = [{ name: "feature.canmodifyextensions", value: "true" }];
testFx.portal.portalContext.testExtensions = [{ name: 'LocalExtension', uri: 'https://localhost:44300/' }];
Let's also declare a variable with the name of the resource that the test will browse to:
let resourceName = 'theresource';
To be able to open the browse blade for our resource we'll need to know three things: The resource provider, the resource type and the title of the blade. You can get all that info from the Browse PDL implementation of your extension. In this case the resource provider is Microsoft.PortalSdk, the resource type is rootResources and the browse blade title is My Resources. With that info we can call the openBrowseBlade function of the Portal object:
return testFx.portal.openBrowseBlade('Microsoft.PortalSdk', 'rootResources', 'My Resources')
From there on we can use the returned Blade object to filter the list, verify that only one row remains after filtering and select that row:
.then((blade) => {
    return testFx.portal.wait<testFx.Controls.GridRow>(() => {
        return blade.grid.rows.count().then((count) => {
            return count === 1 ? blade.grid.rows.first() : null;
        });
    }, null, "Expected only one row matching '" + resourceName + "'.");
}).then((row) => {
    return row.click();
})
And finally we'll verify the correct blade opened and will close the Portal when done:
.then(() => {
	let summaryBlade = testFx.portal.blade({ title: resourceName });
	return testFx.portal.wait(until.isPresent(summaryBlade));
}).then(() => {
	return testFx.portal.quit();
});
Here for the complete test:
/// <reference path="./typings/index.d.ts" />

import assert = require('assert');
import testFx = require('MsPortalFx-Test');
import until = testFx.until;

describe('Local Extension Tests', function () {
    this.timeout(0);

    it('Can Browse To The Resource Blade', () => {
        // Hardcoding credentials to simplify the example, but you should never hardcode credentials
        testFx.portal.portalContext.signInEmail = 'johndoe@outlook.com';
        testFx.portal.portalContext.signInPassword = '12345';
        testFx.portal.portalContext.features = [{ name: "feature.canmodifyextensions", value: "true" }];
        testFx.portal.portalContext.testExtensions = [{ name: 'LocalExtension', uri: 'https://localhost:44300/' }];

        let resourceName = 'theresource';

        return testFx.portal.openBrowseBlade('Microsoft.PortalSdk', 'rootResources', 'My Resources').then((blade) => {
            return blade.filterItems(resourceName);
        }).then((blade) => {
            return testFx.portal.wait<testFx.Controls.GridRow>(() => {
                return blade.grid.rows.count().then((count) => {
                    return count === 1 ? blade.grid.rows.first() : null;
                });
            }, null, "Expected only one row matching '" + resourceName + "'.");
        }).then((row) => {
            return row.click();
        }).then(() => {
            let summaryBlade = testFx.portal.blade({ title: resourceName });
            return testFx.portal.wait(until.isPresent(summaryBlade));
        }).then(() => {
            return testFx.portal.quit();
        });
    });
});
To add the required configuration and run the test:
Create a file named config.json next to localextensiontests.ts. Paste this in the file:
{
  "capabilities": {
    "browserName": "chrome"
  },
  "portalUrl": "https://portal.azure.com"
}
Compile your TypeScript test file:
tsc localextensiontests.ts --module commonjs
Run Mocha against the generated JavaScript file:
node_modules\.bin\mocha localextensiontests.js
The following output will be sent to your console as the test progresses:
  Local Extension Tests
Opening the Browse blade for the Microsoft.PortalSdk/rootResources resource type...
Starting the ChromeDriver process...
Performing SignIn...
Waiting for the Portal...
Waiting for the splash screen...
Allowing trusted extensions...
Waiting for the splash screen to go away...
Applying filter 'theresource'...
    √ Can Browse To The Resource Blade (22872ms)


  1 passing (23s)
Running mocha nodejs tests in cloudtest requires a bit of engineering work to set up the test VM. Unfortunetly, the nodejs test adaptor cannot be used with vs.console.exe since it requires a full installation of Visual Studio which is absent on the VMs. Luckily, we can run a script to set up our environment and then the Exe Execution type for our TestJob against the powershell/cmd executable.
Nodejs (and npm) is already installed on the cloudtest VMs. Chrome is not installed by default, so we can include the chrome executable in our build drop for quick installation.
setup.bat
cd UITests
call npm install --no-optional
call npm install -g typescript
call "%APPDATA%\npm\tsc.cmd"
call chrome_installer.exe /silent /install
exit 0
Use the Exe execution type in your TestJob to specify the powershell (or cmd) exe. Then, point to a script which will run your tests:
TestGroup.xml
<TestJob Name="WorkspaceExtension.UITests" Type="SingleBox" Size="Small" Tags="Suite=Suite0">
    <Execution Type="Exe" Path="C:\Windows\System32\WindowsPowerShell\v1.0\powershell.exe" Args='[SharedWorkingDirectory]\UITests\RunTests.ps1' />
</TestJob>
At the end of your script you will need to copy the resulting trx file to the TestResults folder where Cloudtest expects to pick it up from. To generate a trx file, we used the mocha-trx-reporter npm package. To pass secrets to cloudtest, you can either use test secretstore which has been configured to use a certificate installed on all cloudtest VMs for particular paths, or one of the other solutions shown here
RunTests.ps1
cd ..\UITests

$env:USER_EMAIL = ..\StashClient\StashClient.exe -env:test pgetdecrypted -name:Your/Secret/Path -cstorename:My -cstorelocation:LocalMachine -cthumbprint:0000000000000000000000000000000000000000

$env:USER_PASSWORD = ..\StashClient\StashClient.exe -env:test pgetdecrypted -name:Your/Secret/Path -cstorename:My -cstorelocation:LocalMachine -cthumbprint:0000000000000000000000000000000000000000

$env:TEST_ENVIRONMENT = [environment]::GetEnvironmentVariable("TEST_ENVIRONMENT","Machine")

mocha WorkspaceTests.js --reporter mocha-trx-reporter --reporter-file ./TestResults/result.trx

xcopy TestResults\* ..\TestResults
To pass non-secret parameters to your cloudtest session (and the msportalfx-tests) use the props switch when kicking off a cloudtest session. The properties will become machine level environment variables on your cloudtest VM. Once these are set as environment variables of the session, you can use nconf to pick them up in your UI test configuration.
ct -t "amd64\CloudTest\TestMap.xml" -tenant Default -BuildId "GUID" -props worker:TEST_ENVIRONMENT=canary
See WAES
If you run mocha with the --debug-brk flag, you can press F5 and the project will attach to a debugger.
Sometimes it is useful to get the result of the currently running test, for example: you want to take a screenshot only when the test fails.
    afterEach(function () {
        if (this.currentTest.state === "failed") {
            return testSupport.GatherTestFailureDetails(this.currentTest.title);
        }
    });
One thing to watch out for in typescript is how lambda functions, "() => {}", behave. Lambda functions (also called "fat arrow" sometimes) in Typescript capture the "this" variable from the surrounding context. This can cause problems when trying to access Mocha's current test state. See arrow functions for details.
This is an example of how to take a screenshot of what is currently displayed in the browser.
//1. import test fx
import testFx = require('MsPortalFx-Test');
...
    var screenshotPromise = testFx.portal.takeScreenshot(ScreenshotTitleHere);
Taking a screenshot when there is a test failure is a handy way to help diagnose issues. If you are using the mocha test runner, then you can do the following to take a screenshot whenever a test fails:
import testFx = require('MsPortalFx-Test');
...

    afterEach(function () {
        if (this.currentTest.state === "failed") {
            return testSupport.GatherTestFailureDetails(this.currentTest.title);
        }
    });
When trying to identify reasons for failure of a test its useful to capture the console logs of the browser that was used to execute your test. You can capture the logs at a given level e.g error, warning, etc or at all levels using the LogLevel parameter. The following example demonstrates how to call getBrowserLogs and how to work with the result. getBrowserLogs will return a Promise of string[] which when resolved will contain the array of logs that you can view during debug or write to the test console for later analysis.
import testFx = require('MsPortalFx-Test');
...

        await testFx.portal.goHome(20000);
        const logs = await testFx.portal.getBrowserLogs(LogLevel.All);
        assert.ok(logs.length > 0, "Expected to collect at least one log.");
This document will describe the behavior and list common configuration settings used by the MsPortalFx-Test framework.
The test framework will search for a config.json in the current working directory (usually the directory the test is invoked from). If no config.json is found then it will check the parent folder for a config.json (and so on...).
This file contains a list of configuration values used by the test framework for context when running tests against the portal. These values are mutable to allow test writers to set the values in cases where they prefer not to store them in the config.json. We strongly recommend that passwords should not be stored in the config.json file.
import TestExtension = require("./TestExtension");
import Feature = require("./Feature");
import BrowserResolution = require("./BrowserResolution");
import Timeout = require("./Timeout");

/**
 * Represents The set of options used to configure a Portal instance.
 */
interface PortalContext {
    /**
     * The set of capabilities enabled in the webdriver session.
     * For a list of available capabilities, see https://github.com/SeleniumHQ/selenium/wiki/DesiredCapabilities
     */
    capabilities: {
        /**
         * The name of the browser being used; should be one of {chrome}
         */
        browserName: string;

        /**
         * Chrome-specific supported capabilities.
         */
        chromeOptions: {
            /**
             * List of command-line arguments to use when starting Chrome.
             */
            args: string[]
        };

        /**
         * The desired starting browser's resolution in pixels.
         */
        browserResolution: BrowserResolution;
    };
    /**
     * The path to the ChromeDriver binary.
     */
    chromeDriverPath?: string;
    /**
     * The url of the Portal.
     */
    portalUrl: string;
    /**
     * The url of the page where signin is performed.
     */
    signInUrl?: string;
    /**
     * Email of the user used to sign in to the Portal.
     */
    signInEmail?: string;
    /**
     * Password of the user used to sign in to the Portal.
     */
    signInPassword?: string;
    /**
     * The set of features to enable while navigating within the Portal.
     */
    features?: Feature[];
    /**
     * The list of patch files to load within the Portal.
     */
    patches?: string[];
    /**
     * The set of extensions to side load while navigating within the Portal.
     */
    testExtensions?: TestExtension[];
    /**
     * The set of timeouts used to override the default timeouts.
     * e.g.
     * timeouts: {
     *      timeout: 15000  //Overrides the default short timeout of 10000 (10 seconds).
     *      longTimeout: 70000 //Overrides the default long timetout of 60000 (60 seconds).
     * }
     */
    timeouts?: Timeout;
}

export = PortalContext;
In order to run tests against the Dogfood test environment, you will need to update the follow configuration settings in the config.json:
{
  portalUrl: https://df.onecloud.azure-test.net/,
  signInUrl: https://login.windows-ppe.net/
}
To open/navigate to the create blade a gallery package previously deployed to the Azure Marketplace you can use portal.openGalleryCreateBlade. The returned promise will resolve with the CreateBlade defined by that gallery package.
import TestFx = require('MsPortalFx-Test');
...
FromLocalPackage
        await testFx.portal.openGalleryCreateBladeFromLocalPackage(
            extensionResources.samplesExtensionStrings.Engine.engineNoPdl,     //title of the item in the marketplace e.g "EngineNoPdlV1"
            extensionResources.samplesExtensionStrings.Engine.createEngine, //the title of the blade that will be opened e.g "Create Engine"
            10000);                                                         //an optional timeout to wait on the blade
        await createEngineBlade.checkFieldValidation();
        await createEngineBlade.fillRequiredFields(resourceName, "800cc", "type1", subscriptionName, resourceName, locationDescription);
        await createEngineBlade.reviewAndCreateButton.click();
        await testFx.portal.wait(async () => !await createEngineBlade.createButton.hasClass(CssClassNames.Controls.buttonDisabled));
        await createEngineBlade.createButton.click();
        await testFx.portal.wait(
            until.isPresent(testFx.portal.blade({ title: `${extensionResources.samplesExtensionStrings.Engine.engineNoPdl} - Overview` })),
            120000,
            "The resource blade was not opened, could be deployment timeout.");

...
To open/navigate to the create blade a local gallery package that has been side loaded into the portal along with your extension you can use portal.openGalleryCreateBladeFromLocalPackage. The returned promise will resolve with the CreateBlade defined by that gallery package.
import TestFx = require('MsPortalFx-Test');
...

        await testFx.portal.openGalleryCreateBladeFromLocalPackage(
            extensionResources.samplesExtensionStrings.Engine.engineNoPdl,     //title of the item in the marketplace e.g "EngineNoPdlV1"
            extensionResources.samplesExtensionStrings.Engine.createEngine, //the title of the blade that will be opened e.g "Create Engine"
            10000);                                                         //an optional timeout to wait on the blade
        await createEngineBlade.checkFieldValidation();
        await createEngineBlade.fillRequiredFields(resourceName, "800cc", "type1", subscriptionName, resourceName, locationDescription);
        await createEngineBlade.reviewAndCreateButton.click();
        await testFx.portal.wait(async () => !await createEngineBlade.createButton.hasClass(CssClassNames.Controls.buttonDisabled));
        await createEngineBlade.createButton.click();
        await testFx.portal.wait(
            until.isPresent(testFx.portal.blade({ title: `${extensionResources.samplesExtensionStrings.Engine.engineNoPdl} - Overview` })),
            120000,
            "The resource blade was not opened, could be deployment timeout.");

...
FormElement exposes two useful functions for working with the ValidationState of controls.
The function getValidationState returns a promise that resolves with the current state of the control and can be used as follows
import TestFx = require('MsPortalFx-Test');
...

        //click the createButton on the create blade to fire validation
        await this.createButton.click();
        //get the validation state of the control
        await this.element(By.chained(By.className("fxs-blade-statusbg"), By.className("fxs-bg-error")));
        await this.element(By.className(tabClass)).click();
        const state = await this.primaryEngine.getValidationState();
        //assert state matches expected
        assert.equal(state, testFx.Constants.ControlValidationState.invalid, "name should have invalid state");

...
The function waitOnValidationState(someState, optionalTimeout) returns a promise that resolves when the current state of the control is equivalent to someState supplied. This is particularly useful for scenarions where you may be performing serverside validation and the control remains in a pending state for the duration of the network IO.
import TestFx = require('MsPortalFx-Test');
...

        //change the value to initiate validation
        await this.element(By.className(tabClass)).click();
        await this.primaryEngine.sendKeys(nameTxt + webdriver.Key.TAB);
        //wait for the control to reach the valid state
        await this.primaryEngine.waitOnValidationState(testFx.Constants.ControlValidationState.valid);
...
There is a simple abstraction available in MsPortalFx.Tests.Browse. You can use it as follows:
//1. import test fx
import TestFx = require('MsPortalFx-Test');

...

it("Can Use Context Click On Browse Grid Rows", () => {
    ...
//2. Setup an array of commands that are expected to be present in the context menu
//  and call the contextMenuContainsExpectedCommands on Tests.Browse.
    //  The method will assert expectedCommands match what was displayed

        const expectedContextMenuCommands: Array<string> = [
            PortalFxResources.pinToDashboard,
            extensionResources.hubsExtension.resourceGroups.deleteResourceGroupLabel
        ];
        await testFx.Tests.Browse.contextMenuContainsExpectedCommands(
            resourceProvider, // the resource provider e.g "microsoft.classicCompute"
            resourceType, // the resourceType e.g "domainNames"
            resourceBladeTitle, // the resource blade title "Cloud services (classic)"
            2, // Invoke context menu with right click on a column that does not contain links
            expectedContextMenuCommands)
});
There is a simple abstraction available in MsPortalFx.Tests.Browse. You can use it as follows:
//1. import test fx
import TestFx = require('MsPortalFx-Test');

...

it("Browse contains default columns with expected column header", () => {
 // 2. setup an array of expectedDefaultColumns to be shown in browse

    const expectedDefaultColumns: Array<testFx.Tests.Browse.ColumnTestOptions> =
        [
            { columnLabel: extensionResources.hubsExtension.resourceGroups.browse.columnLabels.name },
            { columnLabel: extensionResources.hubsExtension.resourceGroups.browse.columnLabels.subscription },
            { columnLabel: extensionResources.hubsExtension.resourceGroups.browse.columnLabels.location },
        ];

// 3. call the TestFx.Tests.Browse.containsExpectedDefaultColumns function.
// This function this will perform a reset columns action in browse and then assert
// the expectedDefaultColumns match what is displayed

        return testFx.Tests.Browse.containsExpectedDefaultColumns(
            resourceProvider,
            resourceType,
            resourceBladeTitle,
            expectedDefaultColumns);
}
There is a simple abstraction available in MsPortalFx.Tests.Browse that asserts extension resource specific columns can be selected in browse and that after selection they show up in the browse grid.
the function is called canSelectResourceColumns. You can use it as follows:
// 1. import test fx
import TestFx = require('MsPortalFx-Test');

...

it("Can select additional columns for the resourcetype and columns have expected title", () => {

// 2. setup an array of expectedDefaultColumns to be shown in browse

    const expectedDefaultColumns: Array<testFx.Tests.Browse.ColumnTestOptions> =
        [
            { columnLabel: extensionResources.hubsExtension.resourceGroups.browse.columnLabels.name },
            { columnLabel: extensionResources.hubsExtension.resourceGroups.browse.columnLabels.subscription },
            { columnLabel: extensionResources.hubsExtension.resourceGroups.browse.columnLabels.location },
        ];

// 3. setup an array of columns to be selected and call the TestFx.Tests.Browse.canSelectResourceColumns function.
// This function this will perform:
//   - a reset columns action in browse
//   - select the provided columnsToSelect
//   - assert that brows shows the union of
// the expectedDefaultColumns match what is displayed expectedDefaultColumns and columnsToSelect

        const columnsToSelect: Array<testFx.Tests.Browse.ColumnTestOptions> =
            [
                { columnLabel: extensionResources.hubsExtension.resourceGroups.browse.columnLabels.locationId },
                { columnLabel: extensionResources.hubsExtension.resourceGroups.browse.columnLabels.resourceGroupId },
                { columnLabel: extensionResources.hubsExtension.resourceGroups.browse.columnLabels.status },
                { columnLabel: extensionResources.hubsExtension.resourceGroups.browse.columnLabels.subscriptionId },
            ];
        return testFx.Tests.Browse.canSelectResourceColumns(
            resourceProvider,
            resourceType,
            resourceBladeTitle,
            expectedDefaultColumns,
            columnsToSelect);
}
To navigate to blades within msportalfx-test can use one of several approaches
via a deep link to the blade using the portal.navigateToUriFragment function e.g
import testFx = require('MsPortalFx-Test');
...

    const resourceName = resourcePrefix + guid.newGuid();
    const createOptions = {
        name: resourceName,
        resourceGroup: resourceGroupName,
        location: locationId,
        resourceProvider: resourceProvider,
        resourceType: resourceType,
        resourceProviderApiVersion: resourceProviderApiVersion,
        properties: {
            displacement: "600cc",
            model: "type1",
            status: 0
        }
    };
    const resourceId = await testSupport.armClient.createResource(createOptions);
    //form deep link to the quickstart blade
    await testFx.portal.navigateToUriFragment(`blade/SamplesExtension/EngineQuickStartBlade/id/${encodeURIComponent(resourceId)}`, timeouts.defaultLongTimeout);
    return testFx.portal.wait(ExpectedConditions.isPresent(testFx.portal.blade({ title: resourceId, bladeType: QuickStartBlade })), timeouts.defaultLongTimeout, "Quickstart blade was not found.");
via clicking on another ux component that opens the blade
// New sample needed
via portal.open* functions open common portal blades like create, browse and resource summary blades. See Opening common portal blades
via portal.search function to search for, and open browse and resource blades
import testFx = require('MsPortalFx-Test');
...

//     const subscriptionsBlade = testFx.portal.blade({ title: testSupport.subscription });

//     testFx.portal.portalContext.features.push({ name: "feature.resourcemenu", value: "true" });
//     return testFx.portal.goHome().then(() => {
//         return testFx.portal.search(testSupport.subscription);
//     }).then((results) => {
//         return testFx.portal.wait<SearchResult>(() => {
//             const result = results[0];
//             return result.title.getText().then((title) => {
//                 return title === testSupport.subscription ? result : null;
//             });
//         });
//     }).then((result) => {
//         return result.click();
//     }).then(() => {
//         return testFx.portal.wait(until.isPresent(subscriptionsBlade));
//     });
There are several approaches that can be used for locating an already opened blade use testfx.portal.blade.
by blade title
const resourceBlade = testFx.portal.blade({ title: resourceGroupName });
by using an existing blade type and its predefined locator
var pickerBlade = testFx.portal.blade({ bladeType: SpecPickerBlade, title: resources.choosePricingTier });
See Opening an extensions gallery package create blade
To open/navigate to the Browse blade from resource type you can use portal.openBrowseBlade. The returned promise will resolve with the browse blade.
import testFx = require('MsPortalFx-Test');
...

        const blade = await testFx.portal.openBrowseBlade(resourceProvider, resourceType, resourceBladeTitle, timeouts.defaultLongTimeout);

...
To open/navigate to the Resource Summary blade for a specific resource you can use portal.openResourceBlade. The returned promise will resolve with the Resource summary blade for the given resource.
import testFx = require('MsPortalFx-Test');
...

        const result = await testSupport.armClient.createResourceGroup(resourceGroupName, locationId);
        await testFx.portal.openResourceBlade(result.resourceGroup.id, result.resourceGroup.name, 70000);
        await resourceBlade.clickCommand(extensionResources.hubsExtension.resourceGroups.deleteResourceGroupLabel);
...
The SpecPickerBlade can be used to select/change the current spec of a resource. The following example demonstrates how to navigate to the spec picker for a given resource then changes the selected spec.
//1. imports
import testFx = require('MsPortalFx-Test');
import SpecPickerBlade = testFx.Parts.SpecPickerBlade;


        const pricingTierBlade = testFx.portal.blade({ title: extensionResources.samplesExtensionStrings.PricingTierBlade.title });
        //2. Open navigate blade and select the pricing tier part.
        // Note if navigating to a resourceblade use testFx.portal.openResourceBlade and blade.element
        await testFx.portal.navigateToUriFragment("blade/SamplesExtension/PricingTierV3Blade", 75000);
        await pricingTierBlade.waitUntilBladeAndAllTilesLoaded();
        const pricingTierPart: PricingTierPart = testFx.portal.element(PricingTierPart);
        await pricingTierPart.click();
        //3. get a reference to the picker blade and pick a spec
        var pickerBlade = testFx.portal.blade({ bladeType: SpecPickerBlade, title: extensionResources.choosePricingTier });
        await pickerBlade.pickSpec(extensionResources.M);
There are also several API's available to make testing common functionality within browse such as context menu commands and column picking fucntionality for more details see Browse Scenarios.
Navigation to the PropertiesBlade is done via the resource summary blade. The following demonstrates how to navigate to the properties blade
import testFx = require('MsPortalFx-Test');
...
//2. navigate to the properties blade from the resource blade and check the value of one of the properties

        const resourceBlade = await testFx.portal.openResourceBlade(resourceId, resourceName, 70000);
        await resourceBlade.openMenuItem(PortalFxResources.properties);
        const expectedPropertiesCount = 6;
        await testFx.portal.wait(async () => {
            const properties = resourcePropertiesParentBlade.getAllDetailBladeItems(testFx.Parts.PartProperty);
            const count = await properties.count();
            return count === expectedPropertiesCount;
        }, null, testFx.Utils.String.format("Expected to have {0} properties in the Properties blade.", expectedPropertiesCount));
        const locator = new testFx.Parts.PartProperty().buildLocator({ name: PortalFxResources.nameLabel });
        const property = resourcePropertiesParentBlade.detailBlade.element(locator).asType(testFx.Parts.PartProperty);
        const nameProperty = await testFx.portal.wait(async () => {
            const copyableLabel = property.value.element(testFx.Controls.CopyableLabel);
            const present = await copyableLabel.isPresent();
            const nameProperty = present && await copyableLabel.value();
            return nameProperty || await property.value.getText();
        });
        return assert.equal(nameProperty, resourceName, testFx.Utils.String.format("Expected the value for the 'NAME' property to be '{0}' but found '{1}'.", resourceName, nameProperty));

...
Using a deep link you can navigate directly into a QuickStartBlade for a resource with Portal.navigateToUriFragment.
import testFx = require('MsPortalFx-Test');
...

        const resourceName = resourcePrefix + guid.newGuid();
        const createOptions = {
            name: resourceName,
            resourceGroup: resourceGroupName,
            location: locationId,
            resourceProvider: resourceProvider,
            resourceType: resourceType,
            resourceProviderApiVersion: resourceProviderApiVersion,
            properties: {
                displacement: "600cc",
                model: "type1",
                status: 0
            }
        };
        const resourceId = await testSupport.armClient.createResource(createOptions);
        //form deep link to the quickstart blade
        await testFx.portal.navigateToUriFragment(`blade/SamplesExtension/EngineQuickStartBlade/id/${encodeURIComponent(resourceId)}`, timeouts.defaultLongTimeout);
        return testFx.portal.wait(ExpectedConditions.isPresent(testFx.portal.blade({ title: resourceId, bladeType: QuickStartBlade })), timeouts.defaultLongTimeout, "Quickstart blade was not found.");
While deeplinking is fast it does not validate that the user can actually navigate to a QuickStartBlade via a ResourceSummaryPart on a resource summary blade. The following demonstrates how to verify the user can do so.
import testFx = require('MsPortalFx-Test');
...
//1. model your resource summary blade which contains a resource summary part

import Blade = testFx.Blades.Blade;
import ResourceSummaryControl = testFx.Controls.Essentials;

class SummaryBlade extends Blade {
    public essentialsPart = this.element(ResourceSummaryControl);
}

...
//2. navigate to the quickstart and click a link

        const expectedEndTitle = resourceGroupName + " - " + PortalFxResx.quickStartMenu;

        const resourceBlade = await testFx.portal.openResourceBlade(resourceGroupId, resourceGroupName, timeouts.defaultLongTimeout);
        //click to open the quickstart blade
        await resourceBlade.openMenuItem(PortalFxResx.quickStartMenu);
        await testFx.portal.wait(() => {
            return testFx.portal.blade({ title: expectedEndTitle });
        }, null, "Title of the blade should update to include the Quickstart suffix");

...
Using a deep link you can navigate directly into the user access blade for a resource with Portal.navigateToUriFragment.
import testFx = require('MsPortalFx-Test');
...

        const resourceName = resourcePrefix + guid.newGuid();
        const createOptions = {
            name: resourceName,
            resourceGroup: resourceGroupName,
            location: locationId,
            resourceProvider: resourceProvider,
            resourceType: resourceType,
            resourceProviderApiVersion: resourceProviderApiVersion,
            properties: {
                displacement: "600cc",
                model: "type2",
                status: 0
            }
        };

        const resourceId = await testSupport.armClient.createResource(createOptions);
        //form deep link to the quickstart blade
        await testFx.portal.navigateToUriFragment(`blade/Microsoft_Azure_AD/UserAssignmentsBlade/scope/${resourceId}`, timeouts.defaultLongTimeout);
        return await testFx.portal.wait(ExpectedConditions.isPresent(testFx.portal.element(testFx.Blades.UsersBlade)));
While deeplinking is fast it does not validate that the user can actually navigate to a UsersBlade via a ResourceSummaryPart on a resource summary blade. The following demonstrates how to verify the user can do so.
import testFx = require('MsPortalFx-Test');
...
//1. model your resource summary blade which contains a resource summary part

import Blade = testFx.Blades.Blade;
import ResourceSummaryControl = testFx.Controls.Essentials;

class SummaryBlade extends Blade {
    public essentialsPart = this.element(ResourceSummaryControl);
}

...
//2. navigate to the quickstart and click a link

        const expectedEndTitle = resourceGroupName + " - " + PortalFxResx.usersMenu;

        const resourceBlade = await testFx.portal.openResourceBlade(resourceGroupId, resourceGroupName, timeouts.defaultLongTimeout);
        //click to open the user access blade
        await resourceBlade.openMenuItem(PortalFxResx.usersMenu);
        await testFx.portal.wait(() => {
            return testFx.portal.blade({ title: expectedEndTitle });
        }, null, "Title of the blade should update to include the Users suffix");

...
The MoveResourcesBlade represents the portals blade used to move resources from a resource group to a new resource group portal.startMoveResource provides a simple abstraction that will iniate the move of an existing resource to a new resource group. The following example demonstrates how to initiate the move and then wait on successful notification of completion.
import testFx = require('MsPortalFx-Test');
...

        await testFx.portal.startMoveResource(
            {
                resourceId: resourceId,
                targetResourceGroup: newResourceGroup,
                createNewGroup: true,
                subscriptionName: subscriptionName,
                timeout: 120000
            });
        return await testFx.portal.element(NotificationsPane).waitForNewNotification(portalFxResources.movingResourcesComplete, null, 5 * 60 * 1000);
On some blades you may use commands that cause a blade dialog that generally required the user to perform some acknowledgement action.
The Blade class exposes a dialog function that can be used to locate the dialog on the given blade and perform an action against it.
The following example demonstrates how to:
import testFx = require('MsPortalFx-Test');
...

        const samplesBlade = testFx.portal.blade({ title: "Samples", bladeType: SamplesBlade });
        await testFx.portal.goHome(70000);
        await testFx.portal.navigateToUriFragment("blade/InternalSamplesExtension/BladeWithToolbar");
        let blade = testFx.portal.blade({ title: extensionResources.samplesExtensionStrings.SamplesBlade.bladeWithToolbar });
        blade = await blade.clickCommand("Form");
        //get a reference to a dialog by title
        let dialog = blade.dialog({ title: "Form" });
        //sending keys to a field in a dialog
        await dialog.field(testFx.Controls.TextField, { label: "Form" }).sendKeys("Something goes here");
        //clicking a button within a dialog
        await dialog.clickButton(extensionResources.ok);
let thePart = blade.element(testFx.Parts.ResourceSummaryPart);
let thePart = blade.part({innerText: "some part text"});
let thePart = blade.element(By.Classname("myPartClass")).AsType(testFx.Parts.Part);
The following example demonstrates how to:
blade.element(...).collectionPart.getRollupCount()collectionPart.getRollupLabel()collectionPart.grid.rows
    it("Can get rollup count, rollup label and grid", async () => {
        const collectionBlade = testFx.portal.blade({ title: "Collection" });

        await testFx.portal.navigateToUriFragment("blade/SamplesExtension/CollectionPartIntrinsicInstructions");
        await testFx.portal.wait(() => collectionBlade.waitUntilBladeAndAllTilesLoaded());
        const collectionPart = collectionBlade.element(testFx.Parts.CollectionPart);
        const rollupCount = await collectionPart.getRollupCount();
        assert.equal(4, rollupCount, "expected rollupcount to be 4");
        const label = await collectionPart.getRollupLabel();
        assert.equal(extensionResources.samplesExtensionStrings.Robots, label, "expected rollupLabel is Robots");
        const count = await collectionPart.grid.rows.count();
        assert.ok(count > 0, "expect the grid to have rows");
    });
Note if you have multiple collection parts you may want to use blade.part(...) to search by text.
The following demonstrates how to use Grid.findRow to:
GridRow with the given text at the specified indexGridRow.cells.getText
            const row = await grid.findRow({ text: "John", cellIndex: 0 });
            const texts = await row.cells.getText();
            return texts.length > 2 && texts[0] === "John" && texts[1] === "333";
use this for modeling the resouce group CreateComboBoxField on create blades.
selectOption(...) to chose an existing resource groupsetCreateValue(...) and getCreateValue(...) to get and check the value of the create new field respectivelyreturn testFx.portal.goHome(40000).then(() => {
//1. get a reference to the create blade
return testFx.portal.openGalleryCreateBlade(
galleryPackageName, //the gallery package name e.g "Microsoft.CloudService"
bladeTitle, //the title of the blade e.g "Cloud Services"
timeouts.defaultLongTimeout //an optional timeout to wait on the blade
)
}).then((blade: testFx.Blades.CreateBlade) => {
//2. find the CreateComboBoxField
var createComboField = blade.element(CreateComboBoxField);
//3. set the value of the Create New text field for the resource group
return createComboField.setCreateValue("NewValue")
.then(() =>
createComboField.getCreateValue()
).then((value) =>
assert.equal("NewValue", value, "Set resource group name")
).then(() =>
createComboField.selectOption("OldValue_4")
).then(() =>
createComboField.getDropdownValue()
).then((value) =>
assert.equal("OldValue_4", value, "Set create combo dropdown")
);
});
use this for modeling the resouce group ResourceGroupDropDownField on create blades.
setSelectedResourceGroup(...) and getSelectedResourceGroup to get and check the value of the dropdown field respectivelysetNewResourceGroup(...) and getNewResourceGroup(...) to get and check the value of the create new field respectively
        //1. open create blade
        await testFx.portal.openGalleryCreateBlade(
            extensionResources.samplesExtensionStrings.Engine.engineNoPdl,     //title of the item in the marketplace e.g "EngineNoPdlV1"
            extensionResources.samplesExtensionStrings.Engine.createEngine, //the title of the blade that will be opened e.g "Create Engine"
            10000);                                                         //an optional timeout to wait on the blade
        //2. get a reference to the create blade
        const createEngineBlade = testFx.portal.blade({ bladeType: CreateEngineBlade });
        //3. create the harness for the ResourceGroupDropDownField
        let resourceGroup = createEngineBlade.field(ResourceGroupDropDown, { label: resources.resourceGroup });
        const resourceName = resourcePrefix + guid.newGuid();
        await createEngineBlade.checkFieldValidation();
        //4a. set the value of the Create New text field for the resource group
        await resourceGroup.setNewResourceGroup("NewResourceGroup");
        const rgName = await resourceGroup.getNewResourceGroup();
        assert.equal("NewResourceGroup", rgName, "Set resource group name");
        //4b. set the value of the Use Existing dropdown
        await resourceGroup.setSelectedResourceGroup("Default-Storage-WestUS");
        const selectedRGName = await resourceGroup.getSelectedResourceGroup();
        assert.equal("Default-Storage-WestUS", selectedRGName, "Set resource group dropdown");
        await createEngineBlade.clickClose();
        await testFx.portal.acceptAlert();
        const blade = await testFx.portal.openGalleryCreateBlade("Microsoft.ResourceGroup", "Create a resource group");
        resourceGroup = await blade.field(ResourceGroupDropDown, { label: resources.resourceGroup });
        resourceGroup.setNewResourceGroup("newRG");
The following example demonstrates how to:
read(...) to read the contentempty(...) to empty the contentsendKeys(...) to write the content
        const editorBlade: EditorBlade = await BladeOpener.openSamplesExtensionBlade(
            editorBladeTitle,
            editorUriFragment,
            EditorBlade,
            70000);
        const editor: Editor = editorBlade.editor;
        const content = await editor.read();
        assert.equal(content, expectedContent, "expectedContent is not matching");
        await editor.empty();
        await editor.sendKeys("document.");
        await testFx.portal.wait(async () => {
            return await editor.isIntellisenseUp();
        });
        const saveButton = By.css(`.fxc-simplebutton[data-bind="pcControl: saveButton"]`);
        await editorBlade.element(saveButton).click();
        await testFx.portal.wait(async () => {
            const content = await editor.read();
            return content === "document.";
        });
        const count = await editor.workerIFramesCount();
        assert.equal(count, 0, "We did not find the expected number of iframes in the portal.  It is likely that the editor is failing to start web workers and is falling back to creating new iframes");
The following example demonstrates how to:
countItems(...) to count the number of all items. (MultiLine Item is counted as one)isDisabled(...) to get a value that determines whether the essentials is disabledhasViewAll(...) to get a value that determines whether the essentials has ViewAll button or notgetViewAllButton(...) to get a PortalElement of the essentials' viewAll buttongetItemByLabelText(...) to get an EssentialsItem that is found by its label textgetPropertyElementByValue(...) to get a PortalELement of matching property valuegetExpandedState(...) to get a value that determines the essentials' expanded statesetExpandedState(...) to set the essentials' expanded stategetExpander(...) to get the Expander elementgetProperties(...) to get an array of propertiesgetLabelText(...) to get the item label texthasMoveResource(...) to get whether the item has move resource blade or notgetLabelId(...) to get the item label idgetSide(...) to get the item's side
        try {
            const blade: EssentialsBlade = await BladeOpener.openSamplesExtensionBlade(
                essentialsBladeTitle,
                essentialsUriFragment,
                EssentialsBlade,
                waitTime);
            await blade.waitUntilLoaded(waitTime);
            // Expand the essentials control if it was collapsed in a previous session.
            const essentialVal = await Promise.all([blade.essentials.getExpandedState(), blade.essentials.getExpander()]);
            let expandedState = essentialVal[0];
            const expander = essentialVal[1];
            if (!expandedState) {
                await expander.click().delay(200);
            }

            const essentials: Essentials = blade.essentials;
            const essentialsInfo = await Promise.all([essentials.countItems(), essentials.getExpandedState(), essentials.hasViewAll()]);
            const countItems = essentialsInfo[0];
            expandedState = essentialsInfo[1];
            const hasViewAll = essentialsInfo[2];
            // Essentials item count, expanded state and viewAll button state check
            assert.equal(countItems, 10, "Essentials should have 10 items at the beginning, found " + countItems);
            assert.ok(expandedState, "Essentials should be expanded");
            assert.ok(hasViewAll, "Essentials has the ViewAll button at the beginning");
            await essentials.getViewAllButton().click();
            const count = await essentials.countItems();
            // Essentials item count after click ViewAll button
            assert.equal(count, 12, "Essentials should have 12 items after adding dynamic properties, found " + count);
            // Item label and properties check
            await Promise.all([
                itemAssertionHelper(essentials, {
                    label: "Resource group",
                    hasMoveResource: true,
                    side: "left",
                    properties: [
                        { type: EssentialsItemPropertyType.Link, valueOptions: ["snowtraxpsx600"] }
                    ]
                }),
                itemAssertionHelper(essentials, {
                    label: "Multi-line Item",
                    hasMoveResource: false,
                    side: "right",
                    properties: [
                        { type: EssentialsItemPropertyType.Text, valueOptions: ["sample string value"] },
                        { type: EssentialsItemPropertyType.Link, valueOptions: ["Bing.com"] }
                    ]
                }),
                itemAssertionHelper(essentials, {
                    label: "Status",
                    hasMoveResource: false,
                    side: "left",
                    properties: [
                        { type: EssentialsItemPropertyType.Text, valueOptions: ["", "--"] }
                    ]
                })
            ]);
            const item = await essentials.getItemByLabelText("Status");
            const properties = await item.properties;
            const statusProperty: EssentialsItemProperty = properties[0];
            const value = await statusProperty.getValue();
            if (value !== "1 times clicked!") {
                const propElement = await essentials.getPropertyElementByValue("status will be changed");
                await propElement.click({ remainingAttempts: 0, delay: 0 });
                await testFx.portal.wait<boolean>(async () => {
                    const value = await statusProperty.getValue();
                    return value === "1 times clicked!";
                });
            }
            // Item label and properties check after clicking "status will be changed"
            await itemAssertionHelper(essentials, {
                label: "Status",
                hasMoveResource: false,
                side: "left",
                properties: [
                    { type: EssentialsItemPropertyType.Text, valueOptions: ["1 times clicked!"] }
                ]
            });
            const propElement = await essentials.getPropertyElementByValue("snowtraxpsx600");
            await propElement.click().delay(500);
            await essentials.getExpander().click().delay(200);
            let essentialsState = await Promise.all([essentials.getExpandedState(), essentials.items.isDisplayed()]);
            expandedState = essentialsState[0];
            let isDisplayed = essentialsState[1];
            // check expander state and items' visibilities after closing expander
            assert.ok(!expandedState, "expander should be closed");
            isDisplayed.forEach((state: boolean) => {
                assert.ok(!state, "items should be invisible");
            });
            await essentials.getExpander().click().delay(200);
            essentialsState = await Promise.all([essentials.getExpandedState(), essentials.items.isDisplayed()]);
            expandedState = essentialsState[0];
            isDisplayed = essentialsState[1];
            // check expander state and items' visibilities after opening expander
            assert.ok(expandedState, "expander should be opened");
            isDisplayed.forEach((state: boolean, index: number) => {
                assert.ok(state, "items should be visible");
            });
        } catch (error) {
            console.log("Error:");
            console.log(error);
            console.log(error && error.stack);
            throw error;
        }
The CSS styling regression feature has been deprecated, please remove all usage of the portal.detectStylingRegression function.
The MsPortalFx-Mock package provides a framework for showing mock data in the portal. It come with builtin support for mocking ARM data.
Mock data including providers, subscriptions, resource groups and resources can be defined in JSON object and used to initialize the ArmManager.
import { ArmProxy } from "MsPortalFx-Mock/lib/src/ArmProxy/ArmProxy";
import { ArmManager } from "MsPortalFx-Mock/lib/src/ArmProxy/ArmManager";

...

const mockData: ArmManager.MockData = {
    providers: [
        {
            namespace: "Providers.Test",
            resourceTypes: [
                {
                    resourceType: "type1",
                    locations: ["WestUS"],
                    apiVersions: ["2014-04-01"]
                },
                {
                    resourceType: "type2",
                    locations: ["East US", "East US 2", "North Central US"],
                    apiVersions: ["2014-04-01"]
                }
            ]
        }
    ],
    subscriptions: [
        {
            subscriptionId: "sub1",
            displayName: "Test sub 1",
            state: "Active",
            subscriptionPolicies: {
                locationPlacementId: "Public_2014-09-01",
                quotaId: "FreeTrial_2014-09-01"
            },
            resourceGroups: [
                {
                    name: "sub1rg1",
                    location: "WestUS",
                    tags: {
                        "env": "prod",
                        "ver": "4.6"
                    },
                    properties: {
                        lockState: "Unlocked",
                        provisioningState: "Succeeded",
                    },
                    resources: [
                        {
                            name: "sub1rg1r1",
                            location: "WestUS",
                            tags: {
                                "env": "prod"
                            },
                            type: "providers.test/type1",
                            kind: null,
                            nestedResources: [
                                {
                                    name: "nr1",
                                    tags: {},
                                    type: "nested"
                                }
                            ]
                        }
                    ]
                },
                {
                    name: "sub1rg2",
                    location: "WestUS",
                    tags: {
                        "env": "prod",
                        "ver": "4.6"
                    },
                    properties: {
                        lockState: "Unlocked",
                        provisioningState: "Succeeded",
                    },
                    resources: [
                        {
                            name: "sub1rg2r1",
                            location: "WestUS",
                            tags: {
                                "env": "prod"
                            },
                            type: "providers.test/type2",
                            kind: null
                        }
                    ]
                }
            ]
        }
    ]
};

...

    let armManager = new ArmManager.Manager();
    armManager.initializeMockData(mockData);
The ArmProxy needs to initialized at the beginning of your tests with the ArmManager. The ArmProxy supports two modes for showing data 1) mock ONLY and 2) mock + actual.
You will need to initialize the portalContext->patches to the local server address setup by the proxy.
        const proxy = await ArmProxy.create(nconf.get("armEndpoint"), 5000, armManager, null, true);
        armProxy = proxy;
        testFx.portal.portalContext.patches = [proxy.patchAddress];
The proxy can be disposed at the end of your tests.
        await testFx.portal.quit();
        await ArmProxy.dispose(armProxy);
edge.js
Automated accessibility testing is enabled via './src/Accessibility.ts' which wraps two NPM libraries, 'axe-core' and 'axe-webdriverjs'.
Here is the minimal amount of code necessary to test if a blade is accessible or not, from './test/AccessibilityTests.ts':
import testFx = require("../src/Index");
import timeouts = require("../src/Utils/Timeouts");
import TestSupport = require("./TestSupport");

describe("Can test accessibility of blades", function () {
    this.timeout(0);
    const testSupport = new TestSupport(this);
    const resourceProvider = "Microsoft.Resources";
    const resourceType = "subscriptions%2fresourceGroups";
    const resourceBladeTitle = "Resource groups";

    before(() => {
        testSupport.initializePortalContext();
    });

    it("Can test accessibility of the browse resource groups blade", async () => {
        const blade = await testFx.portal.openBrowseBlade(resourceProvider, resourceType, resourceBladeTitle, timeouts.defaultLongTimeout);
        return await blade.ensureAccessibilityIsAxeCoreClean({ disableRuleIds: ["skip-link"] });
    });
});
This code is opening the browse resource groups blade, and testing if it is accessible. The 'errorIdsToIgnore' parameter is used to ignore a set of errors by their error ID.
Here is a copy of the options interface for the 'ensureAccessibilityIsAxeCoreClean' function, within './src/Accessibility.ts':
export interface Options {
    /*
     * Some blades may require more then one test execution to hit the entire experience that a blade offers. A good example of this is a blade with tabs,
     * you will need to run the test one time per tab. The 'stepName' parameter offers a way to differentate multiple calls to ensureAccessibilityIsAxeCoreClean within a single test.
     * Example: 'BasicsTab'. Use this parameter if you call ensureAccessibilityIsAxeCoreClean more then once in a single test iteration.
     */
    stepName?: string;
    /*
     * Only specify this if you are testing the accessibility of a non-blade element, and you have specified 'overrideElementToInclude'.
     * This should correspond to a "friendly name" for the 'overrideElementToInclude'. Example: "DialogBox".
     */
    friendlyElementName?: string;
    /*
     * Override the default filter that finds blade areas that extension owners typically own. The class name of the top-most element to test within.
     * For example: '.fxs-blade-content-wrapper'. All elements within this element will be tested. In some cases, this may not be the same as the 'webElement'
     * passed into the 'ensureAccessibilityIsAxeCoreClean' function. This value is also used to calculate the extension and blade names. If these values are wrong,
     * it may be because the filter you are using is incorrect or not restrictive enough. This is used in the AxeBuilder.include() function call.
     */
    overrideElementToInclude?: string;
    /*
     * Specify which violation IDs should be ignored. These IDs correspond to the 'id' property on a 'Result' from 'axe-webdriverjs'.
     * Any violations with these IDs are not passed back for filtering & processing, they are completely removed from the violation results.
     * This array of IDs is passed to the AxeBuilder.disableRules() function call.
     */
    disableRuleIds?: string[];
    /*
     * Filter violations based on string checking the results. The key to the mapping should be a descriptive name of what's being filtered, such as "IgnoreColorContrastViolations".
     * Filters can be used instead of or in combination with 'disableRuleIds' in order to offer a way to fine-tune what is filtered.
     */
    violationFilters?: Map<string, ResultFilterFunction>;
    /*
     * Increase how much logging is done to assist with test development or investigating failures.
     */
    verboseLogging?: boolean;
    /*
     * Specify a logging function to call instead of 'console.log'.
     */
    overrideLoggingFunction?: LoggingFunction;
    /*
     * Microsoft tenant only: If true, log a test result to the accessibility report API. Only applies to extension+blade level tests.
     */
    reportTestResult?: boolean;
    /*
     * Microsoft tenant only: Specify a function that can be used to get an authentication token to use with writes to the extension analyzer's accessibility report API. The API does not currently require this, but may in the future.
     * The API URL is: https://extensionanalyzer.azure-test.net/api/extensions/${extensionName}/blades/${bladeName}/accessibilityreport
     */
    getAuthenticationToken?: GetAuthenticationTokenFunction;
}
git clone https://github.com/azure/msportalfx-test.git
Use Visual Studio or Visual Studio Code to build
How to build and push your changes
Go to the root directory
Build the msportalfx-test package (see README.MD for details)
npm run buildTest your changes, see README.md for details on setup
npm test to run tests locallyPush your changes
setup.cmd in the portal repo or have run powershell.exe -ExecutionPolicy Unrestricted -file "%~dp0\Setup-OneCloud.ps1" -DeveloperType Shell %*Once you have the first two use the following to create the AAD application and service principal.
    msportalfx-test\scripts\Create-AdAppAndServicePrincipal.ps1
        -TenantId "someguid"
        -SubscriptionId "someguid"
        -ADAppName "some ap name"
        -ADAppHomePage "https://somehomepage"
        -ADAppIdentifierUris "https://someidentiferuris"
        -ADAppPassword $someAdAppPassword
        -SPRoleDefinitionName "Reader"
Note: Don't forget to store the password you use below in key vault, secret store or other. You will not be able to retrieve it using the commandlets.
You will use the details of the created service principal in the next steps.
For more detail on [AAD Applications and Service Principals] see (https://azure.microsoft.com/en-us/documentation/articles/resource-group-authenticate-service-principal/#authenticate-with-password---powershell).
Open test\config.json and enter appropriate values for:
        "aadAuthorityUrl": "https://login.windows.net/TENANT_ID_HERE",
        "aadClientId": "AAD_CLIENT_ID_HERE",
        "subscriptionId": "SUBSCRIPION_ID_HERE",
        "subscriptionName": "SUBSCRIPTION_NAME_HERE",
The account that corresponds to the specified credentials should have at least contributor access to the subscription specified in the config.json file. The account must be a Live Id account. It cannot be an account that requires two factor authentication (like most @microsoft.com accounts).
Install the Portal SDK from Aux Docs, then open Visual Studio and create a new Portal Extension from File --> New Project --> Azure Portal --> Azure Portal Extension. Name this project LocalExtension so that the extension itself is named LocalExtension, which is what many of the tests expect. Then hit CTRL+F5 to host the extension in IIS Express.
The Can Find Grid Row and the Can Choose A Spec tests require special configuration described in the tests themselves.
Many of the tests currently rely on the CloudService extension. We are working to remove this dependency.
Open a command prompt in this directory and run:
	npm install --no-optional
	npm test
When adding a document create a new *.md file in /docs e.g /docs/foo.md
Author the document using markdown syntax
Inject content from your documents into the master template in /docs/TEMPLATE.md using gitdown syntax E.g
{"gitdown": "include", "file": "./foo.md"}
To ensure all code samples remain up to date we extended gitdown syntax to support code injection. To reference source code in your document directly from a *.ts file use the include-section extension E.g
{"gitdown": "include-section", "file": "../test/BrowseResourceBladeTests.ts", "section": "tutorial-browse-context-menu#step2"}
this will find all content in ../test/BrowseResourceBladeTests.ts that is wrapped in comments //tutorial-browse-context-menu#step2 and will inject them directly into the document. see /docs/tutorial-browse-context-menu.md for a working example
You can generate the documentation in one of two ways
As part of pack the docs script from package.json is run to ensure that all docs are up to date
npm pack
Or, While you are writing docs you may want to check that your composition or jsdoc for API ref is generating as expected to do this you can execute run the following
npm run docs
the output of the composed TEMPLATE.md will be written to ./README.md and the generated API reference from your jsdocs will be written to /docs/apiref.md
Submit a pull request to the repo http://aka.ms/msportalfx-test
This project has adopted the Microsoft Open Source Code of Conduct. For more information see the Code of Conduct FAQ or contact opencode@microsoft.com with any additional questions or comments.
Send an email to ibizadiscuss@microsoft.com
Generated on 2020-05-06
FAQs
Microsoft Azure Portal Test Framework
We found that msportalfx-test demonstrated a not healthy version release cadence and project activity because the last version was released a year ago. It has 4 open source maintainers collaborating on the project.
Did you know?

Socket for GitHub automatically highlights issues in each pull request and monitors the health of all your open source dependencies. Discover the contents of your packages and block harmful activity before you install or update your dependencies.
Product
Socket for Jira lets teams turn alerts into Jira tickets with manual creation, automated ticketing rules, and two-way sync.

Company News
Socket won two 2026 Reppy Awards from RepVue, ranking in the top 5% of all sales orgs. AE Alexandra Lister shares what it's like to grow a sales career here.

Security News
NIST will stop enriching most CVEs under a new risk-based model, narrowing the NVD's scope as vulnerability submissions continue to surge.