opencv4nodejs


Brings lots of features of OpenCV 3.x to nodejs to use as a service, integrate into your Electron app or simply to play around with the OpenCV API in Javascript instead of C++.
Examples
See examples for implementation.
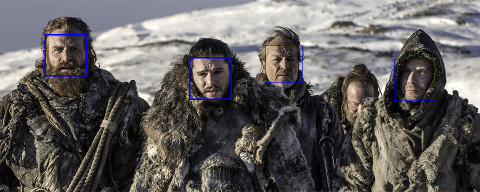
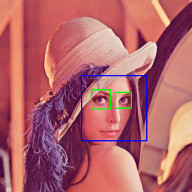
Face Detection
Hand Gesture Recognition
Check out my article for this example.
Object Tracking
Feature Matching
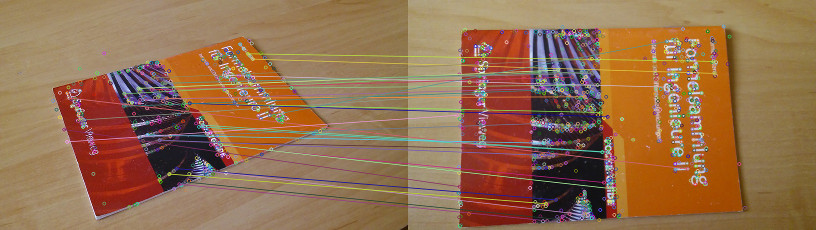
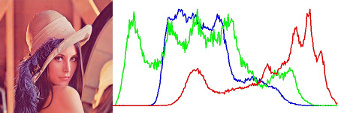
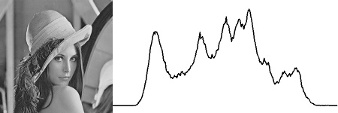
Image Histogram
How to install
$ npm install --save opencv4nodejs
Make sure to have OpenCV 3+ ( extra modules are optional ) installed on your System https://github.com/opencv/opencv/releases/. In case you are running Windows or have OpenCV set up in a custom directory make sure to set the following environment variables:
- OPENCV_DIR pointing to the root path containing include directory or set OPENCV_INCLUDE_DIR explicitly.
- OPENCV_LIB_DIR pointing to the static library dir containing the OpenCV .lib or .so files.
If you are running into issues also check the requirements for node-gyp specific to your OS https://github.com/nodejs/node-gyp.
Usage with Electron
$ npm install --save electron-rebuild
Add the following script to your package.json:
"electron-rebuild": "electron-rebuild -w opencv4nodejs"
Run the script:
$ npm run electron-rebuild
Require it in the application:
const electron = require('electron');
const cv = electron.remote.require('opencv4nodejs');
Documentation
const cv = require('opencv4nodejs');
Initializing Mat (image matrix), Vec, Point
const rows = 100;
const cols = 100;
const emptyMat = new cv.Mat(rows, cols, cv.cvTypes.CV_8UC3);
const whiteMat = new cv.Mat(rows, cols, cv.cvTypes.CV_8UC1, 255);
const blueMat = new cv.Mat(rows, cols, cv.cvTypes.CV_8UC3, [255, 0, 0]);
const matData = [
[[255, 0, 0], [255, 0, 0], [255, 0, 0]],
[[0, 0, 0], [0, 0, 0], [0, 0, 0]],
[[255, 0, 0], [255, 0, 0], [255, 0, 0]]
];
const matFromArray = new cv.Mat(matData, cv.cvTypes.CV_8UC3);
const charData = [255, 0, ...];
const matFromArray = new cv.Mat(new Buffer.from(charData), rows, cols, cv.cvTypes.CV_8UC3);
const pt2 = new cv.Point(100, 100);
const pt3 = new cv.Point(100, 100, 0.5);
const vec2 = new cv.Vec(100, 100);
const vec3 = new cv.Vec(100, 100, 0.5);
const vec4 = new cv.Vec(100, 100, 0.5, 0.5);
Mat and Vec operations
const mat0 = new cv.Mat(...);
const mat1 = new cv.Mat(...);
const matMultipliedByScalar = mat0.mul(0.5);
const matDividedByScalar = mat0.div(2);
const mat0PlusMat1 = mat0.add(mat1);
const mat0MinusMat1 = mat0.sub(mat1);
const mat0MulMat1 = mat0.hMul(mat1);
const mat0DivMat1 = mat0.hDiv(mat1);
const mat0AndMat1 = mat0.and(mat1);
const mat0OrMat1 = mat0.or(mat1);
const mat0bwAndMat1 = mat0.bitwiseAnd(mat1);
const mat0bwOrMat1 = mat0.bitwiseOr(mat1);
const mat0bwXorMat1 = mat0.bitwiseXor(mat1);
const mat0bwNot = mat0.bitwiseNot();
Accessing Mat data
const matBGR = new cv.Mat(..., cv.cvTypes.CV_8UC3);
const matGray = new cv.Mat(..., cv.cvTypes.CV_8UC1);
const vec3 = matBGR.at(200, 100);
const grayVal = matGray.at(200, 100);
const [b, g, r] = matBGR.atRaw(200, 100);
matBGR.set(50, 50, [255, 0, 0]);
matBGR.set(50, 50, new Vec(255, 0, 0));
matGray.set(50, 50, 255);
const width = 25;
const height = 25;
const region = matBGR.getRegion(new cv.Rect(50, 50, width, height));
const matAsBuffer = matBGR.getData();
const matAsArray = matBGR.getDataAsArray();
IO
const mat = cv.imread('./path/img.jpg');
cv.imwrite('./path/img.png', mat);
cv.imshow('a window name', mat);
cv.waitKey();
const devicePort = 0;
const wCap = new cv.VideoCapture(devicePort);
const vCap = new cv.VideoCapture('./path/video.mp4');
const delay = 10;
let done = false;
while (!done) {
let frame = vCap.read();
if (frame.empty) {
vCap.reset();
frame = vCap.read();
}
const key = cv.waitKey(delay);
done = key !== 255;
}
Useful Mat methods
const matBGR = new cv.Mat(..., cv.cvTypes.CV_8UC3);
const matSignedInt = matBGR.convertTo({
type: cv.cvTypes.CV_32SC3
});
const matDoublePrecision = matBGR.convertTo({
type: cv.cvTypes.CV_64FC3
});
const { COLOR_BGR2HSV, COLOR_BGR2Lab } = cv.cvTypes;
const matGray = matBGR.bgrToGray();
const matHSV = matBGR.cvtColor({
code: COLOR_BGR2HSV
});
const matLab = matBGR.cvtColor({
code: COLOR_BGR2Lab
});
const matHalfSize = matBGR.rescale(0.5);
const mat100x100 = matBGR.resize(100, 100);
const matMaxDimIs100 = matBGR.resizeToMax(100);
const [matB, matG, matR] = matBGR.splitChannels();
const matRGB = new cv.Mat([matR, matB, matG]);
Drawing a Mat into HTML Canvas
const matBGR = ...;
const matRGBA = matBGR.cvtColor({
type: cv.cvTypes.colorConversionCodes.COLOR_BGR2RGBA
});
const matDataRaw = matRGBA.getData();
const canvas = document.getElementById('myCanvas');
const ctx = canvas.getContext('2d');
const imgData = ctx.getImageData(0, 0, matRGBA.cols, matRGBA.rows);
for (let i = 0; i < matDataRaw.length; i += 1) {
imgData.data[i] = matDataRaw[i];
}
ctx.putImageData(imgData, 0, 0);
Method Interface
OpenCV method interface from official docs or src:
void GaussianBlur(InputArray src, OutputArray dst, Size ksize, double sigmaX, double sigmaY = 0, int borderType = BORDER_DEFAULT);
translates to:
const src = new cv.Mat(...);
const dst0 = src.gaussianBlur({
ksize: new cv.Size(5, 5),
sigmaX: 1.2
});
const dst1 = src.gaussianBlur({
ksize: new cv.Size(5, 5),
sigmaX: 1.2,
borderType: cv.cvTypes.borderTypes.BORDER_CONSTANT
});
For more documentation refer to examples or have a look into the tests for method invocation.


