opencv4nodejs


By it's nature, JavaScript lacks the performance to implement Computer Vision tasks efficiently. Therefore this package brings the performance of the native OpenCV C++ library to your Node.js application.
Examples
See examples for implementation.
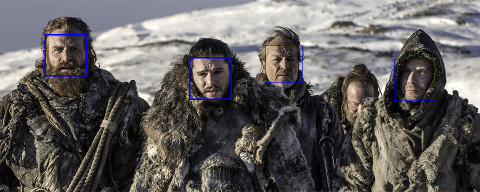
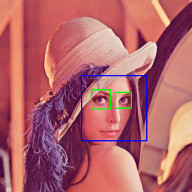
Face Detection
Hand Gesture Recognition
Check out my article about fingertip detection.
Machine Learning
Check out my article about recognition of handwritten letters using Histogram of oriented Gradients (HOG) and Support Vector Machines (SVM).

Object Tracking
Feature Matching
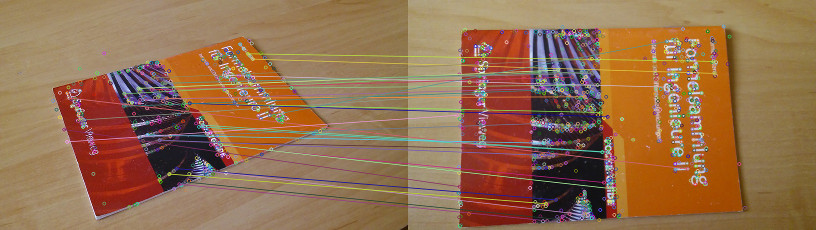
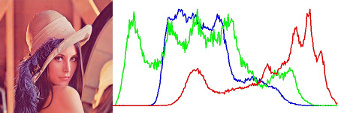
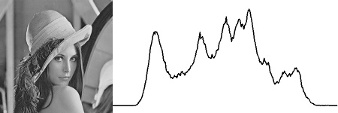
Image Histogram
How to install
$ npm install --save opencv4nodejs
Make sure to have OpenCV 3+ ( extra modules are optional ) installed on your System https://github.com/opencv/opencv/releases/. In case you are running Windows or have OpenCV set up in a custom directory make sure to set the following environment variables:
- OPENCV_DIR pointing to the root path containing include directory or set OPENCV_INCLUDE_DIR explicitly.
- OPENCV_LIB_DIR pointing to the static library dir containing the OpenCV .lib or .so files.
If you are running into issues also check the requirements for node-gyp specific to your OS https://github.com/nodejs/node-gyp.
Usage with Electron
$ npm install --save electron-rebuild
Add the following script to your package.json:
"electron-rebuild": "electron-rebuild -w opencv4nodejs"
Run the script:
$ npm run electron-rebuild
Require it in the application:
const electron = require('electron');
const cv = electron.remote.require('opencv4nodejs');
Quick Start
const cv = require('opencv4nodejs');
Initializing Mat (image matrix), Vec, Point
const rows = 100;
const cols = 100;
const emptyMat = new cv.Mat(rows, cols, cv.CV_8UC3);
const whiteMat = new cv.Mat(rows, cols, cv.CV_8UC1, 255);
const blueMat = new cv.Mat(rows, cols, cv.CV_8UC3, [255, 0, 0]);
const matData = [
[[255, 0, 0], [255, 0, 0], [255, 0, 0]],
[[0, 0, 0], [0, 0, 0], [0, 0, 0]],
[[255, 0, 0], [255, 0, 0], [255, 0, 0]]
];
const matFromArray = new cv.Mat(matData, cv.CV_8UC3);
const charData = [255, 0, ...];
const matFromArray = new cv.Mat(new Buffer.from(charData), rows, cols, cv.CV_8UC3);
const pt2 = new cv.Point(100, 100);
const pt3 = new cv.Point(100, 100, 0.5);
const vec2 = new cv.Vec(100, 100);
const vec3 = new cv.Vec(100, 100, 0.5);
const vec4 = new cv.Vec(100, 100, 0.5, 0.5);
Mat and Vec operations
const mat0 = new cv.Mat(...);
const mat1 = new cv.Mat(...);
const matMultipliedByScalar = mat0.mul(0.5);
const matDividedByScalar = mat0.div(2);
const mat0PlusMat1 = mat0.add(mat1);
const mat0MinusMat1 = mat0.sub(mat1);
const mat0MulMat1 = mat0.hMul(mat1);
const mat0DivMat1 = mat0.hDiv(mat1);
const mat0AndMat1 = mat0.and(mat1);
const mat0OrMat1 = mat0.or(mat1);
const mat0bwAndMat1 = mat0.bitwiseAnd(mat1);
const mat0bwOrMat1 = mat0.bitwiseOr(mat1);
const mat0bwXorMat1 = mat0.bitwiseXor(mat1);
const mat0bwNot = mat0.bitwiseNot();
Accessing Mat data
const matBGR = new cv.Mat(..., cv.CV_8UC3);
const matGray = new cv.Mat(..., cv.CV_8UC1);
const vec3 = matBGR.at(200, 100);
const grayVal = matGray.at(200, 100);
const [b, g, r] = matBGR.atRaw(200, 100);
matBGR.set(50, 50, [255, 0, 0]);
matBGR.set(50, 50, new Vec(255, 0, 0));
matGray.set(50, 50, 255);
const width = 25;
const height = 25;
const region = matBGR.getRegion(new cv.Rect(50, 50, width, height));
const matAsBuffer = matBGR.getData();
const matAsArray = matBGR.getDataAsArray();
IO
const mat = cv.imread('./path/img.jpg');
cv.imwrite('./path/img.png', mat);
cv.imshow('a window name', mat);
cv.waitKey();
const devicePort = 0;
const wCap = new cv.VideoCapture(devicePort);
const vCap = new cv.VideoCapture('./path/video.mp4');
const delay = 10;
let done = false;
while (!done) {
let frame = vCap.read();
if (frame.empty) {
vCap.reset();
frame = vCap.read();
}
const key = cv.waitKey(delay);
done = key !== 255;
}
Useful Mat methods
const matBGR = new cv.Mat(..., cv.CV_8UC3);
const matSignedInt = matBGR.convertTo(cv.CV_32SC3);
const matDoublePrecision = matBGR.convertTo(cv.CV_64FC3);
const matGray = matBGR.bgrToGray();
const matHSV = matBGR.cvtColor(cv.COLOR_BGR2HSV);
const matLab = matBGR.cvtColor(cv.COLOR_BGR2Lab);
const matHalfSize = matBGR.rescale(0.5);
const mat100x100 = matBGR.resize(100, 100);
const matMaxDimIs100 = matBGR.resizeToMax(100);
const [matB, matG, matR] = matBGR.splitChannels();
const matRGB = new cv.Mat([matR, matB, matG]);
Drawing a Mat into HTML Canvas
const matBGR = ...;
const matRGBA = matBGR.cvtColor(cv.COLOR_BGR2RGBA);
const matDataRaw = matRGBA.getData();
const canvas = document.getElementById('myCanvas');
const ctx = canvas.getContext('2d');
const imgData = ctx.getImageData(0, 0, matRGBA.cols, matRGBA.rows);
for (let i = 0; i < matDataRaw.length; i += 1) {
imgData.data[i] = matDataRaw[i];
}
ctx.putImageData(imgData, 0, 0);
Method Interface
OpenCV method interface from official docs or src:
void GaussianBlur(InputArray src, OutputArray dst, Size ksize, double sigmaX, double sigmaY = 0, int borderType = BORDER_DEFAULT);
translates to:
const src = new cv.Mat(...);
const dst0 = src.gaussianBlur(new cv.Size(5, 5), 1.2);
const dst2 = src.gaussianBlur(new cv.Size(5, 5), 1.2, 0.8, cv.BORDER_REFLECT);
const optionalArgs = {
borderType: cv.BORDER_CONSTANT
};
const dst2 = src.gaussianBlur(new cv.Size(5, 5), 1.2, optionalArgs);
Available Modules


