Product
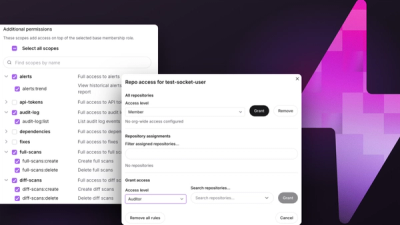
Introducing Repository Access Permissions and Custom Roles
Socket now supports Custom Roles and Repository Access Permissions so organizations can control who can access specific repositories and actions.
By Joe Werle - Jun 19, 2026
puppeteer-browser-agent
Advanced tools
This library consists of a number of convenient building blocks that can be extended and assembled to create a Puppeteer browser agent.
The browser agent can communicate with external actors, including agents and users, to instruct the browser agent to take actions to fulfill objectives according to a plan. Actions can creted or customized, added and removed to suit any purpose.
This library is based on original work from unconv/puppeteer-gpt
npm i puppeteer-browser-agent
The library is written in Typescript 5 and is best used leveraging strong typing.
A minimal configuration of building blocks with an custom external AI and input controller would look like the following. For more customization options, see Customization.
export class MyAgentPlanner extends AgentPlanner {
  // override as necessary

  protected createDriver() {
    this.driver = new MyAgentDriver(this, this.opts);
  }

  protected createMessageBroker() {
    return new MyMessageBroker(this.driver);
  }
}

// factory function to return a simple interface to ask questions
// to an external actor (user or AI agent) and return an answer
// if this is a method on the driver, it can access all the additional infrastructure and context if needed
const createInputReader = {
	question: async (text: string) => {
		// prompt with text and wait for answer
		return answer
	}
};

export class MyAgentDriver extends AgentDriver {
  // override as necessary

  protected createInputController() {
    // pass a createInputReader factory function
    return new MyTerminalInputController(createInputReader);
  }

  // to build messages to send to the particular (AI) controller used
  protected createMessageBuilder() {
    return new MyMessageBuilder(this);
  }

  protected createMessageBroker() {
    return new MyMessageBroker(this);
  }


export class MyMessageBroker extends MessageBroker {
  // override as necessary

  protected createController() {
    return new MyAIController(this.driver, definitions, this.opts);
  }

  protected createTokenCostCalculator() {
    return new MyAITokenCostCalculator(this.driver, this.opts);
  }
}

// See sample OpenAIController included in the code base for inspiration
// or extend and override it as you see fit
export class MyAIController implements IAIController {
  public async getResponse(
    messages: any[],
    definitions: any[],
    fnCall = "auto"
  ) {
	// send previous messages and definitions to AI for it to have the relevant context and tools
	// information to know how to respond with something that can be parsed as a step
    // ... fetch response from AI API
    return await response?.json();
  }
}
The library is designed around the following core concepts
An implementation typically starts with a planner which implements IAgentPlanner or extends/uses the built-in AgentPlanner class.
The planner needs to have an async start method which starts the plan.
By default the planner will ask an external agent (such as a user or AI agent) to accept the plan. When the plan has been accepted it runs the plan via runPlan and when completed it calls onPlanCompleted which cleans up resources, such as closing the browser.
public async start() {
	this.preparePlanPrompt();
	while (!this.isPlanAccepted()) {
		await this.askForPlanAcceptance();
	}
	await this.runPlan();
	this.onPlanCompleted();
}
The AgentPlanner can use the AgentDriver to implement an agent driving the browser via puppeteer.
The AgentDriver must implement IAgentDriver by supplying the async methods start and run.
The start method should start the browser and do any initialization necessary.
public async start() {
	this.initialize();
	await this.openBrowserPage();
}
The run method should implement the core logic which takes actions and performs them via the browser. This method is configured to set the context, run doStep to perform the actions and when done do cleanup such as closing down the browser in onStepDone.
public async run(agentState: IAgentState) {
	this.prepareStep(agentState);
	await this.doStep();
	this.onStepDone();
}
The doStep method performs the actions based on the response received from the external agent, using a StepRunner (see below), calling stepRunner.run with the response.
protected async doStep() {
	await this.stepRunner.run(this.response);
}
The driver can register actions via the method registerAction(action: IDriverAction, id?: string) and remove actions via removeAction(id: string).
See the Actions section for a more detailed walk-through of how to use actions.
The run method of StepRunner takes the response which contains step instructions.
run is by default configured to do the following:
step via an appropriate handlerThe step is the response received from an external agent (such as an AI) that is parsed to determine which handler to process it.
public async run(step: any) {
	this.initState(step);
	await this.handleStep();
	await this.prepareNextStep();
	this.logContext();
	await this.doNextStep();
}
Preparing for the next step requires the following:
protected async prepareNextStep() {
	await this.getPageData();
	await this.getNextStep();
	this.updateContext();
}
Getting the next step (ie. agent response) is done by calling getControllerResponse which passes a structured message to a MessageBroker instance which communicates with the external agent responsible for generating the response that forms the step.
protected async getNextStep() {
	const response = await this.getControllerResponse(
		this.structuredMsg,
		this.context,
	);
	this.messageBuilder.setContent(this.message);
	this.step = response;
}
The handleStep method iterates through the registered step handlers and executes each handler via their handle method, passing the step to be processed.
for await (const handler of this.handlers) {
  await handler.handle(this.step);
}
By default an instance of FunctionHandler and ContentHandler are registered. You can register specialized handlers on the step runner as needed, via the registerHandler method and clear the default handler registry via clearHandlers
In case the response/step is a function, a FunctionHandler is invoked to handle the step. If the step is not a function, a ContentHandler is invoked to handle it.
If the response has the shape of a function, the function attributes such as function name and parameters are parsed. These will be used attempt to call a registered action.
If the the response does not look like a function, the content handler will be called.
The performInteraction method does the following
this.ensurePageContent();
this.setPageUrl();
await this.getNextStep();
this.updateContext();
The library comes with a set of basic actions that can be used as starting point, to be extended or used as you find suitable. Each of these actions extends DriverAction and implements the IDriverAction interface which simply requires an async execute method.
These actions are:
GotoUrlAction to goto a given URL pageClickLinkAction to click page linksReadFileAction to read a file for instructionsCommunicateAction answer user/agent with page summary and receive input to instruct driver in responseEnterDataAction to enter data into form fields and (optionally) submit the formTakeScreenshotAction to take a screenshot of the page or starting from a specific element of interestSearchAction searches for search results using a search engine of choiceFindCodeAction finds code blocks with headers and descriptive textSectionOutlineAction creates an outline of the main sections of the pageNavigationOutlineAction creates an outline of the main navigation sections of the pageSome of these actions have been ported directly from GPT-puppeteer. They can be refined and customized as needed to suit your requirements.
Note that for the TakeScreenshot action, a SimpleGPTVision adapter class is made available, that can be worked into an IResponseController implementation, so that the screenshot can be uploaded to the GPT vision API. Adapters can also be implemented and used for other Vision APIs using a similar approach.
Any action must have an async execute function which performs the given action.
Action classes can extend either of the abstract classes BaseDriverAction or ElementAction, where ElementAction is useful for actions that directly interact with page elements, whereas BaseDriverAction is for more general actions, that do not interact with the page.
Action definitions are used to inform the browser agent which actions are available and how to use them, similar to the tools of f.ex CrewAI
Each definition must contain the following:
name ie. the name of the actiondescription what the action doesparameters the parameters that can be supplied to the function call to execute the actionThe parameters will be passed from an external agent to the driver and then passed into the action when the action is retrieved from the action registry by the driver. The action is then executed.
const makePlan = {
  name: "make_plan",
  description:
    "Create a plan to accomplish the given task. Summarize what the user's task is in a step by step manner. How would you browse the internet to accomplish the task. Start with 'I will'",
  parameters: {
    type: "object",
    properties: {
      plan: {
        type: "string",
        description:
          "The step by step plan on how you will navigate the internet and what you will do",
      },
    },
  },
  required: ["plan"],
};

const readFile = {
  name: "read_file",
  description: "Read the contents of a file that the user has provided to you",
  parameters: {
    type: "object",
    properties: {
      filename: {
        type: "string",
        description: "The filename to read, e.g. file.txt or path/to/file.txt",
      },
    },
  },
  required: ["filename"],
};

export const definitions = [
  makePlan,
  readFile,
  // more actions ...
];
Definitions are supplied to the driver, either directly or via the planner using methods such as setDefinitions and addDefinitions
Any action may include a definition property as well. If such a property exists on the action, this definition will be added automatically to the set of definitions when the action is registered with the driver.
The Actions guide describes how to leverage the built-in actions.
See the Customization example document which may act as a guide.


![]()
Yet another (opinionated) TypeScript library starter template.
If you're looking for a backend service starter, check out my typescript-service-starter
npx degit gjuchault/typescript-library-starter my-project or click on the Use this template button on GitHub!cd my-projectnpm installgit init (if you used degit)npm run setupTo enable deployment, you will need to:
NPM_TOKEN secret in GitHub Actions (Settings > Secrets > Actions)GITHUB_TOKEN write permissions for GitHub releases (Settings > Actions > General > Workflow permissions)TypeScript Library Starter relies on Volta to ensure the Node.js version is consistent across developers. It's also used in the GitHub workflow file.
Leverages esbuild for blazing-fast builds but keeps tsc to generate .d.ts files.
Generates a single ESM build.
Commands:
build: runs type checking, then ESM and d.ts files in the build/ directoryclean: removes the build/ directorytype:dts: only generates d.tstype:check: only runs type checkingtype:build: only generates ESMTypeScript Library Starter uses Node.js's native test runner. Coverage is done using c8 but will switch to Node.js's one once out.
Commands:
test: runs test runnertest:watch: runs test runner in watch modetest:coverage: runs test runner and generates coverage reportsThis template relies on Biome to do both formatting & linting in no time. It also uses cspell to ensure correct spelling.
Commands:
format: runs Prettier with automatic fixingformat:check: runs Prettier without automatic fixing (used in CI)lint: runs Biome with automatic fixinglint:check: runs Biome without automatic fixing (used in CI)spell:check: runs spell checkingUnder the hood, this library uses semantic-release and Commitizen.
The goal is to avoid manual release processes. Using semantic-release will automatically create a GitHub release (hence tags) as well as an npm release.
Based on your commit history, semantic-release will automatically create a patch, feature, or breaking release.
Commands:
cz: interactive CLI that helps you generate a proper git commit message, using Commitizensemantic-release: triggers a release (used in CI)FAQs
Puppeteer browser agent for use in AI agent systems
We found that puppeteer-browser-agent demonstrated a not healthy version release cadence and project activity because the last version was released a year ago. It has 1 open source maintainer collaborating on the project.
Did you know?

Socket for GitHub automatically highlights issues in each pull request and monitors the health of all your open source dependencies. Discover the contents of your packages and block harmful activity before you install or update your dependencies.
Product
Socket now supports Custom Roles and Repository Access Permissions so organizations can control who can access specific repositories and actions.
Product
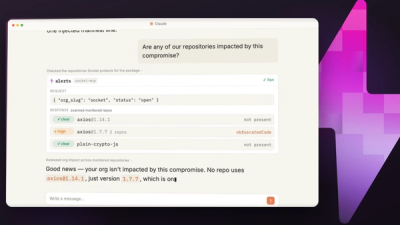
Socket MCP now lets AI assistants review org alerts, investigate threats using the Socket threat feed, and inspect package files in addition to dependency scoring.
Product
Socket Firewall blocks malicious VS Code and Open VSX extensions before install, protecting developers from compromised editor marketplaces.