React Native JustTrack SDK for Android


Installation
You can install the JustTrack SDK for React Native from npm using:
npm install react-native-justtrack-sdk --save
react-native run-android
Getting an API token
Navigate to your apps on the JustTrack dashboard and view your app.
If you haven't created your app on the dashboard yet, go to Products
and create the product for your app if needed, then go to Apps and create your app.
This will generate the API token needed to use the JustTrack SDK and it should look like this:
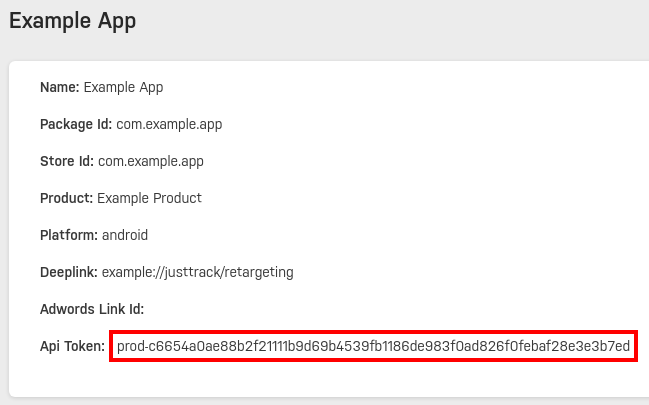
Thus, for this example app, you would be using prod-c6654a0ae88b2f21111b9d69b4539fb1186de983f0ad826f0febaf28e3e3b7ed as the API token.
Initialize the SDK
You first have to initialize the SDK with yout API token.
Only after initializing the SDK will you be able to call the methods to attribute the current user or send user events.
import * as JustTrackSdk from 'react-native-justtrack-sdk';

await JustTrackSdk.init('prod-your64charactertoken');
Get an attribution
An attribution tells you from which source you got a user. Did the user click on an Ad and installed
your app? Did they find it on their own in the Play Store and simply downloaded it? Did another user
invite the user so they can play your game together (or against each other)?
An attribution contains these information by providing the campaign, channel, and network the user was
acquired through. It also assigns a unique JustTrack ID to that user which is later used to identify
a user.
After initializing the SDK you can simply call attributeUser to retrieve an attribution containing
your JustTrack user id as well as information about the source of the user.
const attributionData: JustTrackSdk.AttributionData = await JustTrackSdk.attributeUser();
console.log('My user id is ' + attributionData.userId);
Getting the Advertiser and Test Group Id
The JustTrack SDK can provide you with the advertiser id of the user if the user didn't limit ad tracking.
Additionally, users are divided into three test groups (1, 2, and 3) based on their advertiser id.
You can retrieve that test group id from the SDK, implement a different logic for one of the test groups, and then compare the (different) performance of that group on the JustTrack dashboard.
const info: JustTrackSdk.AdvertiserIdInfo = await JustTrackSdk.getAdvertiserIdInfo();
console.log('My advertiser id is ' + info.advertiserId);
console.log('Ad tracking is limited = ' + info.isLimitedAdTracking);
const testGroupId: JustTrackSdk.TestGroupId | null = await JustTrackSdk.getTestGroupId();
console.log('My test group id is ' + testGroupId);
User events
After initializing the JustTrack SDK you can publish an event at any place in your app (you don't need to for example wait for a successful attribution).
The simplest form to publish an event is to call publishEvent with the name of the event you want to publish:
await JustTrackSdk.publishEvent('category_element_action');
The SDK defines a broad range of event classes with predefined semantics.
When creating those events you can specify some predefined dimensions depending on the event.
For example, to track the navigation from your menu screen to a game screen, you could record the
following event:
await JustTrackSdk.publishEvent(new JustTrackSdk.UserScreenShowEvent('Game Main', 'SCREEN_GAME_MAIN'));


