uPort Transports


Introduction | Quick Start | Modules | Development Guide
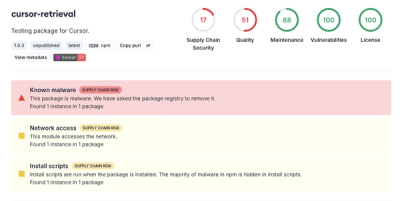
:bangbang: :warning: Transport modules rely on a spec change that is yet to be released in the uPort mobile app. Until the new mobile app is released, integrating the transport modules is not fully supported. Once it is fully supported, we will remove this message.
Introduction
uPort is a collection of tools and protocols for building decentralized user-centric applications. It is built on open standards and open source libraries. uPort identities can be created and interacted with through uPort clients, including the uPort mobile app. Identities are fully owned and controlled by the creator, and don't rely on centralized third-parties for creation, control or validation.
uport-transports is a loosely coupled collection of functions called transports and utility functions used to set up communication channels between an application and a uPort client. Transports are simply functions that consume request messages and additional transport params, then they send these strings to a uPort client. Some the transports will also manage receiving a response to a given request. Many of these functions can be combined to create transports specific to your use case and environment. You can then use these transports in uport-connect or use them in combination with message creation in uport-credentials. If you are looking for quick start integration you will likely be better served by using the default transports used in uport-connect.
For more information about our system and other products visit uport.me. For more library information and in depth documentation and guides visit the developer docs site. View our protocol specs if interested in understanding the lower level details.
For any questions or library support reach out to the uPort team on Riot or create a Github issue.
Quick Start
Below is a quick start example, look in the docs for information on functions not shown here, more examples, and all additional configuration details.
Install through npm:
npm install uport-transports
Import specific modules. You will primarily use transport. Message and crypto include utility functions for handling, parsing, encrypting, and decrypting messages for transports.
import { transport, message, crypto } from 'uport-transports'
To send a request in our default QR code modal:
const request = `eyJ0eXAiOiJKV1QiLCJhbG...`
const transportQR = transport.qr.send()
transportQR(request)
To send a request in our default QR code modal and use the message server transport and chasqui (the message server service provided by uPort) to get the response. This transport combines the QR send transport along with the message server tranport which handles responses. This assumes that chasqui was set as a callback in the request token. You can get a chasqui callback with utility function transport.messageServer.genCallback()
const request = `eyJ0eXAiOiJKV1QiLCJhbG...`
const transportQRChasqui = transport.qr.chasquiSend()
transportQRChasqui(request).then(response => {
})
To send a request in push notification. You can get a pushToken and pubEncKey for a user by requesting push notification permissions in a selective disclosure request. If the user accepts, these two values can be found in the response returned. You can handle the response as you want and specify or you can combine this with the message server transport to handle the response.
const request = `eyJ0eXAiOiJKV1QiLCJhbG...`
const pushTransport = transport.push.send(pushToken, pubEncKey)
pushTransport(request)
To send the request through a URL when on the same mobile device as uPort app, whether from a mobile browser or a mobile application. Transport adds necessary params for sending and handling response and then opens request URL.
const request = `eyJ0eXAiOiJKV1QiLCJhbG...`
const urlTransport = transport.url.send()
urlTransport(request)
To the get a response from a URL:
const response = tranport.url.getResponse()
Or listen for url response:
tranport.url.onResponse().then(response => {
  ...
})
Development Guide
Run Locally
Download this repo or your fork, then run npm install.
Builds
All builds are created from files in /src
To transpile to ES5. All files are output to /lib. The entry of our npm package is /lib/index.js
$ npm run build:es5
To generate a bundle/distributable. We use webpack for our builds. The output dist is /dist/uport-transports.js and source map /dist/uport-transports.map.js
$ npm run build:dist
Tests
We write our tests using mocha, chai and sinon.
To run our tests:
$ npm run test