Product
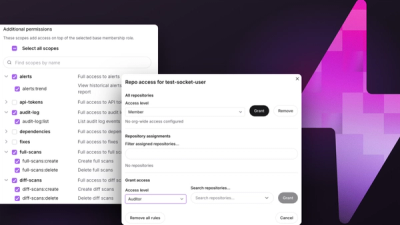
Introducing Repository Access Permissions and Custom Roles
Socket now supports Custom Roles and Repository Access Permissions so organizations can control who can access specific repositories and actions.
By Joe Werle - Jun 19, 2026
webpack-runtime-analyzer
Advanced tools
Webpack plugin for analyzing internal processes, state and structure of bundles

Webpack 1.x/2.x plugin for analyzing internal processes, state and structure of bundles. Built on rempl.
npm install webpack-runtime-analyzer --save-dev
Add plugin to your webpack config:
var RuntimeAnalyzerPlugin = require('webpack-runtime-analyzer');

// ...

plugins: [new RuntimeAnalyzerPlugin()]
You can set optional configuration for RuntimeAnalyzerPlugin constructor with this defaults:
new RuntimeAnalyzerPlugin({
    // Can be `standalone` or `publisher`.
    // In `standalone` mode analyzer will start rempl server in exclusive publisher mode.
    // In `publisher` mode you should start rempl on your own.
    mode: 'standalone',
    // Port that will be used in `standalone` mode to start rempl server.
    // When set to `0` a random port will be chosen.
    port: 0,
    // Automatically open analyzer in the default browser. Works for `standalone` mode only.
    open: false,
    // Use analyzer only when Webpack run in a watch mode. Set it to `false` to use plugin
    // in any Webpack mode. Take into account that a building process will not be terminated
    // when done since the plugin holds a connection to the rempl server. The only way
    // to terminate building process is using `ctrl+c` like in a watch mode.
    watchModeOnly: true
})
For publisher mode you should start rempl server on your own:
npm install -g rempl-cli
rempl
Also, you can use the GUI to control rempl server.
After you run Webpack you can open web interface of analyzer.
standalone mode the link to the web interface will be printed after build is done. With open option set to true, the web interface will be opened in default browser automatically.publisher mode your should open URL of the rempl server, usually, it's http://localhost:8177/. You can set custom rempl server url via REMPL_SERVER environment variable.Try the example to see how it works:
cd example
npm i
npm run dev
The list of the modules and the assets is always at hand.

The left list contains all modules in your bundle.
Click on a module name to view detail info about the module.
Click on a module name withholding shift key to open a file that related with this module in your editor.
The right list contains building output (chunks, static, etc).
Take a look at the dependencies of the modules and at the modules stats.

There are a few basic module types:
require(...)require.context(...)Some modules can be marked as entry. It means that this module is declared in entry section in you webpack-config.
The modules is separated by file types (scripts, templates, styles, etc). Every file type has a different color. You can see these colors at the nodes of graph or at the color bar above the graph.
You can hover mouse cursor at the nodes of graph or at the color bar sections and see an additional module-info or a file type statistic.
space-keyLook at the file map and find out why your bundle is so big.

escape to return to the rootDisplays more useful details about the modules.

In the text input, you can choose a module or a file which info you want to see. Just start typing module/file name and choose it from the suggestion list.
In the table you can see some modules statistic:
Displays modules are required by chosen module/file.
Displays modules are requiring chosen module/file.
Displays modules that required by chosen module/file recursively.
For example, we have three modules: foo, bar and baz.
If foo requires bar and bar requires baz then:
foo is 2 (bar and baz)bar is 1 (baz)baz is 0Displays modules are required only by this module/file and by all its dependencies recursively.
For example, we have three modules: foo, bar and baz.
Case 1: If foo requires bar then foo exclusive is 1 because no more modules that require bar.
Case 2: If foo and bar requires baz then:
foo exclusive is 0 because bar also requires baz.bar exclusive is 0 because foo also requires baz.Case 3: If foo requires bar and bar requires baz then:
foo exclusive is 2 because no more modules that require bar and bazbar exclusive is 1 because no more modules that require bazshift-key to open a file that related with this module in your editorAnalyzing process is performing in realtime.

You can open any bundle file in you favorite editor. Just set the EDITOR variable in your environment then you will may click on any file path withholding shift key to open the file in a chosen editor.
For example: export EDITOR=sublime && webpack -w
For more information about supported editors see open-in-editor documentation.
devtool: 'source-map')Required module in details page and your editor will open the place (file, line and column) where clicked module was required by a filtered moduleOccurrences module in details page and your editor will open the place (file, line and column) where clicked module are requiring filtered moduleYou can use Webpack Runtime Analyzer everywhere when having an access to a web-view (e.g. web pages, browser plugins, mobile browsers and applications).
Some code editors have access to a web view (e.g. iframe) and this is a great opportunity to integrate Webpack Runtime Analyzer in these editors to use unique editor features.
You can use Webpack Runtime Analyzer in Atom Editor by installed the plugin.
This plugin creates a bridge between the editor and Webpack Runtime Analyzer. It allows you to open the UI directly in an editor tab and observing current editing file.
Just type Rempl in command palette and enter rempl-server url (http://localhost:8177 by default).
If the editing file is a part of the bundle, you can see the info about it in the following places:
details page in the UI
The bottom bar exists only when the UI is running within editor
VS Code support is in plans... But if you want it faster, then like this comment ;)
In huge bundles, there are many modules that are useless for analyzing.
For example, look at the AST Explorer bundle:

In this case graph is not usable, moreover overloaded graph decreases rendering performance.
You can enable Hide 3rd party modules in the Options menu to hide modules that aren't requiring your project modules.
So, modules list, graph and file map will contain only modules that requiring your project modules.

Hide 3rd party modules is enabled by default.
All features is working correctly with webpack 2.x and 1.x
MIT
FAQs
Webpack plugin for analyzing internal processes, state and structure of bundles
The npm package webpack-runtime-analyzer receives a total of 53 weekly downloads. As such, webpack-runtime-analyzer popularity was classified as not popular.
We found that webpack-runtime-analyzer demonstrated a not healthy version release cadence and project activity because the last version was released a year ago. It has 1 open source maintainer collaborating on the project.
Did you know?

Socket for GitHub automatically highlights issues in each pull request and monitors the health of all your open source dependencies. Discover the contents of your packages and block harmful activity before you install or update your dependencies.
Product
Socket now supports Custom Roles and Repository Access Permissions so organizations can control who can access specific repositories and actions.
Product
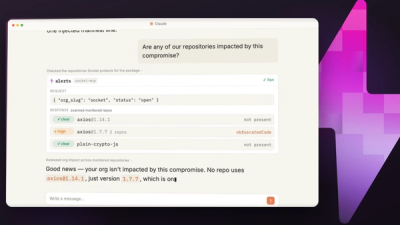
Socket MCP now lets AI assistants review org alerts, investigate threats using the Socket threat feed, and inspect package files in addition to dependency scoring.
Product
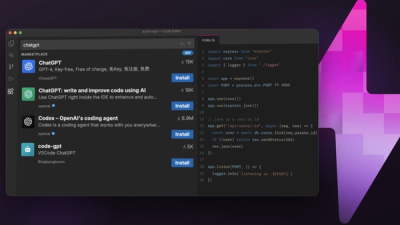
Socket Firewall blocks malicious VS Code and Open VSX extensions before install, protecting developers from compromised editor marketplaces.