Witcher API Tester

Witcher is a lightweight, easy to maintain and fast API tester that is configuration driven.
- No need to learn a complicated system
- Make API calls, then validate any part of the response header or body.
- Set variables based on the response, then use them in subsequent tests/calls.
- Check for side-effects in a database after each call.
Running the Project Locally
Setup / First Time
- Run
npm i the first time to install dependencies. - Update
./test-json/testSetup.json and ./test-json/testUnits.json to fit your API.
Running
npm run serve This will run the project and give you a command line prompt.- Options to Toggle:
Interactive – run tests one by oneStop on Failure - stop the test suite on the first failure.
- Choose
File on your computer as data source - Select one of the files placed in the
./tests-json folder - Optionally select database connection secrets from
./tests-json/secrets folder
Running the Project with Joystick-Hosted Configs
Joystick is robust remote configuration service. Using Witcher with Joystick-hosted configs means your entire team can collaborate and update your tests.
Setup / First Time
- Run
npm i for the first time to install dependencies. - Create an account on Joystick
- Create an organization, product and environment for your testing configs.
- Add the test suite:
- Click on "Create config" on the page of environment
- Paste the contents of
./test-json/testUnits.json into editor - Change the test suite to fit your API
- Specify the name of the test suite in the "Content ID" field (e.g. "testsuite-dev-billing")
- Click on "Save"
- Add the root config:
- Click on "Create config"
- Paste the contents of
./test-json/testSetup.json into editor - Change the root config to fit your API
- In the
testUnitsConfigs specify the Content ID of the test suite created in the previous step - Specify the name of the setup config in the "Content ID" field (e.g. "testsetup-dev")
- Click on "Save"
Running
npm run serve This will run the project and give you a command line prompt.- Choose options:
Interactive – run tests one by oneStop on failure - stop the test suite on the first failure
- Choose
Joystick as data source - For the first time you'll be requested to name the environment and specify the API key. You can find the API key in the settings of the environment on Joystick.
- Paste the
ContentID of the root config created in the previous step - Select one of the files placed in the
./tests-json folder - Optionally select secrets from
./tests-json/secrets folder - The environment info is stored locally (
homeDirectory + "/.witcher/.joystick.json") so when you run witcher again, you can select an existing profile.
Notes
- Supporting PostgreSQL and mySQL database out-of-the-box. Can be easily extended.
- Witcher requires two configurations: a Test Setup "root" config and one or more Test Units config. The Test Setup config can reference or more Test Units config.
- For an example with comments if you have have a PostgreSQL db to check see:
./tests-json/testSetup.json and ./tests-json/testUnits.json - For an example with comments for just API validation see:
./tests-json/noDbTestSetup.json and ./tests-json/noDbTestUnits.json
Schematics
Overview
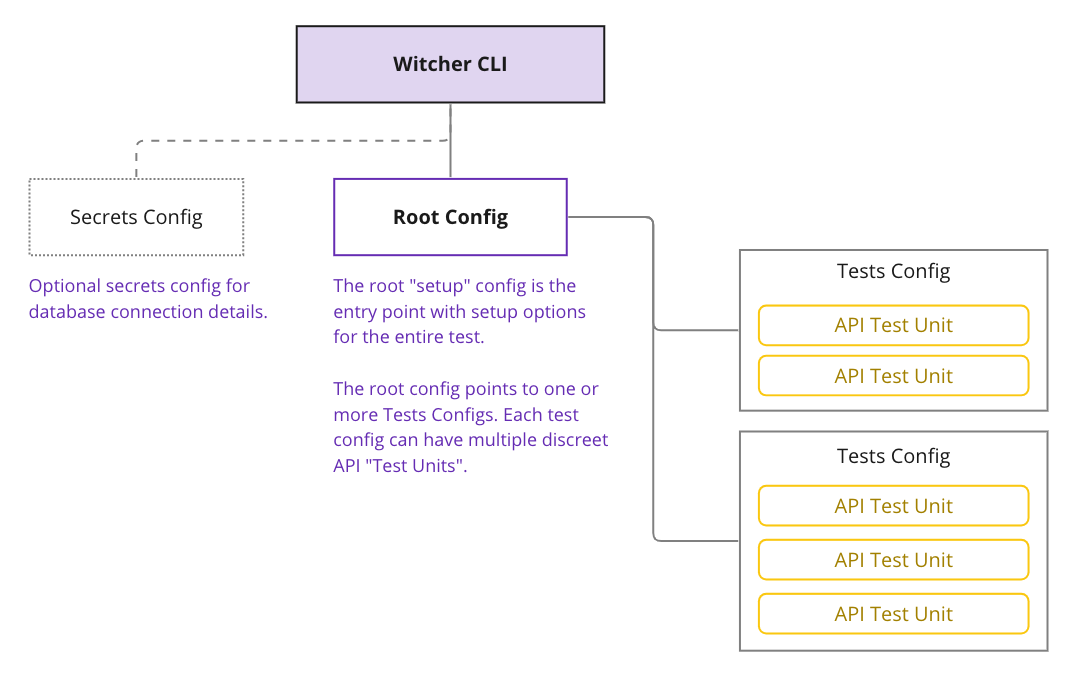
At least two configs are required to run Witcher: the "root" config and a test units config with one or more API tests defined.
Running Logic

The Test Setup "Root" Config
This is entry point / starting point of a test run. This should be a .json file in the ./tests-json folder.
{
  // REQUIRED: An array of Test Unit configuration file names. Should be in the same directory. Test units will be run in the order they are listed here.
  "testUnitsConfigs": ["testUnits.json"],
  // OPTIONAL: You can put any key:value pair here. They will be available in your test units. See the "Variables" section below for usage.
  "initialTestRunVariables": {
    "endpointRoot": "http://localhost:5001/",
    "apiKey": "abc123"
  },
  // OPTIONAL: You don't need this object if you don't want to check a database for side-effects.
  "databaseConnectionOptions": {
    "dbms": "postgresql", // We support "postgresql" or "mysql"
    "host": "YOUR DB HOST PATH",
    "port": 12345,
    "user": "YOUR DB USER NAME",
    "password": "YOUR DB PASSWORD",
    "database": "YOUR DB NAME",
    "sslCertificatePath": "./ca-certificate.cert" // OPTIONAL: If you need to use an SSL certificate. Path is relative to the root directory.
  },
  "testRunnerOptions": {
    // OPTIONAL. All params below are optional and false by default if not set.
    "debugResponseOptions": {
      "showRequestErrors": false, // Show the full request error (no response received).
      "showStatusCode": false, // Show the status code of the response.
      "showHeaders": false, // Show all of the headers of the response.
      "showBody": false // Show the full body of the response.
    }
  }
}
Debug Mode
- You can show the full error, if any, with the request by setting
testRunningOptions.debugResponseOptions.showRequestErrors. - You can show the full response status code, headers and body by setting the options in the Test Setup config
testRunnerOptions.debugResponseOptions object. Reference testSetup.json for usage.
The Secrets Config
If you want to share the original Setup Config with other developers, but don't want to share your secrets, you can put them in a separate file.
This file should be in the ./tests-json/secrets folder
{
  "databaseConnectionOptions": {
    "dbms": "postgresql", // We support "postgresql" or "mysql"
    "host": "YOUR DB HOST PATH",
    "port": 12345,
    "user": "YOUR DB USER NAME",
    "password": "YOUR DB PASSWORD",
    "database": "YOUR DB NAME",
    "sslCertificatePath": "./ca-certificate.cert" // OPTIONAL: If you need to use an SSL certificate. Path is relative to the /secrets directory.
  }
}
The Test Units Config
This should be a .json file that is in the ./tests-json folder.
{
    "testUnits": [...] // An array of Test Units
}
A Single Test Unit

This is one Test Unit. It goes inside the "testUnits" array of the Test Units config.
{
  "name": "Create a Widget",
  "description": "Create a new widget for ${ productId }",
  "endpointDetails": {
    "url": "${ endpointRoot }/product/${ productId }/widget/witcher-widget-${ random.hash }",
    "method": "POST",
    "headers": {
      "Content-Type": "application/json",
      "Authorization": "Bearer ${ accessToken }"
    },
    "body": {
      "data": "{\"widgetName\": \"Auto Test Widget ${ random.hash }\", \"widgetDescription\": \"A fine widget.\"}",
      "description": "Auto Test Config ${ random.hash }"
    }
  },
  "validation": {
    "statusCode": 200,
    "tablesToCheck": [
      {
        "tableName": "Widgets",
        "expectedDelta": 1,
        "rowChecks": [
          {
            "queryFilter": {
              "widgetSlug": "witcher-widget-${ random.hash }"
            },
            "rowCountAssertion": "value = 1",
            "columnChecks": {
              "productId": "value = '${ productId}'"
            }
          }
        ]
      },
      {
        "tableName": "ChangeLog",
        "expectedDelta": 1
      }
    ],
    "assertions": [
      {
        "path": "responseBody.widgetName",
        "assertion": "value = 'Auto Test Widget ${ random.hash }'"
      },
      {
        "path": "responseBody.widgetSlug",
        "assertion": "value = 'witcher-widget-${ random.hash }'"
      }
    ]
  },
  "variablesToSet": [
    {
      "variableName": "widgetId",
      "path": "responseBody.id"
    },
    {
      "variableName": "widgetSlug",
      "path": "responseBody.widgetSlug"
    }
  ]
}
Variables
Setting Variables
- Variables can be set using the "initialTestRunVariables" object in the setup config, or using any body or header parameter from a response to any test.
- Variables set in initialTestRunVariables are available immediately to any test.
- Variables set in Test Unit are only available after the are set, then can be used in any Test Units that come after.
You can set variables that can be used in subsequent tests by with data from any part of the body or header of an API response. See the variablesToSet array in the above example. Use responseBody or responseHeader as the start of your path. Below are some valid examples of how to set variables based on a response from an API call.
{
  "variablesToSet": [
    {
      "path": "responseBody", // The entire response body
      "variableName": "myResponseBody"
    },
    {
      "path": "responseBody[0].someNumber",
      "variableName": "myNumber"
    },
    {
      "path": "responseBody[1].brand.name",
      "variableName": "myBrandName"
    },
    {
      "path": "responseBody.1.myArray.2.title", // same as responseBody[1].myArray[2].title. Either notation works.
      "variableName": "myTitle"
    },
    {
      "path": "responseHeader.some-header",
      "variableName": "myResponseHeader"
    }
  ]
}
Using Variables
- Anywhere within the test unit, you can use this pattern
${ myVar } to use a variable you have previously set. - The Test Unit must still validate as JSON, so variable declarations must be used within strings. Thus, they can be used as keys as well!
- For numbers or boolean types, declare the type inside the curly brackets with immediately enclosing double quotes:
"myNumber": "${ someId : number }" -> OUTPUT "myNumber": 123. "myString": "Doing something with ${ myVar }!!" is supported"myNumber": "${ random.number : number }" is supported"myBoolean": "${ myBoolean : boolean }" is supported
{
  "endpointDetails": {
    "url": "${ endpointRoot }/product/${ productId }/widget/witcher-widget-${ random.hash }",
    "method": "POST",
    "headers": {
      "Content-Type": "application/json",
      "Authorization": "Bearer ${ accessToken }"
    },
    "body": {
      "data": "{\"widgetName\": \"Auto Test Widget ${ random.hash }\", \"widgetDescription\": \"A fine widget.\"}",
      "title": "My widget title: ${ myTitle }",
      "myNumber": "${myNumber : number }", // If you declare a type, and it is immediately surrounded by double quotes: will rendered as "myNumber": 123
      "myBoolean": "${myNumber : boolean }" // If you declare a type, and it is immediately surrounded by double quotes: will rendered as "myBoolean": true/false
    }
  }
}
Special Variables
There are some special variables you can use.
${ random.hash } Will insert a random 8 character hash. The hash will be the same for any Test Unit but will be different for different Test Units.${ random.number } Will insert a random number between 0-10000. The number will be the same for any Test Unit but will be different for different Test Units.${ testRunHash } Will insert a hash that represents the current full test run. It will be the same everywhere you use it during one test run.${ dateTime.now }" Will insert the date time as yyyy-mm-ddd hh:mm:ss.
Database Checking
With Database Checking
- Reference the information in testSetup.json and testUnits.json as you see fit for your endpoints and database.
- Supports a row count delta on any table. Will do a count on the designated tables before and after the test unit and compare the difference and if it matches what you expect.
- Supports checking value on any column with a query filter
- Supports checking all tables not explicitly mentioned have 0 row count changes.
Without Database Checking
- Reference the information in noDbTestSetup.json and noDbTestUnits.json as you see fit for your endpoints.
- On the Test Setup config,
databaseConnectionOptions is optional. - On the Test Unit config,
TestUnit.validation.tablesToCheck array is optional.
Validation and Assertions
With Witcher, you can validate three things:
- Simple database row count deltas for before and after the API call
- Make assertions on the responseBody or responseHeader.
- Make row-level checks on single DB tables with a simple filter.
Simply add a "validation" object to the Test Unit. Usage reference below.
Validation Usage Examples
"validation": {
    // OPTIONAL: "statusCode"
    // If not set, will default to 200. You may have cases where non-200 is valid. Can be a range.
    // Valid Examples: 200, ["200-299"], ["400-499", "200-299"]
    "statusCode": 400,

    // OPTIONAL: "tablesToCheck"
    // You must have a database configured in the Setup Config to use this feature.
    "tablesToCheck": [
        {
            "tableName": "MyTableName",
            "expectedRowCountChange": 1, // Will do a count on the table before and after the test unit and compare the difference.
            // OPTIONAL: rowChecks
            "rowChecks": [
                {
                    // OPTIONAL: queryFilter. If not present, will return every check every row from the table.
                    "queryFilter": {
                        "widgetSlug": "witcher-widget-${ random.hash }" // the WHERE clause of a query. e.g. SELECT * from "MyTableName" WHERE "widgteSlug" = 'witcher-widget-${ random.hash }'
                    },
                    // OPTIONAL: rowCountAssertions. If not present, expecting row count > 0
                    "rowCountAssertion": "value = 1", // make assertions on the count of rows that are returned.
                    // OPTIONAL: columnChecks. Key:value pairs where the key is the column name and value is the assertion. If not present, no column checks will be performed.
                    "columnChecks": {
                        "productId": "value = '${ productId}'" // make assertions on the value in individual columns.
                    }
                }
            ]
        },
        {
            "tableName": "MyOtherTableName",
            "expectedRowCountChange": -1
        }
    ],

    // OPTIONAL: "tablesHaveNoUnexpectedRowCountChanges"
    // This will check through all the db tables not explicitly defined in tablesToCheck and make sure row count changes for before and after the API call is 0.
    // The explicitly defined tables in "tablesToCheck" will use the expectedRowCountChange there.
    // If you have 12 tables, this will make 12 db calls before and again 12 calls after the API call.
    "tablesHaveNoUnexpectedRowCountChanges": true,

    // OPTIONAL: "assertions"
    "assertions": [
        {
            "path": "responseBody.name",
            "assertion": "exists" // a value at the path must exist.
        },
        {
            "path": "responseBody.name",
            "assertion": "typeof string" // "typeof [string, number, boolean, object, array, null]": the type of the value at the path must match the comparison.
        },
        {
            "path": "responseBody.name",
            "assertion": "value = 'myValue'" // "value [<,>,<=,>=,=,!=] X": the value at the path must match the comparison against X.
        },
        {
            "path": "responseBody.name",
            "assertion": "value = 'Hello, ${ myVar}'" // You can use variables previously set in assertions also.
        },
        {
            "path": "responseBody.array",
            "assertion": "length >= ${ someNumber }" // you can use variables in assertions!
        },
        {
            "path": "responseHeader.myHeader",
            "assertion": "value = 'hello'" // you can check headers as well.
        }
    ]
}
Sample Output
🐺⚔️  Welcome to Witcher API Test Runner!

Attempting "testSetup.json" as the config file....
Start Test Run..........................................................

💊💊💊💊💊 RUNNING TEST: Login 💊💊💊💊💊
🔗🔗🔗🔗🔗 POST http://localhost:5002/api/v1/user/login
✅ Login - Status Code Check Success! (Got 200 as expected default.)
🔧 'accessToken' SET AS: eyJhbGciOiJodHRwOi8v...

💊💊💊💊💊 RUNNING TEST: Login with wrong password 💊💊💊💊💊
🔗🔗🔗🔗🔗 POST http://localhost:5002/api/v1/user/login
✅ Login with wrong password - Status Code Check Success! (Got 400 as expected.)

💊💊💊💊💊 RUNNING TEST: Get Organizations and Products Tree 💊💊💊💊💊
🔗🔗🔗🔗🔗 GET http://localhost:5002/api/v1/organization/tree
✅ Get Organizations and Products Tree - Status Code Check Success! (Got 200 as expected default.)
🔧 'productContentId' SET AS: Wt200gpf
🔧 'productName' SET AS: Amazing Product 01

💊💊💊💊💊 RUNNING TEST: Get all Environments for a Product 💊💊💊💊💊
Get all environments for the product "Amazing Product 01" / Wt200gpf
🔗🔗🔗🔗🔗 GET http://localhost:5002/api/v1/product/Wt200gpf/env
✅ Get all Environments for a Product - Status Code Check Success! (Got 200 as expected default.)
🔧 'envContentId' SET AS: wLZH5rL0
🔧 'envName' SET AS: Dev01

💊💊💊💊💊 RUNNING TEST: Get tree for a given Environment 💊💊💊💊💊
🔗🔗🔗🔗🔗 GET http://localhost:5002/api/v1/product/Wt200gpf/env/wLZH5rL0/tree
✅ Get tree for a given Environment - Status Code Check Success! (Got 200 as expected default.)

💊💊💊💊💊 RUNNING TEST: Create a Folder 💊💊💊💊💊
Test Folder Description
🔗🔗🔗🔗🔗 POST http://localhost:5002/api/v1/product/Wt200gpf/env/wLZH5rL0/folders
✅ Create a Folder - Status Code Check Success! (Got 200 as expected default.)
🔧 'folderId' SET AS: 470
🗄️  Table 'ConfigFolders': Before: 198 After: 199
🗄️  ✅ Table 'ConfigFolders': row count changed by 1 as expected.
🗄️  Table 'ActionLogs': Before: 6790 After: 6791
🗄️  ✅ Table 'ActionLogs': row count changed by 1 as expected.
🗄️  ✅  🟦 All tables checked. No unexpected row count changes in any database tables.
🛂  ✅ Assertion Success! value = 33 for responseBody.productId.
🛂  ❌ Assertion Failed. responseBody.productId: Responded with number. Expecting response to equal string.

💊💊💊💊💊 RUNNING TEST: Delete a Folder 💊💊💊💊💊
Delete a folder from "Dev01" / wLZH5rL0
🔗🔗🔗🔗🔗 DELETE http://localhost:5002/api/v1/product/Wt200gpf/env/wLZH5rL0/folders/id/470
✅ Delete a Folder - Status Code Check Success! (Got 200 as expected default.)
🗄️  Table 'ConfigFolders': Before: 199 After: 198
🗄️  ✅ Table 'ConfigFolders': row count changed by -1 as expected.
🗄️  Table 'ActionLogs': Before: 6791 After: 6792
🗄️  ✅ Table 'ActionLogs': row count changed by 1 as expected.

💊💊💊💊💊 RUNNING TEST: Get Config from Web API 💊💊💊💊💊
Get the config!
🔗🔗🔗🔗🔗 POST http://localhost:5003/api/v1/config/auto-test-2lauob/dynamic
✅ Get Config from Web API - Status Code Check Success! (Got 200 as expected default.)

......................................................Finished!

   📋  Test Report  📋
   ------------------
   📋  Total Tests.........8
   ✅  Successful Tests....7
   ❌  Failed Tests........1
   ------------------
   ❌  Failed Tests:
   - Create a Folder
   ------------------
Happy testing! Contributions welcome!