Motion-Xray
Developer tools for iOS. Runs on the device, no browser or computer needed.
(think Firebug or Webkit Developer Tools)
TL;DR
gem install motion-xray- Replace
UIWindow with Motion::Xray::XrayWindow
And if you want the email features, add app.frameworks << 'MessageUI' to your
Rakefile.
The Problem
During development we rely heavily on the simulator to quickly view and test
features, but often when we finally install our app on a device, the experience
is not up-to-snuff with what was going on in the simulator. Views are off by a
few pixels, performance is not what we expect, and crashes occur where we never
saw them in the simulator. Sometimes these are device problems, sometimes it
has to do with dropping in and out of signal, all sorts of scenarios that we
cannot easily test for in the simulator.
And of course there is the problem that iOS devices have more features than the
simulator! Bluetooth 4, for example, is not easy to get setup in the simulator
(and you have to buy a USB bluetooth module).
My thesis is that we need to make on-device testing a more enjoyable and useful
testing environment, so that we are compelled to test on it sooner and more
often.
My Proposal
Motion-Xray is such a solution. During development you can use Xray as a UI
inspector, or to monitor the console log, preview how accessibile your app is
(to blind and color blind developers), or you can create a plugin that provides
information specifically useful to your app. Below I'll show how to create a
new plugin. Check out the plugins folder for some examples.
Overview
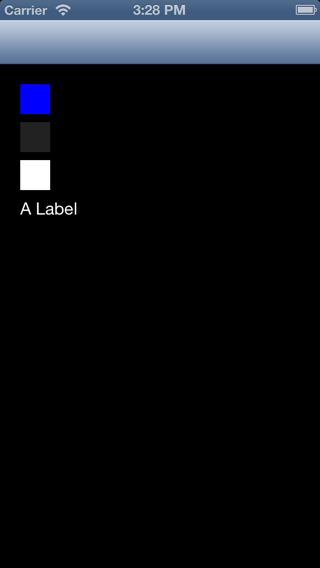
If you clone and run Xray in the simulator, you will see a very boring app:
Activate a "shake" gesture by pressing ⌘⌃Z and Xray will activate, which
displays this:
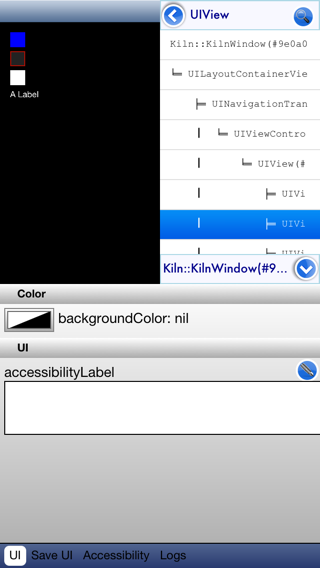
The application shrinks down to a quarter size, and the development environment
takes up the remaining space. That is Xray, an in-app debugging and development
environment! :smiley:
Features
That's enough to have the Motion::Xray.toggle command fired whenever you shake
the device. If you want to use some other mechanism that launches Xray (a
complicated gesture recognizer would be a good candidate), you can call
Xray.toggle (which calls either Xray.fire_up or Xray.cool_down). The
Motion::Xray::XrayWindow class is only used to listen for the shake event, so
using it will not affect your app in any other way.
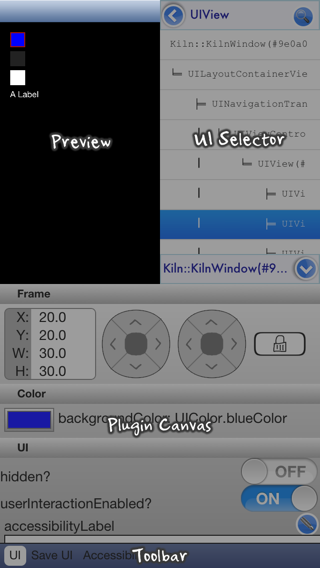
When you shake your phone and activate Xray, you are presented with three panes
and a toolbar at the bottom:
1. Preview
All the views under the main window are placed in the Preview area:

If you touch this area, you can get a quick preview of the view, or you can
quickly change to another view, or change orientation. After a few seconds,
Xray will automatically be displayed again. If you want to leave the Xray debug
area, you should shake the phone again.
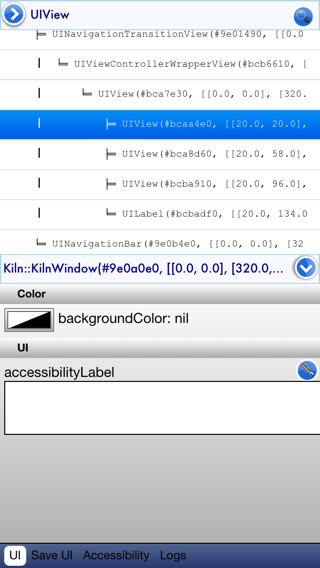
2. UI Selector
This pane shows the view hierarchy of your app:
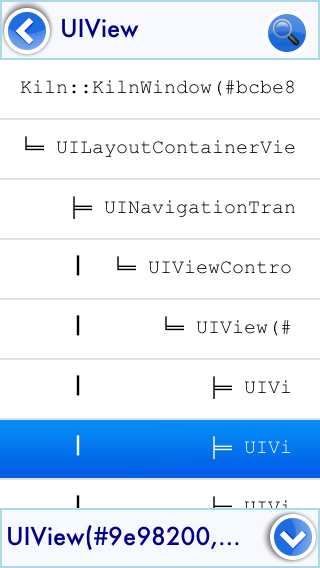
All the views on screen can be selected here, and a red box will show the bounds
of that view in the Preview pane. If you touch it again, that view will be
sent to whatever plugin you have visible, or you can press the "down" button in
the bottom-right corner of this pane.
Not all plugins respond to the selected view. For instance the accessibility
plugin will always display the entire screen, regardless of which view is
selected. The log plugin, on the other hand, displays the inspect information
about the view. And of course the UI plugin will change so that you can edit
the properties of that view.
The button in the upper-left corner expands this view, so that you can see the
tree easier.
In the upper-right corner is the button to activate a visual view selector:
You can tap a view to get information about it, or press and hold to make that
view "go away" so that you can choose the view behind it, or double-tap to
select that view.
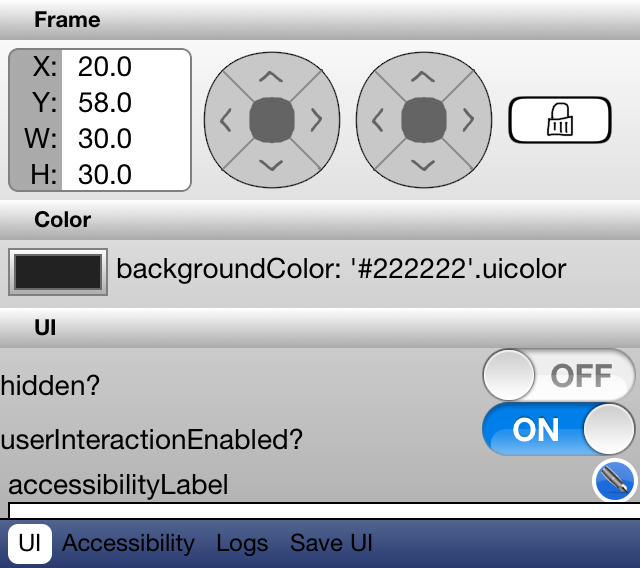
3. Plugin Canvas
Here's where the inspector and other plugins live, with a toolbar at the bottom
to select what plugin you want to view:
It is very easy to create new plugins, I'll go over that below. After you
create a new plugin, you register it with Xray:
Xray.register(YourPlugin.new)
Built-in plugins
UI (Motion::Xray::UIPlugin)
included automatically
The original idea for Xray was just this UI plugin. The other plugins came
later. I realized that it could (and should) be a generic "development
environment" instead of a "UI editor". Also, some early feedback from the
HipByte team helped open up this world of possibilities. :-)
UIPlugin uses a pluggable architecture. First, there are the editors:
Motion::Xray::TextEditorMotion::Xray::ColorEditorMotion::Xray::BooleanEditorMotion::Xray::FrameEditor
Second, these editors get associated with the view properties in a Hash that
is returned by the class method UIView##xray. In custom views you only need
to return the properties that your custom view uses; any editable properties
in views you inherit from will be included. Don't do any merging in your xray
method, that is handled by the plugin (by UIView##build_xray, in
xray_ext.rb)
class << UILabel
def xray
{
'Content': {
text: Motion::Xray::TextEditor,
}
}
end
end
If you inherit from a view and you want to disable one of the editors, assign
nil as the editor for that property. UIWindow does this to prevent editing
frame, hidden, and userInteractionEnabled properties from getting changed.
class << UIWindow
  def xray
    {
      'TurnOff' => {
        frame: nil,
        hidden: nil,
        userInteractionEnabled: nil,
      },
    }
  end
end
Writing custom editors can be time consuming, because they are often very UI
heavy (check out the ColorEditor to see what I mean). That said, the concept
is very easy:
-
extend the Motion::Xray::PropertyEditor class.
-
Return your editor in the edit_view(container_width) method. You don't have
to use the entire width, but your editor view can't be any wider.
If you want, you can return a "preview" that just shows the value, with a
button that opens a much larger editor. ColorEditor and TextEditor
behave this way.
-
To get the value of the property being edited, use the method get_value. It
will introspect self.target looking for a the appropriate getter method.
-
Whenever the value changes, assign the new value to set_value, and that
will fire a XrayTargetDidChangeNotification notification, which is used by
Motion::Xray::SaveUIPlugin. set_value will, like get_value, look for an
appropriate setter.
The editors should be able to be used for many properties, but if you're writing
a one-off editor, I suppose you could call the getters and setters directly, but
you should post the XrayTargetDidChangeNotification notification if you do
this.
Save UI (Motion::Xray::SaveUIPlugin)
After you have made your changes to your UIViews, you will want to save those
changes, right? This plugin is your friend. It is not included by default,
though, because not everyone uses teacup or pixate.
Many of the properties that you'll be editing will already have the appropriate
output in this plugin (it uses #inspect), but the way that Xray records your
changes can be customized in two ways:
-
Change the type of output that you want. The default is teacup, but it
is possible to setup the SaveUIPlugin to record NUI or Pixate changes as
well.
Motion::Xray.registerPlugin(Motion::Xray::SaveUIPlugin.new)
Motion::Xray.registerPlugin(Motion::Xray::SaveUIPlugin.new(:pixate))
-
Register custom output, by class. This will be used for any property, for
instance if you want UIColor objects to be persisted as an array of RGB
values, you could register that output like this:
register(:teacup, UIColor) { |color| "[#{color.red}, #{color.blue}, #{color.green}]" }
Because Xray uses SugarCube, a lot of the hard work is done for us there
(because SugarCube implements lots of useful to_s and inspect methods)
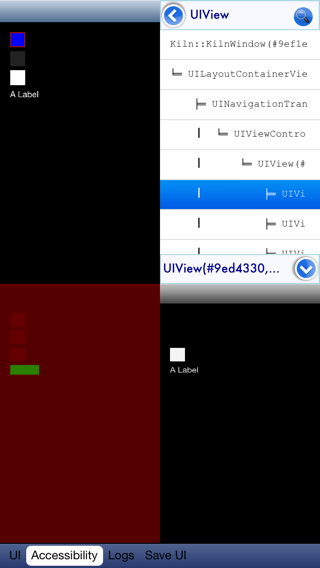
Accessibility (Motion::Xray::AccessibilityPlugin)
included automatically
This plugin provides two screenshots of the current screen. One that mimics how
a sightless person would "see" your app, and another that mimics how a (very)
color blind person would see it. Each one is at best, an approximation, but
the goal is that having this quick metric handy will encourage more developers
to spend some time on accessibility. A little goes a long way!
This plugin generated a lot of excitement when I announced Xray at the
RubyMotion conference, #inspect2013. We had all heard [Austin
Seraphin's][austinseraphin] talk the previous day, about how to improve
accessibility. This plugin tries to provide a visualization of the
recommendations he gave us - first and foremost, he recommended that you should
at least set the accessibilityLabel on custom views.
The left side shows a screenshot of your app with only red and green squares.
Green squares mean "you're doing OK". It does NOT mean that your app has "good"
accessibility, but at a minimum you should at least get all your screens "in the
green" before you send your app to an accessibility consultant.
The other screenshot is a your app in black and white, with colors desaturated.
An attempt to mimic how a color blind person would see your app. There are
many types of color blindness, and down the road I would love to see a few
different screen shots for each specific type in this pane. For now, it takes
the "common denominator" approach, which is to remove all color.
Log (Motion::Xray::LogPlugin)
included automatically
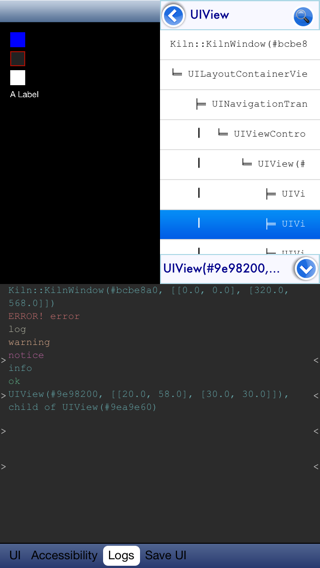
This plugin requires more involvement in your application code, if you want to
make it useful. You basically need to use the Motion::Xray::Log.log family of methods,
and each of them will write to the Motion::Xray::LogPlugin.log buffer. Here's a quick
way to do this:
Log = Motion::Xray::Log
Log.info('info!')
Log.error('an error occurred!')
Log.level = Log::Warning
Or you can write a log method yourself that calls one of the Motion::Xray::Log methods.
If you use CocoaLumberjack, it should be very easy to hook up Motion::Xray::Log, but
it will have to be done in Obj-C I think (I took a stab at it, but gave up when
I couldn't access the message property).
The upside to using these Motion::Xray::Log methods is that they use pretty coloring,
they output to both the console and the Xray log, and I'm planning on
including some awesome-print-like features to the log methods in the future
(or, more likely, delegate to awesome-print if it's available).
Writing an Xray plugin
My hope is that you will identify places in your app where you would benefit
from on-device feedback. Here are just some ideas as examples:
- Building an app that interacts with bluetooth devices: How about
signal strength? Devices detected? Connect and disconnect buttons?
- Interfacing with an API: Logging requests, logging parameters sent and
responses, interface to send arbitrary requests
- Building a game: framerate, number of textures on screen. To find out
when the performance breaks down on the device, you can't trust the
simulator!
So, let's get to it. I will use some code from AccessibilityPlugin in this
example.
First, the most basic plugin structure:
class AccessibilityPlugin < Plugin
name 'Accessibility'
def plugin_view(canvas)
return UIView.initWithFrame(canvas.bounds)
end
end
So far we have:
- named our plugin 'Accessibility'
- returned an empty container
Let's add our two image views. We'll make use of geomotion, which is required
by Xray:
def plugin_view(canvas)
  return UIView.alloc.initWithFrame(canvas.bounds).tap do |view|
    view.backgroundColor = :black.uicolor

    @accessibility = UIButton.alloc.initWithFrame(view.bounds
      .thinner(view.bounds.width / 2))
    @colorblind = UIButton.alloc.initWithFrame(view.bounds
      .thinner(view.bounds.width / 2)
      .right(view.bounds.width / 2))

    view << @accessibility
    view << @colorblind
  end
end
When the plugin is activated, we should grab a screenshot of the app and assign
it to each view. The show method is called on a plugin when it is selected.
def show
  Dispatch::Queue.main.async do
    @colorblind.setImage(get_colorblind_image, forState: :normal.uicontrolstate)
  end
  Dispatch::Queue.main.async do
    @accessibility.setImage(get_accessibility_image, forState: :normal.uicontrolstate)
  end
end
The AccessibilityPlugin does a few more things like show spinners, display a
big screenshot image on touch, and I haven't implemented the
get_{accessibility,colorblind}_image methods here, but hopefully this is
enough for you to get the gist of writing a plugin. Here is the entire list of
methods that you can call, or get called, on a plugin:
Properties
name - the name as it appears in the toolbarview - stores the plugin view that is returned by plugin_view. This
method is only created once (much like UIViewController#loadView)target - the view that has been selected in the UI picker
Methods you must implement
plugin_view(canvas_view) - the view returned by this method will be placed
in canvas_view when your plugin is selected
Methods you can implement
edit(target) - called when a new view is chosen in the UI picker.
You should call super, which assigns this view to the target property.
Then you can update self.view with any changes that you need to apply.show - called when your plugin is selected (this will always be after
edit(target))hide - called just before your plugin is removed from the canvas
Registering your plugin
Register your new plugin in the
AppDelegate#application(didFinishLaunchingWithOptions:) method.
class AppDelegate
def application(application, didFinishLaunchingWithOptions:launchOptions)
@window = Motion::Xray::XrayWindow.alloc.initWithFrame(UIScreen.mainScreen.bounds)
@window.makeKeyAndVisible
Motion::Xray.register(Motion::Xray::SaveUIPlugin.new)
Motion::Xray.register(CustomPlugin.new)
return true
end
end
Dependencies
Xray depends on geomotion, which I don't feel bad about, and SugarCube. I would
consider removing the SugarCube dependency, because not everyone uses it, but
SugarCube adds a ton of benefit (like #to_s and UIColor additions).


