@descope/react-sdk
This library lets you consume your login pages created by Descope console-app in your application
Under the hood, it uses web-js-sdk
Usage
Install the package
npm install @descope/react-sdk
Render it in your application
Wrap your app with Auth Provider
import { AuthProvider } from '@descope/react-sdk';

const AppRoot = () => {
	return (
		<AuthProvider projectId="my-project-id">
			<App />
		</AuthProvider>
	);
};
Use Descope to render specific flow
You can use default flows or provide flow id directly to the Descope component
1. Default flows
import { SignInFlow } from '@descope/react-sdk'
const App = () => {
return (
{...}
<SignInFlow
onSuccess={(e) => console.log('Logged in!')}
onError={(e) => console.log('Could not logged in!')}
/>
)
}
2. Provide flow id
import { Descope } from '@descope/react-sdk'
const App = () => {
return (
{...}
<Descope
flowId="my-flow-id"
onSuccess={(e) => console.log('Logged in!')}
onError={(e) => console.log('Could not logged in')}
/>
)
}
Use the useDescope, useSession and useUser hooks in your components in order to get authentication state, user details and utilities
This can be helpful to implement application-specific logic. Examples:
- Render different components if current session is authenticated
- Render user's content
- Logout button
import { useDescope, useSession, useUser } from '@descope/react-sdk'
const App = () => {
const { isAuthenticated, isSessionLoading } = useSession()
const { user, isUserLoading } = useUser()
const { logout } = useDescope()
if(isSessionLoading || isUserLoading){
return <p>Loading...</p>
}
if(isAuthenticated){
return (
<p>Hello ${user.name}</p>
<button onClick={logout}>Logout</div>
)
}
return <p>You are not logged in</p>
}
Session token server validation (pass session token to server API)
When developing a full-stack application, it is common to have private server API which requires a valid session token:
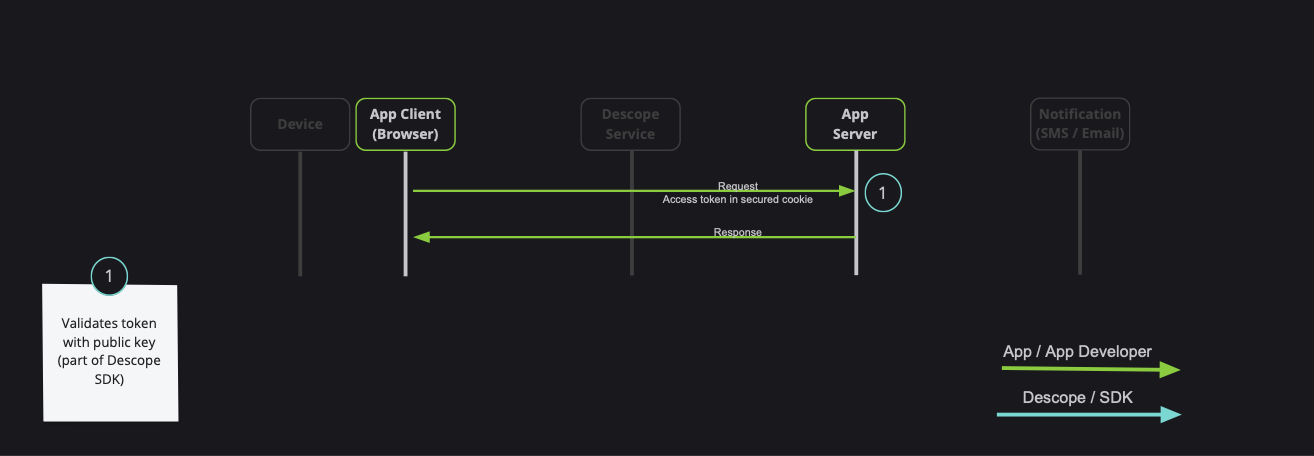
Note: Descope also provides server-side SDKs in various languages (NodeJS, Go, Python, etc). Descope's server SDKs have out-of-the-box session validation API that supports the options described bellow. To read more about session validation, Read this section in Descope documentation.
There are 2 ways to achieve that:
- Using
getSessionToken to get the token, and pass it on the Authorization Header (Recommended) - Passing
sessionTokenViaCookie boolean prop to the AuthProvider component (Use cautiously, session token may grow, especially in cases of using authorization, or adding custom claim)
1. Using getSessionToken to get the token
An example for api function, and passing the token on the Authorization header:
import { getSessionToken } from '@descope/react-sdk';
export const fetchData = async () => {
const sessionToken = getSessionToken();
const res = await fetch('/path/to/server/api', {
headers: {
Authorization: `Bearer ${sessionToken}`
}
});
};
An example for component that uses fetchData function from above
import { fetchData } from 'path/to/api/file'
import { useCallback } from 'react'
const Component = () => {
const onClick = useCallback(() => {
fetchData()
},[])
return (
{...}
{
<button onClick={onClick}>Click Me</div>
}
)
}
2. Passing sessionTokenViaCookie boolean prop to the AuthProvider
Passing sessionTokenViaCookie prop to AuthProvider component. Descope SDK will automatically store session token on the DS cookie.
Note: Use this option if session token will stay small (less than 1k). Session token can grow, especially in cases of using authorization, or adding custom claims
Example:
import { AuthProvider } from '@descope/react-sdk';

const AppRoot = () => {
	return (
		<AuthProvider projectId="my-project-id" sessionTokenViaCookie>
			<App />
		</AuthProvider>
	);
};
Now, whenever you call fetch, the cookie will automatically be sent with the request. Descope backend SDKs also support extracting the token from the DS cookie.
Run a local example
There is a simple app that uses Descope React SDK, with two routes
In order to run this app locally, do the following steps:
- Clone this repository
- Navigate to repository directory
- Run
npm i - Create a
.env file with the following variables (or alternatively export them manually):
// .env
# Your project id
DESCOPE_PROJECT_ID=<project-id>
# Flow id to run, e.g. sign-up-or-in
DESCOPE_FLOW_ID=<flow-id>
# Optional - Descope base url, e.g. http://localhost:8000
DESCOPE_BASE_URL=<base-url>
# Optional - Debug mode
DESCOPE_DEBUG_MODE=<debug-mode>
# Optional - Theme, can be "light", "dark" or "os" (Auto select based on the OS theme settings). Default is "light"
DESCOPE_THEME=<theme>
# Optional - Telemetry key provided by Descope Inc
DESCOPE_TELEMETRY_KEY=<telemetry-key>
# Optional - Step-Up flow id. If exists, The home page of a logged-in user will show a step-up button
DESCOPE_STEP_UP_FLOW_ID=step-up
- Run
npm run start - Go to
http://localhost:3000/ and press the "Start Flow" button
Note: if you change env file (for example, change DESCOPE_PROJECT_ID), you need to rerun npm run start


