grunt-flexcombo
flex-combo插件的grunt版本.
Getting Started
依赖 Grunt 版本~0.4.1
安装
npm install grunt-flexcombo --save-dev
安装后,在Gruntfile.js中载入任务
grunt.loadNpmTasks('grunt-flexcombo');
"flexcombo" 任务配置
步骤
在grunt.initConfig()中添加flexcombo的配置:
grunt.initConfig({
flexcombo:{
main:{
options: {
target:'src',
urls:'/group/project',
port:'80',
proxyport:'8080',
servlet:'?',
separator:',',
charset:'utf8',
proxyHosts:['a.com','b.com'],
filter:{
'-min\\.js':'.js'
}
}
}
}
});
其中,options的更多配置请参照flex-combo。
flexcombo将在本地启动两个服务

启动服务后,可以直接通过localhost来预览本地文件
http://localhost/group/project
若要模拟真实环境调试,两种方法(二者取其一):
- 将cdn配向开发机
127.0.0.1 g.tbcdn.cn a.tbcdn.cn - 将浏览器或者设备HTTP代理配置到本机的反向代理服务的端口
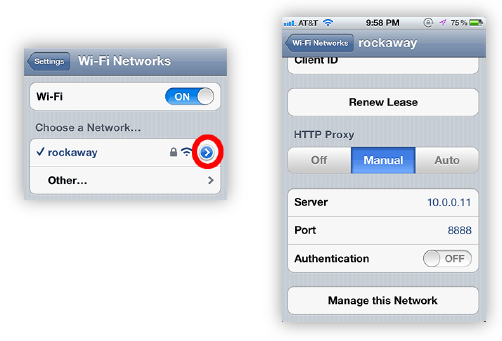
比如在手机终端设置代理方法:
说明
该服务添加了jayli-server,支持标准格式的 SSI include
<!--#include path="asdf.html" -->
使用案例1
KISSY 组件如何调试线上代码
使用案例2
KISSY项目构建工具和本地环境:generator-clam一同使用,构建工具生成本地配置文件,形如:
flexcombo:{
	options: {
		target:'src',
		urls:'/<%= pkg.group %>/<%= pkg.name %>',
		port:'<%= port %>',
		servlet:'?',
		separator:',',
		charset:'utf8'
	},
	main:{}
}
执行任务
task.run(['flexcombo']);


