
chuck 


chuck is a webservice that converts files that Unity understands to Unity3D AssetBundles.
From the Unity3D documentation:
AssetBundles are files which you can export from Unity to contain Assets of your choice, [that] can be loaded on demand by your application. This allows you to stream content, such as models, Textures, audio clips, or even entire Scenes [...].
Chuck notably features REST & Server-Sent APIs, a command-line interface, an admin page for managing API keys, and integrates Toureiro for viewing queued jobs.
:point_right: See also: @mitm/assetbundlecompiler, fluent JavaScript API to create AssetBundles from any files.
:point_right: See also: @mitm/unityinvoker, invoke Unity3D CLI with a fluent JavaScript API.
Requirements
- Node.js v.7 or higher ;
- yarn dependency manager, for development or standalone installation ;
- An Azure account where chuck will send its generated asset bundles (limitation) ;
- A running MongoDB server ;
- A running Redis server ;
- :warning: An activated installation of Unity on the machine :warning:
- If Unity is not installed in the standard path, configure the path via the Configuration
- You must activate Unity if not already done, even with a free plan, read Unity activation from AssetBundleCompiler
- An installation of IfcConvert (IfcOpenShell) available as
IfcConvert via the PATH, but only if you are converting IFC files.
Installation
Please note that chuck is not a pure library, nor a reusable Express middleware. It's a standalone application with its own logging, database, etc. But it can be installed via an npm package and exposes a public JavaScript API as well, for writing plugins or configuring and boot it.
Chuck can be installed in two ways, either:
Standalone installation
Classical approach. Use this to deploy chuck directly without integrating it to another application (except API communication of course)
1. Install the application and dependencies
$ git clone git@github.com:mitmadness/chuck.git && cd chuck
$ yarn install
$ yarn build
2. Configure Chuck
Create a blank .env file at the root.
Look at the .env.defaults file (don't delete it, it's part of the application), it contains key/value pairs of environment variables.
You can now override values from .env.defaults to match your own environment when the default values are incorrect.
You can also, of course, set environment variables by hand with your preferred method (exports, inline variables when launching the command...).
3. Run it
Run yarn start. That's it.
Embedded installation
Somewhat recommended. Use this when deploying chuck inside/aside of your own application, or any other reason (including philosophical ones) that would necessitate using chuck as an npm package rather than a raw Git clone.
@todo
Configuration
Available configuration keys
This is the interface for the available configuration (we'll see in the next sections how to configure it).
interface IChuckConfig {
env: EnvType;
logLevel: string;
serverPort: number;
mongoUrl: string;
redis: { host: string; port: number; db: number };
adminWebUis: { enable: boolean, user: string; password: string; };
unityPath: string;
azure: { enableEmu: boolean; };
}
Using environment variables
Chuck is primarily configurable via environment variables.
You can set environement variables in the way you prefer. Tou can set them inline, in the CLI command that launches chuck, via export, or for example, if you use the standalone installation, via an .env file at root that overrides Chuck's .env.defaults values (only for redefined keys).
Then, environment variables are simply mapped to the real configuration. Take those example:
- To set
config.logLevel, set CHUCK_LOGLEVEL - To set
config.adminWebUis.enable, set CHUCK_ADMINWEBUIS_ENABLE.
Etc. Prefix with CHUCK_ and replace dots with underscores, all uppercase.
Configuring in embedded mode
When using the embedded version, you can either use environment variable, or use a fluent API that configures a Chuck instance.
@todo
Public REST / SSE API
Chuck exposes a simple REST and SSE (Server-Sent Events) API for converting files to asset bundles.
Create a new conversion request
POST /api/conversions
This endpoint will create a conversion request. It will immediately push on the conversions queue, so the job will start as soon as possible (conversions are ran sequentially).
Request
:closed_lock_with_key: This endpoint requires authentication using an API key. You can generate one either via the CLI, or via the web interface. Pass the API key like this: Authorization: Bearer YOUR_API_KEY.
Note: compilerOptions is an object of options to pass to AssetBundleCompiler (abcompiler's reference).
Note: azure.sharedAccessSignatureToken is an Azure SAS token that lets chuck create the asset bundle binary blob on Azure, without giving your Azure credentials to chuck. You can automate token creation with Azure CLI or Azure SDKs.
POST /api/conversions
Content-Type: application/json
Authorization: Bearer {{apiKey}}
{
  "assetBundleName": "myassetbundle.ab",
  "compilerOptions": {
    "targeting": "webgl"
  },
  "assetUrls": [
    "https://url/to/a/file.fbx",
    "https://url/to/another/file.ifc"
  ],
  "azure": {
    "host": "{{azureHost}}",
    "container": "{{azureContainer}}",
    "sharedAccessSignatureToken": "{{azureSharedAccessSignatureToken}}"
  }
}
Successful response
HTTP/1.1 202 Accepted
Content-Type: application/json; charset=utf-8
{
  "assetBundleName": "myassetbundle.ab",
  "conversion": {
    "logs": [],
    "assetBundleUrl": null,
    "error": null,
    "step": null,
    "isCompleted": false,
    "jobId": "138"
  },
  "compilerOptions": {
    "targeting": "webgl",
    "editorScripts": [],
    "buildOptions": {}
  },
  "azure": {
    "host": "{{azureHost}}",
    "container": "{{azureContainer}}",
    "sharedAccessSignatureToken": "{{azureSharedAccessSignatureToken}}"
  },
  "assetUrls": [
    "https://url/to/a/file.fbx",
    "https://url/to/another/file.ifc"
  ],
  "code": "00cad557-5acc-4c6b-a987-79f650d67197"
}
Retrieve a conversion request
GET /api/conversions/{{code}}
Retrieves a previously-posted conversion request. This endpoint has no authentication as the conversion code adds a first layer of security (moreover, conversion requests are not editable).
Request
GET /api/conversions/{{conversionCode}}
Successful response (completed conversion)
HTTP/1.1 200 OK
Content-Type: application/json; charset=utf-8
{
  "assetBundleName": "myassetbundle.ab",
  "conversion": {
    "assetBundleUrl": "https://{{azureHost}}/{{azureContainer}}/myassetbundle.ab",
    "error": null,
    "step": null,
    "isCompleted": true,
    "jobId": "139"
  },
  "compilerOptions": {
    "targeting": "webgl",
    "editorScripts": [],
    "buildOptions": {}
  },
  "azure": {
    "host": "{{azureHost}}",
    "container": "{{azureContainer}}",
    "sharedAccessSignatureToken": "{{azureSharedAccessSignatureToken}}"
  },
  "assetUrls": [
    "https://url/to/a/file.fbx",
    "https://url/to/another/file.ifc"
  ],
  "code": "00cad557-5acc-4c6b-a987-79f650d67197"
}
Successful response (failed conversion)
HTTP/1.1 200 OK
Content-Type: application/json; charset=utf-8
{
  ...
  "conversion": {
    "assetBundleUrl": null,
    "error": {
      "name": "Error",
      "message": "Error(s) while downloading assets",
      "errors": [
        {
          "name": "FetchError",
          "message": "request to https://url/to/a/file.fbx failed, reason: getaddrinfo ENOTFOUND url url:443"
        },
        {
          "name": "FetchError",
          "message": "request to https://url/to/another/file.ifc failed, reason: getaddrinfo ENOTFOUND url url:443"
        }
      ]
    },
    "step": "cleanup",
    "isCompleted": true,
    "jobId": "140"
  },
  ...
}
Real-time conversion job's events
GET /api/conversions/{{code}}/events
This is the only way to know precisely when a conversion is completed (or failed). It also sends various events concerning the job state, which step is running, and various logging informations.
This is an Server-Sent Events (SSE) endpoint, use the browser's native interface EventSource to access it, or a browser/node.js polyfill like the eventsource package on npm.
Request
GET /api/conversions/{{conversionCode}}/events
Available query parameters:
?sseType={events|data}: whether to use data-only SSE messages or event+data. If using data, the event name will be in the type property of the data-only message. Defaults to events.?replay={true|false}: whether to dump missed events between the job start and the connection to the SSE endpoint. Defaults to true.
Successful response (completed conversion)
:warning: The SSE spec does not allow a server to close the connection is a clean way. It's client's responsibility to close the connection (EventSource#close()) when it receives either:
- An
error event: happens only if the conversion does not exist (check the code in the URL) - A
queue/conversion-ended event that contains either an error or an URL to the resulting asset bundle.
HTTP/1.1 200 OK
Content-Type:text/event-stream; charset=utf-8
Cache-Control: no-cache

: sse-start
event: processor/step-change
data: {"step":{"priority":10,"name":"Download remote assets","code":"download-assets"},"message":"Starting \"Download remote assets\""}

event: queue/conversion-start
data: {"message":"Conversion started"}

event: processor/download-assets/start-download
data: {"message":"Downloading \"https://i.ytimg.com/vi/qIIN64bUbsI/maxresdefault.jpg\""}

event: processor/step-change
data: {"step":{"priority":30,"name":"Execute AssetBundleCompiler to assemble the asset bundle","code":"exec-assetbundlecompiler"},"message":"Starting \"Execute AssetBundleCompiler to assemble the asset bundle\""}

event: processor/exec-assetbundlecompiler/abcompiler-log
data: {"message":"Preparing Unity project in /tmp/AssetBundleCompiler"}

event: processor/exec-assetbundlecompiler/abcompiler-log
data: {"message":"Copying assets to /tmp/AssetBundleCompiler/Assets/CopiedAssets"}

event: processor/exec-assetbundlecompiler/abcompiler-log
data: {"message":"Copying custom editor scripts to /tmp/AssetBundleCompiler/Assets/Editor/CopiedScripts"}

event: processor/exec-assetbundlecompiler/abcompiler-log
data: {"message":"Generating asset bundle in /tmp/AssetBundleCompiler/GeneratedAssetBundles"}

event: processor/exec-assetbundlecompiler/abcompiler-log
data: {"message":"Updating resource: maxresdefault.jpg"}

event: processor/exec-assetbundlecompiler/abcompiler-log
data: {"message":"Moving asset bundle to target destination"}

event: processor/exec-assetbundlecompiler/abcompiler-log
data: {"message":"Cleaning up the Unity project"}

event: processor/exec-assetbundlecompiler/abcompiler-log
data: {"message":"Done."}

event: processor/step-change
data: {"message":"Starting \"Upload the AssetBundle on Azure\"","step":{"code":"upload-bundle","name":"Upload the AssetBundle on Azure","priority":40}}

event: processor/upload-bundle/upload-start
data: {"message":"Uploading \"/tmp/chuck-exec-assetbundlecompiler-1495536189347/myassetbundle.ab2\" to Azure"}

event: processor/upload-bundle/upload-end
data: {"message":"Upload terminated with success","blobUrl":"https://mitmtest.blob.core.windows.net/assetbundles/myassetbundle.ab2","blobResult":{"container":"assetbundles","name":"myassetbundle.ab2","lastModified":"Tue, 23 May 2017 10:43:19 GMT","etag":"\"0x8D4A1C886E0CAC4\"","requestId":"54ef0e35-0001-0088-4db1-d3adde000000","contentSettings":{"contentMD5":"xRF+eIadlPTWCVp8Y8IkjA=="}}}

event: processor/step-change
data: {"message":"Performing cleanup for steps: download-assets, exec-assetbundlecompiler, upload-bundle (All steps have terminated successfuly)","step":{"code":"cleanup","name":"Conversion artifacts cleanup","priority":null}}

event: queue/conversion-ended
data: {"message":"Conversion terminated with success!","assetBundleUrl":"https://mitmtest.blob.core.windows.net/assetbundles/myassetbundle.ab2","error":null}

: sse-keep-alive
: sse-keep-alive
Command Line Interface
Chuck provides a CLI tool that is exported as the bin file in the package. In standalone mode, use it with yarn cli -- --arguments.
chuck-cli help get available commandschuck-cli help <command> displays informations about a command and available argumentschuck-cli api:generate-key generates an API key. Pass --save to save the generated key to the database.chuck-cli api:revoke-key <key> revokes an API key stored in the database.
Admin Web Interface
A very, very simple administration interface is available under https://chuck/admin and uses HTTP Basic authentication, with the same credentials as Toureiro (see Configuration section).
It lets you create and revoke API keys as an alternative to the CLI.
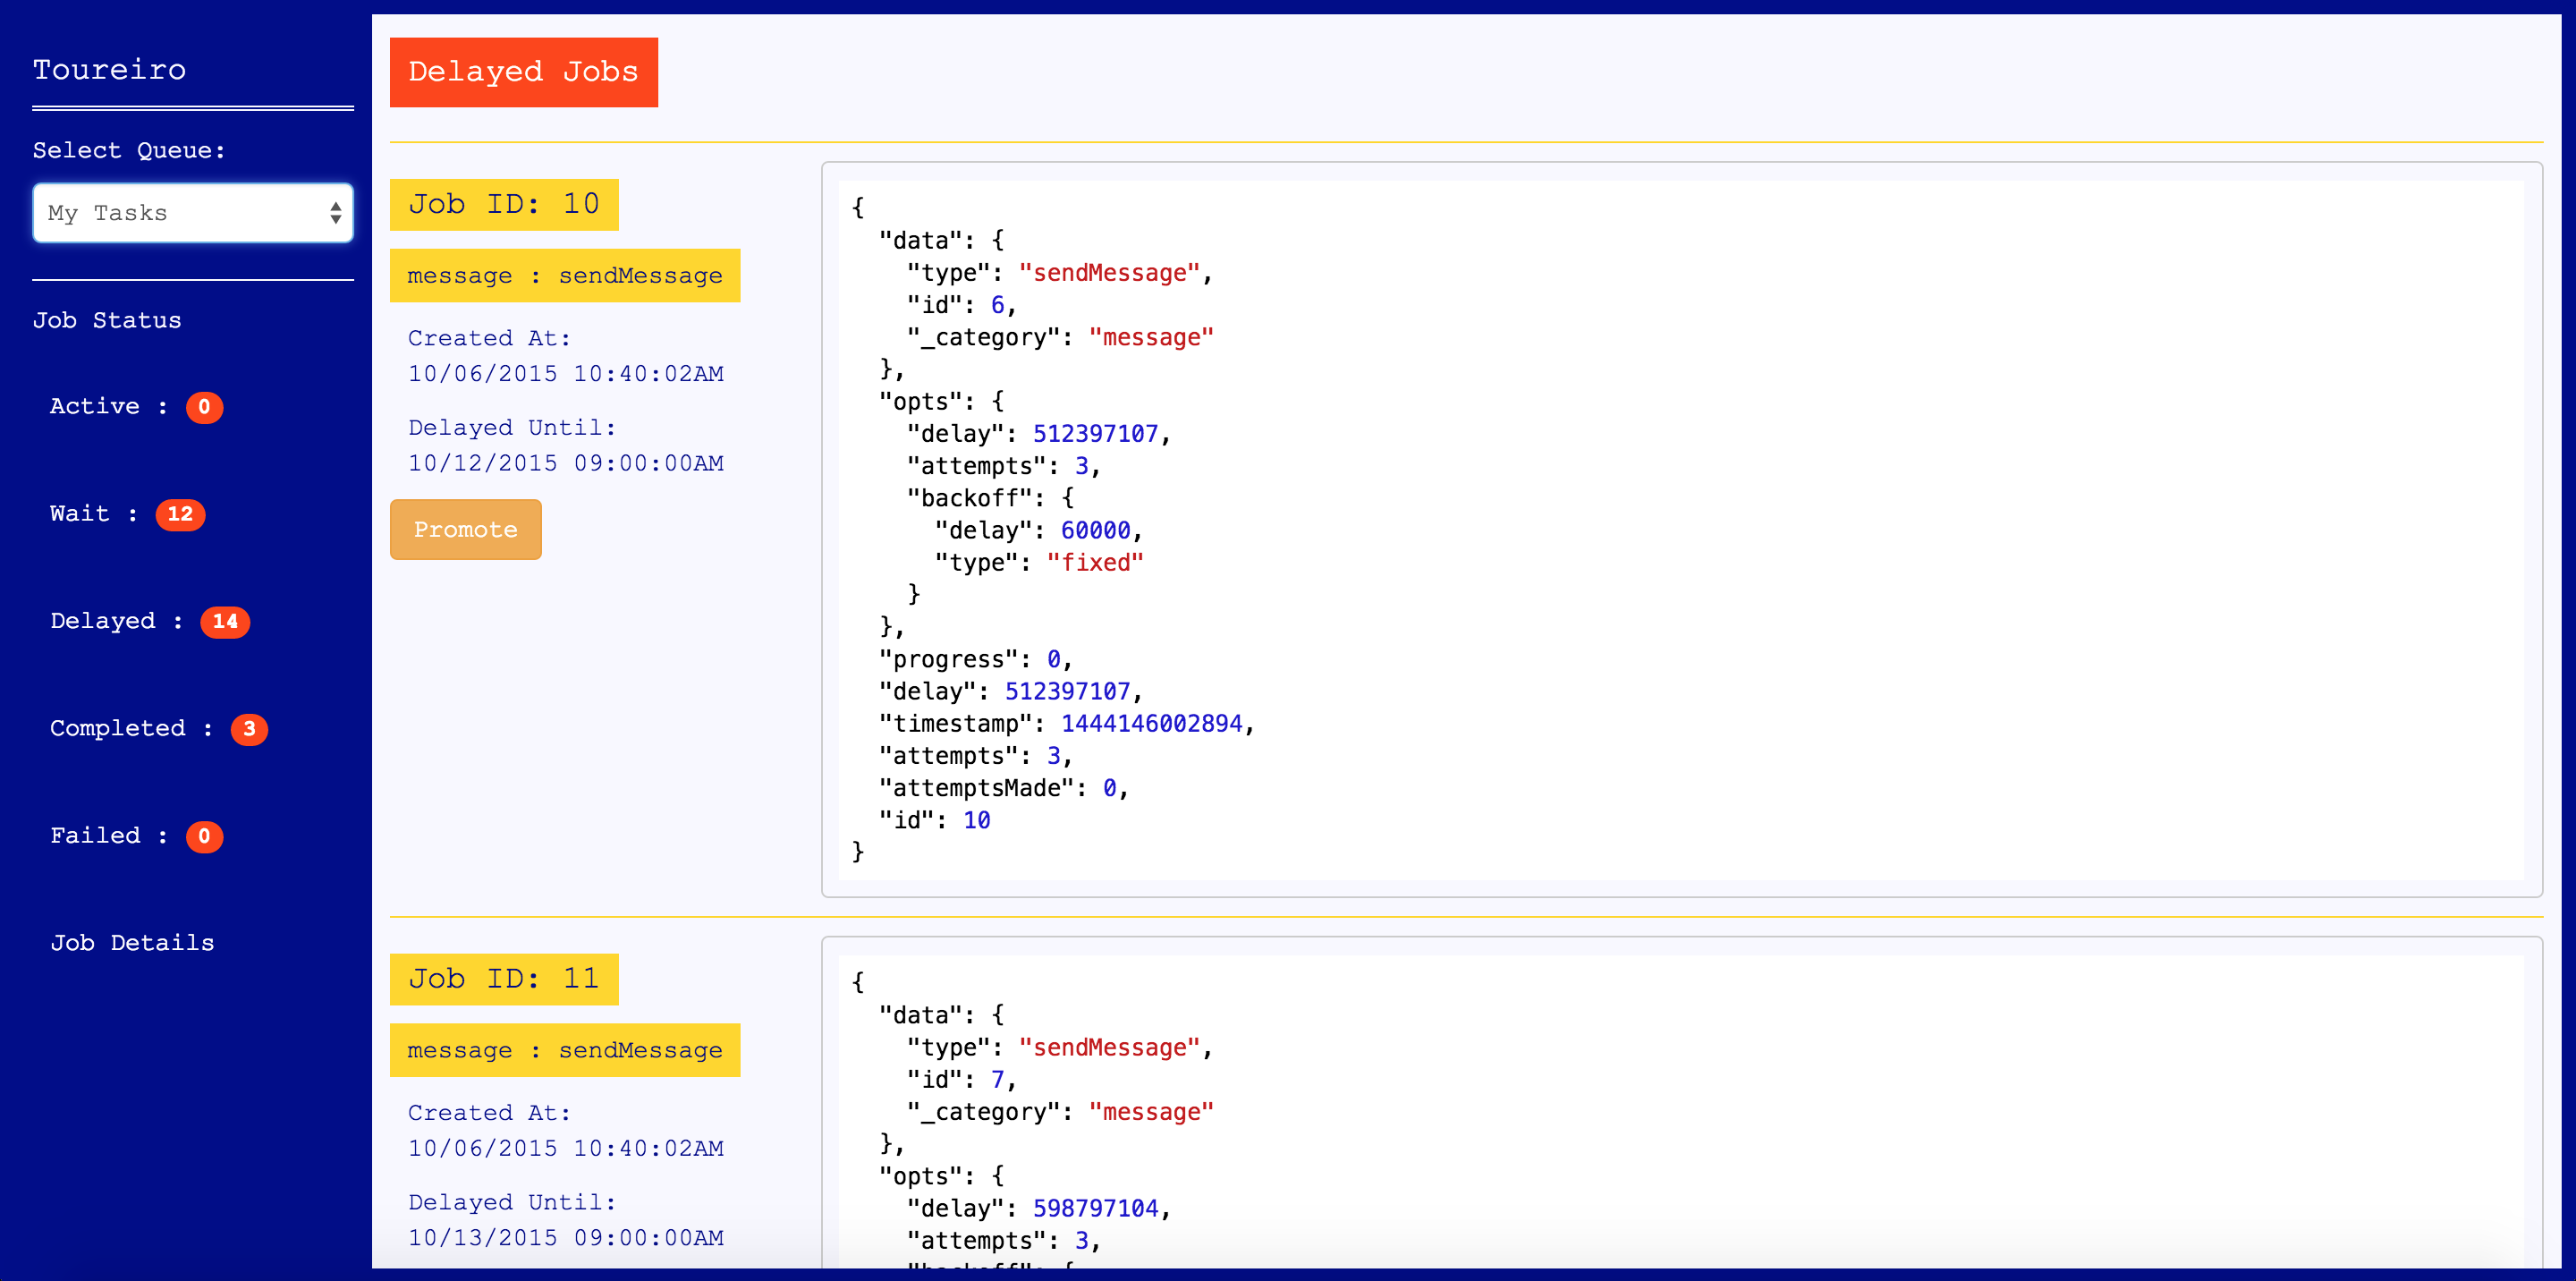
Toureiro
Chuck embarks Toureiro, which is...
A graphical monitoring interface for the distributed job queue bull built using express and react. Toureiro provides simple monitoring features as well as the ability to promote delayed jobs directly.
Toureiro's interface can be found on https://chuck/toureiro, and is protected by the same HTTP Basic Auth and credentials used to login to the administration interface (see Configuration section).
Development & Contributing
The workflow is based on npm scripts:
yarn watch: starts the TypeScript compiler in watch mode ;yarn build: compile TypeScript sources ;yarn start: (run watch or build before!) starts the server and restarts it when the compiled files change (production or development, but for production you could use pm2 with yarn standalone) ;yarn cli: shortcut to chuck's CLI (usage: yarn cli -- command --arg1 --arg2) ;yarn standalone: starts the Express server without nodemon ;yarn lint: checks code style on the TypeScript sources (recommended: install typescript and tslint extensions for your editor).
So, basically, to start a development session, run in a terminal:
yarn install
yarn watch
In a terminal aside of the first one, run:
yarn start
You can also create an .env file at the project root to override the default environment variables in .env.defaults.


