Web Component Collector
A biometrics collector custom element built with svelte + ts + vite + DaisyUI. The purpose of this component is to be almost completely modular and customizable, allowing the user to change most aspects to their liking.
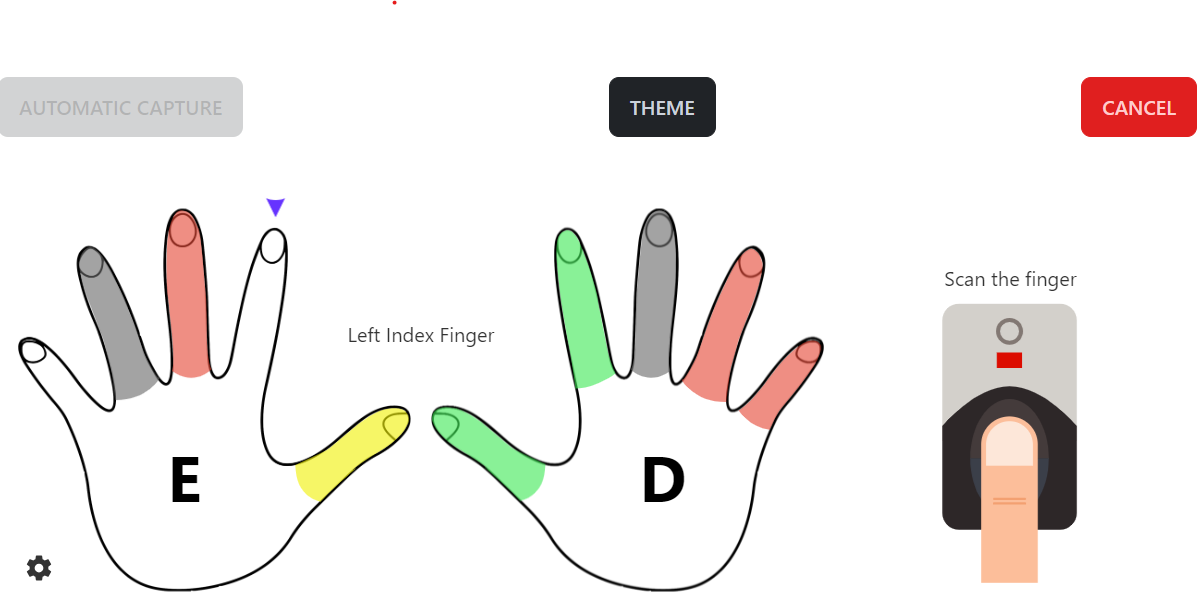
Fingerprint Collector
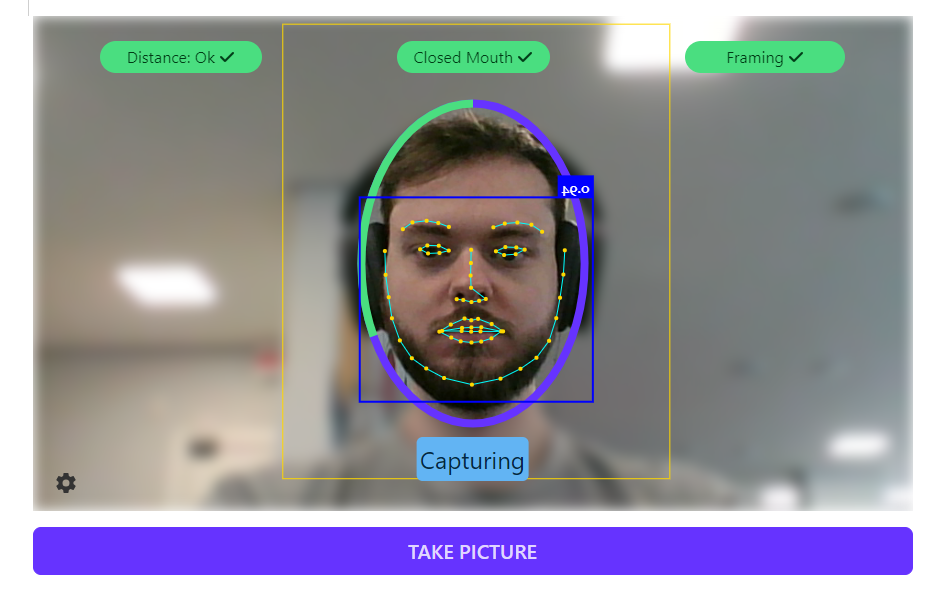
Face collector
Quick Start
Simply include the last version of Web Component Collector directly from a CDN in your HTML, as shown in the example below:
<!DOCTYPE html>
<html>
<head>
<title>Bry Web Component Collector</title>
<!-- NPM module -->
<script type="module" src="https://unpkg.com/bry-biometric-collector@latest/dist/bry-biometric-collector-main.js"
defer> </script>
<script>
window.addEventListener("export-fingers", async (a) => {
/** @type {BodyPart[]} fingers */
const fingers = a.detail;
console.log('captured event export-fingers', fingers )
});
window.addEventListener("face-unconformities-validated", (e) => {
console.log(`captured event 'face-unconformities-validated'`, e)
});
</script>
</head>
<body>
<biometric-collector
import_extension_script="true"
extension_name="BryWebExtension"
extension_url_script="https://www.bry.com.br/downloads/extension/v2/api/v1/extension-api.js"
extension_url_chrome="https://chrome.google.com/webstore/detail/assinatura-digital-no-nav/mbpaklahifpfndjiefdfjhmkefppocfm"
extension_url_firefox="https://addons.mozilla.org/pt-BR/firefox/addon/assinatura-digital-navegador/"
collector_select="BOTH"
video_dimensions="800x450"
min_nfiq_acceptable="3"
show_theme_picker="false"
>
</biometric-collector>
</body>
</html>
Building
nvm use install / use
npm i
npm run build
In dist folder you should get the biometric-collector.js script and a folder containing the weights used to perform image recognition. To use the web-component, refer to the example at client integration. Clone the project and place it in the same root path as the project, then rename the bry-collector-component-client directory to "client".
npm run build-and-copy
There is also a development server complete with HMR, thanks to Vite. However the development server mode is limited because it cannot access the relevant endpoints. To run the development server run:
npm run start
Functionalities
The web component collects fingers and face biometrics. The logic was created to serve the business requirements of the PSBIO network. As such, there are buttons for defining a finger as missing and unavailable and many other business specific paramters and properties.
To capture the finger, the component relies on the BryWebCollector extension. To validate the fingers quality and duplicity, the component originally used an endpoint to query for those values. Later, a web assembly transpilation of the original binaries was released and the web-component now uses that to perform those calculations. At its current state the web component allows for switching between the 2 finger validators. Still, we require an endpoint to be able to validate face captures.
To obtain the output of the component, the hosting page should listen for a specific event on the window. Please refer to the events section.
Customization
The web-component purports to be more customizable than not. As such, there are a number of ways the host (or client) may interact with the component in build and run time to change its behaviour.
Customizable Build-time parameters (props)
Some parameters are passed-in at build time as an html parameter in the tag. If you would like any of these parameters to also be configurable at run time, that can probably be arranged. The parameters use snake_case because of svelte's limitation.
Currently supported tag parameters:
-
weights_path: Should point to folder containing the weights, it will be used to perform image recognition.
Default: "https://unpkg.com/bry-biometric-collector@latest/dist/weights/"
Example: weights_path="https://myapp.mydomain.com/public/weights/"
-
extension_name: The extension name that the webcomponent should use to perform finger capturing.
We require the extension to be able to access the fingerprint scanner. The webcomponent uses this extension by calling window[extension_name].
Default: "BryWebExtension"
Example: extension_name="BryWebExtension"
-
enable_minutiae: Show face detections and capture border in face collector.
Default: "false"
Example: enable_minutiae="true"
-
*video_dimensions: The face collector's video dimensions. *Required if using face collector. Accepts a string with widthxheight
Example: video_dimensions="800x500"
-
collector_select: The collectors that should be rendered. Possible values are "BOTH", "FINGERS", "FACE", "DOCUMENT", "STREAM". When using only one, the tabs are hidden.
Default: "BOTH"
Example: collector_select="FACE"
-
min_nfiq_acceptable: The minimum nfiq score that should be accepted.
Default: 3
Example: min_nfiq_acceptable=2
-
show_theme_picker: Wether to render the theme picker button in the fingers tab. This is useful when testing multiple the multiple types themes to choose from.
Default: true
Example: show_theme_picker=false
-
import_lottie: Wether to import the lottie script from inside the web component. If you already import the script, you can disable this.
Default: true
Example: import_lottie=false
-
hide_tabs: Wether to hide the built-in tab selector component. You may want to use an outside tab selection mechanism. To do that see the events section.
Default: false
Example: hide_tabs=false
-
import_extension_script: Wether to import the personalized extension script.
Default: true
Example: import_extension_script=false
-
liveness_enable: Wether to enable liveness verification in the facial capture process. If enabled, the liveness check enpoint also has to be set.
Default: false
Example: liveness_enable=false
-
extension_url_chrome: The url provided to the user when the component detects the extension isn't installed in a chrome environment.
Default: https://chrome.google.com/webstore/detail/assinatura-digital-no-nav/mbpaklahifpfndjiefdfjhmkefppocfm
Example: extension_url_chrome="https://chrome.google.com/webstore/detail/minha-extensao/"
-
extension_url_mozilla: The url provided to the user when the component detects the extension isn't installed in a mozilla environment.
Default: https://addons.mozilla.org/pt-BR/firefox/addon/assinatura-digital-navegador/
Example: extension_url_mozilla="https://addons.mozilla.org/pt-BR/firefox/addon/minha-extensao/"
-
extension_url_script: The url provided import extension script.
Default: https://www.bry.com.br/downloads/extension/v2/api/v1/extension-api.js
Example: extension_url_mozilla="https://www.bry.com.br/downloads/extension/v2/api/v1/extension-api.js"
-
evaluate_photo: Wether to enable photo evaluation in the facial capture process. If enabled, the evaluation endpoint also has to be set.
Default: true
Example: evaluate_photo=false
-
show_capture_button: Wether to hide capture button. If you enable a button to trigger manual capture, it will be shown below the video.
Default: true
Example: show_capture_button=false
-
show_unconformities: Wether to hide unconformities and capture preview. If enabled, a preview of the photo will be shown along with possible nonconformities.
Default: true
Example: show_unconformities=false
-
video_overlay: Camera filter/color outside the oval area. Possible values are "none", "white", "blue", "red", "green", "gray", "yellow", "black". HTML colors are also accepted.
Default: white
Example: video_overlay=white
-
video_overlay_transparency: Specifies the level of transparency for the filter/color applied outside the oval area of the camera. The value is given on a scale from 0 to 100, where 0 means fully opaque and 100 means fully transparent.
Default: 0
Example: video_overlay_transparency=60
-
show_config_button: Wether to hide config button. It will be shown below the video on the left side.
Default: true
Example: show_config_button=false
-
show_auto_capture_button: Whether to hide the auto capture button. If you enable a button to trigger automatic capture, it will be shown below the oval.
Default: false
Example: show_auto_capture_button
-
language: Language of the webcomponent that should override the browser language. Possible values are "pt-br", "en-us", "es-cl".
Default: Browser language
Example: language="es-cl"
-
show_camera_button: Wether to hide swap camera button. It will be shown below the video on the right side.
Default: true
Example: show_camera_button=false
-
show_justification_field: Whether to hide the justification field for unconformities during Face collection. When enabled, the justification field will be visible.
Default: true
Example: show_justification_field=false
-
min_eye_to_eye_dist: The minimal interocular distance of face that should be accepted on face collector.
Default: 0
Example: min_eye_to_eye_dist=50
-
show_watermark: Whether to show water mark. When enabled, the water mark Bry will be visible.
Default: true
Example: show_watermark=false
-
face_detection_sensitivity: Defines the level of strictness for face detection based on the confidence score returned by the model. Higher sensitivity requires higher confidence to validate a face.
Accepted values:
permissive: Accepts faces with low detection confidence (score ≥ 0.2). Accepts less confident but potentially valid detections.medium: Balanced threshold (score ≥ 0.4). Balanced for general use.strict: Requires high confidence to validate a face (score ≥ 0.6). Stricter, reduces false positives.
Default: permissive
Example: face_detection_sensitivity=strict
-
camera_device_id: Defines the camera device ID to be used for video capture. This allows specifying which camera should be used when multiple cameras are available.
Default: undefined (uses default camera)
Example: camera_device_id="0" or camera_device_id="camera-id-string"
-
liveness_blob_size: Defines the size that the encrypted liveness blob file should return.
Accepted values:
normal: Normal size of the liveness blob.small: Small size of the liveness blob.
Default: normal
Example: liveness_blob_size=small
-
show_console: Whether or not to display a box with console logs, for easier debugging. When enabled, the transparent log box will be visible.
Default: false
Example: show_console=true
Run-time Configuration
Functions
The Web-component exports a series of functions that the host environment may call. These functions are called by simply getting the html element from the page and invoking them. The following actions can be performed during run-time from the host environment:
-
setBioAcJWTToken*: Sets the JTWToken to perform face validations on the specified back-end. This configuration is necessary when the evaluate_photo parameter has a value of true. Receives a string token, a string for the base URL, and a string path to the evaluate biometrics endpoint. This endpoint was previously used for both fingers and face validations, now however, we only use it for face validation. The endpoint should accept a post containing in the body an object with a list of BodyParts, such as described here. The return is expected to be an object containing a list called bodyParts conforming to the BodyPartReturnType interface, but also a field called icaoWarnings containing an array of unconformities in string form.
Example:
component.setBioAcJWTToken(accessToken, 'https://bioac.hom.bry.com.br', '/api/ar-universal/evaluate-biometrics');
-
setAutomaticFingers: Sets the automatic fingers. Paints the fingers with the finger automatic color (unless they exceed the number of fingers to collect). The host may call this function to set which fingers should be captured in this session. Accepts an array of strings and/or numbers indicating which fingers should be automatic. By default no fingers are automatic.
Example setting the pinkies and thumbs as automatic 🤙 🤙:
component.setAutomaticFingers(['LEFT_HAND_PINKY', 'RIGHT_HAND_PINKY', 4, 5]);
-
setNumberOfFingersToCollect: Sets the number of fingers that will be colored as suggested. The default is 4.
-
setDefaultTheme: Sets the Theme upon startup. Accepts any of the daisyUI themes as a string. The Default is "bry". You can check out the "bry" definition in the src/assets/themes.json
-
setMissingFingers: Sets which fingers are already missing. This makes these fingers no longer collectable. Accepts an array of strings and/or numbers indicating the fingers.
-
setUnavailableFingers: Sets which fingers were unavailable. By default these fingers are not collectable, that may be changed by calling the setUnavailableFingersEditable with true. Accepts an array of strings and/or numbers indicating the fingers.
-
setUnavailableFingersEditable: Sets wether unavailable fingers (set through the function below) should be editable.
-
setUnsuggestedFingersCollectable: Turns the unsuggested fingers collectable or not. Accepts a either false or true. Default: true.
-
setAllSuggestedCollectable: Makes the suggested fingers (from the list) collectable at any moment. Has no effect if setUnsuggestedFingersCollectable is true. Accepts a either false or true. Default: false.
-
clear: Programmatically invokes the clear button's functionality. Usually there is no need to call this function. If you really need to call this function, be careful though, as the clear buttons functionality is dependant upon which finger is selected.
-
reset: Completely resets the web component to its startup state. Unlike clear, this function doesn't depend on finger selected state.
-
$destroy: Removes the web component from the DOM and triggers all onDestroy handlers, also stops the camera on face collector.
-
setExportEnableStrategy: Sets the export buttons enable strategy. The available strategies are subdivied into 3 groups. The CollectedFingersExportEnableStrategy, the BadFingersExportEnableStrategy, and the FaceExportStrategy. The first one defines how the fingers should be captured and how many. The second one fulfills the edge case, when no finger can be captured. The third one affects the behaviour when the face capture is involved. When evaluating wether to turn the export button on or not, first we check the first strategy, and if it doesn't turn on, then evauluate the second strategy, and then the third. The last two strategies will not override the first one to turn the button off, only on. The CollectedFingersExportEnableStrategy accepts the following values:
-
ALWAYS_ON
The default. The export button will always be clickable.
-
SOMETHING_COLLECTED
The button will turn on when any finger is collected.
-
SOMETHING_SUGGESTED_COLLECTED
The button will enable when some suggested finger gets collected.
-
EVERY_SUGGESTED_COLLECTED
The button will only be clickable when every suggested finger is collected.
-
ALWAYS_OFF
The button will always be off.
The BadFingersExportEnableStrategy accepts:
-
DISABLED
The default. Will not influence the export button.
-
ALL_BAD
Enables export button when all fingers are either unavailable or missing.
-
ALL_MISSING
Enables export button when all fingers are missing.
-
ALL_UNAVAILABLE
Enables export button when all fingers are unavailable.
-
ALL_SUGGESTED_BAD
Enables export button when all suggested fingers are bad.
The FaceExportStrategy accepts:
-
DISABLED
FaceExportStrategy will have no effect. Default value.
-
ENABLE_ONLY_FACE_CAPTURED
Keeps the button disabled when the face still hasn't been captured.
-
TAKE_TO_OTHER_TAB
The button will enable as if it were using the disabled strategy, but will take the user to the other tab instead of exporting the fingers, if the face hasn't been saved.
Example:
component.setExportEnableStrategy('SOMETHING_COLLECTED', 'ENABLE_ALL_BAD');
-
getBiometrics(ignoreBlob = false): BodyPart[] | Promise<BodyPart[]>: Programmatically get the currently collected biometrics. Will return a list of body-parts containing face if captured and missing or unavailable fingers. *As of version 2.0.0, this function optionally takes a parameter, and may also be asynchronous. When ignoreBlob is true, the biometrics will be exported without the blob even if it is present. When false, and the blob is present, the function will act asynchronously, and will also include the liveness blob in base64 when the promise resolves. When the blob isn't present, the parameter is ignored. The liveness blob will be present in the face body part with the key livenessBlob like so:
      {
        bodyPart: 'FACE',
        data: '<base64Data>',
        justification: '<justification>',
        livenessBlob: 'base64Blob'
      }
-
getFingers: synchronously get just the fingers.
-
getJustification: Get the picture justification the user typed in.
-
setBlacklistedFingers: Sets a list of fingers (base64 WSQ images) against which to check during capture phase. If any finger is found within this list, the component will refuse to collect that finger and show an error swal. *Only available when using wasm mode.
Example:
component.setBlacklistedFingers([bodyPart: "LEFT_HAND_PINKY", data: "<base64Data>"]);
-
useWasm: Wether to use web-assembly to check for duplicate fingers and finger quality locally. If set to false, will instead query the evaluate biometris end-point. Default: true.
-
setMakeValidateBiometricsRequests: Wether to perform the request or not. If this is disabled, the component will operate in iframe mode, sending a message to the parent page instead of making the request directly, so the parent can handle it however they want.
In this mode the web component will perform a postmessage on the window.parent like so:
window.parent.postMessage({ type: 'ValidateBiometricsRequest', data: biometrics }, '*');
And subsequently listen to a response named ValidateBiometricsWebComponentResponse containing
the data or ValidateBiometricsWebComponentResponseError.
The web component expects the validate biometrics request to return the data in the following fashion:
{
 bodyParts: {
   minutiae: number;
   quality: number;
   format: string;
   bodyPart: string;
   data: string;
   status?: string;
   justification?: string;
   capturedEyeToEyeDist?: number,
   minEyeToEyeDist?: number,
 }[];
 icaoWarnings: string[];
}
-
getEventEmitter: Returns the event emitter that waits for the responses if operating in iframe mode. Use this to post the response message back to the web component.
-
setCode: Sets the code to use when validating the fingers using endpoint.
Example:
component.setCode('78855675753');
-
setAgrCode: Sets Agr code to send in request.
Example:
component.setAgrCode('78855675753');
-
setAgrAuthentication: Wether to send the agrAuthentication: true on evaluate biometrics request.
-
setId: Sets the request ID to use when validating the face/fingers using endpoint.
Example:
component.setId('61a8cc3d-cb31-4b94-acd9-b283f185a94f');
-
setMissingDisabled: Disables the missing button completely. Accepts a boolean.
Example:
component.setMissingDisabled(true);
-
setUnavailableDisabled: Disables the unavailable button completely. Accepts a boolean.
Example:
component.setUnavailableDisabled(true);
-
showRandomizeFingerButton: Wether to show the randomize fingers button. This is especially useful when validating AGR and you need to be able to randomize the available finger. Accepts a boolean that switches on and off.
Example:
component.showRandomizeFingerButton(true);
-
stopCamera: Stops the camera. This calls track.stop() and assigns null to video src object.
-
getStream: Returns the video stream currently playing. Usefull if stop camera didn't work and you want to do it yourself from the outside.
-
setNotifyEachFingerCollected: Wether to send a finger-collected message with the currently collected fingers after every successfully collected finger
Example:
component.setNotifyEachFingerCollected(true);
-
setNotifyFingersCleared: Wether to send a finger-cleared message whenever the clear btn is clicked.
-
async setFaceCollectorComponent: Sets the face collector component within the web component. This is required when changing tabs in the embedded application. This is because of a svelte issue. If switching to the face tab after closing the component (or changing route) doesn't open the camera, call this to fix it. This happens because the component's onDestroy never actually gets called and therefore the on mount doesn't get called so we have to compensate that by manually telling svelte to render the component, and this function does that. This came up as a side effect of separating the face collector component into chunks and dynamically loading them. Hopefully in svelte version 4 that issue will get fixed.
-
setEnableFaceDetector: You may disable the face detector in case your computer isn't powerful enough. This will prevent files associated with facial detection and automatic capture to be loaded. Automatic capture will be disabled.
-
setRequiredFingers: You may define a list of fingers and their base64 WSQ values that should be captured. This forces the capture process to match the given finger at the given position, and stopping otherwise. Only works in wasm mode and requires agrAuthentication to be true.
Example:
component.setRequiredFingers([bodyPart: "LEFT_HAND_PINKY", data: "<base64Data>"]);
-
setCollectedFingers: Sets up the component to contain the given fingers in collected state. It is necessary to provide the bodyPart and the finger base64data. The component will try to get the nfiq result from the base64data so it has to be at least valid. You may also provide the nfiq and or the image to display when clicking the finger. If no image is given, a generic finger image will be used. It is recommended to pass in the nfiq value if you have it, since the nfiq score is calculated with wasm and may be resource-intensive.
Example:
component.setCollectedFingers([bodyPart: "LEFT_HAND_PINKY", data: "<base64Data>", nfiq: 3, img: "imageData(with out without URI)"]);
-
setLivenessEndpoint(url: string): Sets the liveness endpoint to validate the capture. This is required when liveness is enabled. The component will uise this endpoint to evaluate capture and facial liveness.
-
async captureFace(
validateCapture: boolean
): Promise<{
returnCode: handleCaptureReturnStatus;
message?: string;
}: Calls the capture face function from the web component directly. The advantage of this method is that it calls the capture function directly, works with or without liveness detection, and allows you to enable or disable detection validation during face capture.
-
async captureSingleFinger(
fingerNameOrIndex: number | BodyPartNames,
getFingerprintParams: CaptureParams
): Promise<{
returnCode: handleCaptureReturnStatus;
bodyParts: BodyPart[];
matchingFingers?: BodyPartNames[];
message?: string;
}: Calls the capture function from the web component. The advantage of this method over directly using the extension is the abstranctions and data structures granted. This function will call the capture finger from the extension but will also behave according to the web component's rules (using wasm, agr validation, etc...). The getFingerprintParams is an object that, if passed, will call the extension passing it along. The default params passed to getFingerprint are as follows { outputFormat: 'BASE64', imageFormat: 'BMP', nonce: 'webCollector', timeout: 3 }. This function relies on throwing and returning errors to indicate results. It may throw an error of type CaptureApiError containing a field status of type CaptureErrorStatusEnum. If the capture doesn't catastrophically fail in one of those categories, it may return an error code in the returnCode field which is of type handleCaptureReturnStatus. If the everything is ok, the return will be 'CAPTURED' and you may find the captured finger in the bodyParts object. If it fails, there will be an error code explaining the failure, along with an html-ready message in the message field. If the wasm if enabled, the web component may also return the offending finger names in case a of a duplicate finger error. That will appear in the matchingFingers field.
-
async verify(
missingFingers: Array<number | BodyPartNames> = [],
unavailableFingers: Array<number | BodyPartNames> = [],
automaticFingers: Array<number | BodyPartNames> = [2, 3, 6, 7],
code: string
): Configures the custom element to perform a verify according to the PSBIO network rules. Be sure to call a reset when swapping between operations. Under the hood, the component is customized with the following:
await setFaceCollectorComponent();
setUnavailableFingers(unavailableFingers);
setMissingFingers(missingFingers);
setAutomaticFingers(automaticFingers);
setNumberOfFingersToCollect(1);
setExportEnableStrategy(
  CollectedFingersExportEnableStrategy.SOMETHING_SUGGESTED_COLLECTED,
  BadFingersExportEnableStrategy.ENABLE_ALL_SUGGESTED_BAD,
  FaceExportStrategy.DISABLED
);
setUnsuggestedFingersCollectable(false);
setAllSuggestedCollectable(true);
setCode(code);
-
async update(
missingFingers: Array<number | BodyPartNames> = [],
unavailableFingers: Array<number | BodyPartNames> = [],
automaticFingers: Array<number | BodyPartNames> = [2, 3, 6, 7],
code: string
): Configures the custom element to perform an update according to the PSBIO network rules. Be sure to call a reset when swapping between operations. Under the hood, the component is customized with the following:
await setFaceCollectorComponent();
setUnavailableFingers(unavailableFingers);
setMissingFingers(missingFingers);
setAutomaticFingers(automaticFingers);
setNumberOfFingersToCollect(1);
setExportEnableStrategy(
  CollectedFingersExportEnableStrategy.SOMETHING_COLLECTED,
  BadFingersExportEnableStrategy.ENABLE_ALL_SUGGESTED_BAD,
  FaceExportStrategy.DISABLED
);
setUnavailableFingersEditable(true);
setCode(code);
-
async enroll(
code: string
): Configures the custom element to perform an enroll according to the PSBIO network rules. Be sure to call a reset when swapping between operations. Under the hood, the component is customized with the following:
await setFaceCollectorComponent();
setAutomaticFingers([2, 3, 6, 7, 4, 5, 0, 1, 8, 9]);
setNumberOfFingersToCollect(4);
setExportEnableStrategy(
  CollectedFingersExportEnableStrategy.EVERY_SUGGESTED_COLLECTED,
  BadFingersExportEnableStrategy.ENABLE_ALL_BAD,
  FaceExportStrategy.DISABLED
);
setCode(code);
-
async verifyAgr(
missingFingers: Array<number | BodyPartNames> = [],
unavailableFingers: Array<number | BodyPartNames> = [],
automaticFingers: Array<number | BodyPartNames> = [2, 3, 6, 7],
blacklistedFingers: { data: string; bodyPart: FingerName }[] = [],
code: string,
agrCode: string
): Configures the custom element to perform a verify of an AGR, according to the PSBIO network rules. Be sure to call a reset when swapping between operations. Under the hood, the component is customized with the following:
await verify(missingFingers, unavailableFingers, automaticFingers, code);
setAgrAuthentication(true);
setMissingDisabled(true);
setUnavailableDisabled(true);
setAllSuggestedCollectable(false);
showRandomizeFingerButton(true);
setBlacklistedFingers(blacklistedFingers);
setCode(code);
setAgrCode(agrCode);
Events
The web component listens to and emits a few events. The events emitted are:
- brycc-camera-ready: When the camera device has been opened and is ready. The event payload has the structure:
{detail: {stream: MediaStream}
-
brycc-face-initialized: When the IDRnd widget is initialized and ready for face capture operations.
-
stream-ready: When the face capture stream is ready for biometric capture. This event is fired when the camera opens successfully. The event payload has the structure:
{detail: {message: string}}
- stream-error: When an error occurs in the face capture stream. This event is fired when camera fails to open or other stream errors occur. The event payload has the structure:
{detail: {message: string, error: Event}}
- stream-lost-focus: When the stream is closed due to window losing focus. This event is fired when the browser window or tab loses focus and the camera stream is automatically closed. The event payload has the structure:
{detail: {message: string}}
- stream-capture: When a face capture is completed in the stream collector. This event can be fired with either success or error status. The event payload has the structure:
{detail: {image: string, blob: string, status: 'success'}}
{detail: {errorCode: string, translatedError: string, status: 'error'}}
-
face-scrapped: When the user scraps their face (by clicking capture again after having saved their picture) this event gets emitted without any data.
-
face-unconformities-validated: When the photo is captured and after evaluating it, an event of this kind is emitted with their picture like so:
  {detail: {bodyParts[{bodyPart:'FACE', data: string, livenessBlob: string *, livenessResult: string}, icaoWarnings: string[], status?: string]}
  * only if liveness_enable=true
- export-face: When the user saves their face (by clicking finish), an event of this kind is emitted with their picture like so:
{detail: {bodyPart: 'FACE', data: string, justification: string}}
- export-fingers: When the user clicks the export button an event of this kind gets fired. The behavior changes if the FaceExportStrategy is different from disabled. In that case, the export button will send an export-biometrics event. See below. The data is exported like so:
{detail: {bodyPart: string, data: string, justification: string}[]}
- export-biometrics: When the user clicks the export button and the FaceExportStrategy is different from disabled. In that case, the export button will send an export-biometrics event containing fingers and face biometrics if present. The data is exported like so:
{detail: {bodyPart: string, data: string, justification: string}[]}
-
finger-collected: When notifyFingerCollected is enabled, after every finger gets collected, this event is fired. The data is sent in the same fashion as the previous event.
-
finger-cleared: If notifyFingersClearedStore is enabled, when the clearbtn is pressed, the fingers' current state are exported..
-
document-scrapped: When the user scraps their document photo (by clicking capture again after having saved their picture) this event gets emitted without any data.
-
document-unconformities-validated: When the photo is captured, an event of this kind is emitted with their picture like so:
{detail: {bodyParts[{bodyPart: 'DOCUMENT', data: string}, status?: string]}
- export-document: When the user saves their document photo (by clicking finish), an event of this kind is fired with their picture like so:
{detail: {bodyPart: 'DOCUMENT', data: string, justification: string}}
-
console-open-status: Emitted when the browser’s developer tools (DevTools) or console is opened, when liveness is enabled. The component actively monitors for console access to help prevent potential injection attacks during remote liveness evaluation. When this event is triggered, the integrator is expected to:
- Close or reset the component,
- Inform the user about the console access,
- Optionally reopen the component securely.
This event allows integrators to implement proactive security responses and maintain the integrity of the liveness check process. The event payload has the structure:
{ detail: { isOpen: true } }
And the events the webcomponent listens to are:
- change-tabs: When received, the web component switches the currently displaying tab. This is useful when you want an outer tab switching mechanism. The event must contain the tab to switch to which must be either 'Face' or 'Fingers', for example:
dispatchEvent(new CustomEvent('change-tabs', { detail: 'Face' }));
- extension-error: When extension errors are caught, this event is fired . The data is exported like so:
{detail: {code: number, description: string, key: string }};
Slots
Due to the computational power required to find finger matches in the browser, the main thread gets stuck when a finger is scanned. To circumvent this, the web-component uses a gif with a delay to show the gif before computation begins. As a way for the user to not lose the ability to customize the loading gif, we implemented a slot. This way, the loading gif and its accompanying text can be completely overhauled. To override the loading gif, the passed-in element's slot property must be set to validating-fingerprint-gif. Below we provide an example of how to do that.
<biometric-collector
  lottie_color="221 89 234"
  extension_name="BryWebExtension"
  video_dimensions="800x500"
  enable_minutiae="true"
  collector_select="BOTH"
>
  <img
  slot="validating-fingerprint-gif"
  src="https://www.w3schools.com/html/programming.gif"
  style="height: 100px; width: 100px;"
  alt="" />
</biometric-collector>
Other slots that show the loading gif that can be overhauled are:
-
obtaining-photo-gif: When employing liveness verification, this slot is displayed within the timeframe from when the liveness component is prompted to capture an image to the moment it reports the event of the captured picture.
-
loading-camera-gif: When employing liveness verification, this slot is displayed while the component is opening the camera.
Customizable CSS Values
As if the customizations that precede this chapter weren't enough, it is also possible to configure the css values. The web-component has its own css classes, and thanks to the shadow root, the css classes don't spill out. And the classes outside don't spill in. However you can target the exported css classes and change them from outside. The targetable css classes are those from DaisyUI and have to be set with hsl values. By changing them, you can create your own theme. Besides the DaisyUI color classes, the component itself uses and exports a list of colors with the purpose of being modifiable from the exterior. These have to be set with rgb. The custom configurable non-DaisyUI colors are as follows:
-
--finger-highlight-color
Defines the color when a finger is moused-over.
-
--finger-indicator-fill
Defines the finger indicator's (jumping triangle) internal color.
-
--finger-indicator-stroke
Defines the finger indicator's (jumping triangle) stroke color.
-
--finger-suggested-color
Defines the suggested (automatic) fingers internal color.
-
--finger-unavailable-color
Defines the color when a finger is unavailable.
-
--finger-collected-color
Defines the finger's color when it is collected.
-
--finger-missing-color
Defines the finger's color when the finger is missing.
If an even greater degree of customizability is required, this can be easily implemented. Below is an example where we set some of these css variables.
<style>
biometric-collector {
--finger-highlight-color: 0 252 210;
--finger-indicator-fill: 84 44 125;
--finger-indicator-stroke: 21 5 38;
--finger-suggested-color: 240 240 20;
--p: 58 100% 85%;
--n: 213 25% 14%;
--er: 0 81% 63%;
}
</style>
The map between fingers and their indexes is as follows (BodyPartNames):
0. LEFT_HAND_PINKY
1. LEFT_HAND_RING
2. LEFT_HAND_MIDDLE
3. LEFT_HAND_INDEX
4. LEFT_HAND_THUMB
5. RIGHT_HAND_THUMB
6. RIGHT_HAND_INDEX
7. RIGHT_HAND_MIDDLE
8. RIGHT_HAND_RING
9. RIGHT_HAND_PINKY
10. LEFT_HAND
11. RIGHT_HAND
The CaptureErrorStatusEnum looks like this:
CaptureErrorStatusEnum {
  'ExtensionMissing',
  'UserCancelled',
  'UnauthorizedExtension',
  'ScannerNotFound',
  'ExtensionModuleNotInstalled',
  'FingerNotRemoved',
  'UnknownError',
  'evaluateBiometricsTimeout',
  'evaluateBiometricsNetworkIssue',
}
The CaptureApiError is defined as:
class CaptureApiError extends Error {
  constructor(message: string, public status: CaptureErrorStatusEnum) {
    super(message);
  }
}
The handleCaptureReturnStatus is defined as:
handleCaptureReturnStatus {
  CAPTURED = 'CAPTURED',
  LOW_QUALITY = 'LOW_QUALITY',
  DUPLICATE = 'DUPLICATE',
  FORBIDDEN = 'FORBIDDEN',
  AGR_DETECTED = 'AGR_DETECTED',
  AGR_NO_MATCH = 'AGR_NO_MATCH',
}
Notable ids
Some tags are of customizable relevance and therefore were given an exclusive id, which makes it easier to target them from the outside, should that need arise. The notable ids are: