Security News
vlt Launches "reproduce": A New Tool Challenging the Limits of Package Provenance
vlt's new "reproduce" tool verifies npm packages against their source code, outperforming traditional provenance adoption in the JavaScript ecosystem.
react-native-share-menu
Advanced tools
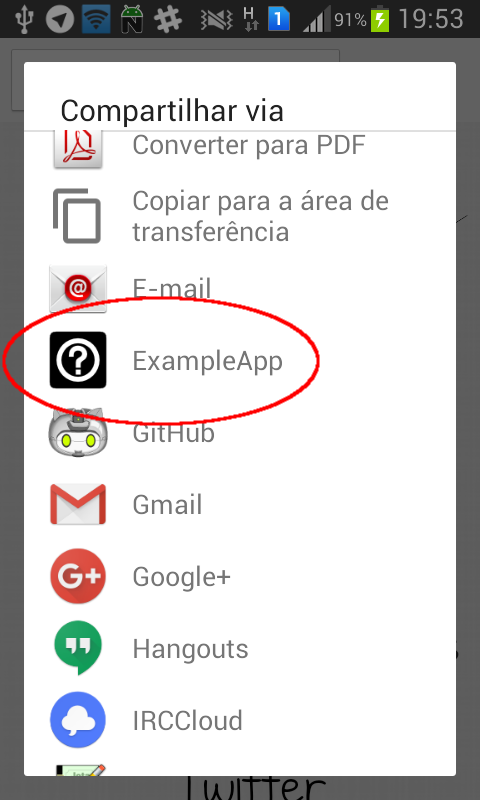
Adds the app to share menu, so it can be launched from share menu and receive data from other apps
Adds the application to the share menu of the device, so it can be launched from other apps and receive data from them.
npm i --save react-native-share-menu
At the command line, in the ios directory:
pod install
At the command line, in the project directory:
react-native link
android/settings.gradle...
include ':react-native-share-menu', ':app'
project(':react-native-share-menu').projectDir = new File(rootProject.projectDir, '../node_modules/react-native-share-menu/android')
android/app/build.gradle...
dependencies {
...
compile project(':react-native-share-menu')
}
android/app/src/main/AndroidManifest.xml in the <activity> tag:<activity
...
android:documentLaunchMode="never">
...
<intent-filter>
<action android:name="android.intent.action.SEND" />
<category android:name="android.intent.category.DEFAULT" />
<data android:mimeType="text/plain" />
<data android:mimeType="image/*" />
<!-- Any other mime types you want to support -->
</intent-filter>
</activity>
import com.meedan.ShareMenuPackage;  // <--- import

public class MainApplication extends Application implements ReactApplication {
  ......
  @Override
  protected List<ReactPackage> getPackages() {
    return Arrays.<ReactPackage>asList(
      new MainReactPackage(),
      new ShareMenuPackage()  // <------ add here
    );
  }
  ......

}
Create a Share Extension by going to your project settings

Then creating a new target

And choosing Share Extension

Name your extension and make sure you've selected Swift as the language to use
Select your new target, go to Build Settings, search for iOS Deployment Target and make sure it matches your app's target (iOS 10.0 in RN 0.63)
When your extension has been created, delete the ShareViewController.swift file generated by Xcode in the extension folder, right click on the folder, and choose Add Files to "ProjectName"
On the pop-up, select node_modules/react-native-share-menu/ios/ShareViewController.swift. Make sure Copy items if needed is NOT selected and that the selected target is your newly created Share Extension

Create an App Group to be able to share data between your extension and your app. To do so, go to your app target's settings, go to Signing & Capabilities, press + Capability and select App Groups

At the bottom of the window on Xcode you should see an App Groups section. Press the + button and add a group named group.YOUR_APP_BUNDLE_ID.
Repeat this process for the Share Extension target, with the exact same group name.
Add the following to your app's Info.plist (if you already had other URL Schemes, make sure the one you're adding now is the FIRST one):
<key>CFBundleURLTypes</key>
<array>
    <dict>
        <key>CFBundleTypeRole</key>
        <string>Editor</string>
        <key>CFBundleURLSchemes</key>
        <array>
            <string>A_URL_SCHEME_UNIQUE_TO_YOUR_APP</string>
        </array>
    </dict>
</array>
Add the following to your Share Extension's Info.plist:
<key>HostAppBundleIdentifier</key>
<string>YOUR_APP_TARGET_BUNDLE_ID</string>
<key>HostAppURLScheme</key>
<string>YOUR_APP_URL_SCHEME_DEFINED_ABOVE</string>
<key>NSExtension</key>
<dict>
    <key>NSExtensionAttributes</key>
    <dict>
        <key>NSExtensionActivationRule</key>
        <dict>
            <!-- For a full list of available options, visit https://developer.apple.com/library/archive/documentation/General/Reference/InfoPlistKeyReference/Articles/AppExtensionKeys.html#//apple_ref/doc/uid/TP40014212-SW10 -->
            <key>NSExtensionActivationSupportsImageWithMaxCount</key>
            <integer>1</integer>
            <key>NSExtensionActivationSupportsText</key>
            <true/>
            <key>NSExtensionActivationSupportsWebURLWithMaxCount</key>
            <integer>1</integer>
        </dict>
    </dict>
    <key>NSExtensionMainStoryboard</key>
    <string>MainInterface</string>
    <key>NSExtensionPointIdentifier</key>
    <string>com.apple.share-services</string>
</dict>
Finally, in your AppDelegate.m add the following:
...
#import <RNShareMenu/ShareMenuManager.h>

...

@implementation AppDelegate
    ...

    - (BOOL)application:(UIApplication *)app
            openURL:(NSURL *)url
            options:(NSDictionary<UIApplicationOpenURLOptionsKey,id> *)options
    {
      return [ShareMenuManager application:app openURL:url options:options];
    }
@end
If you want a custom sharing view, do these steps:
Make these changes to your Podfile:
target '<PROJECT_NAME>' do
  config = use_native_modules!

  use_react_native!(:path => config["reactNativePath"])

  target '<PROJECT_NAME>Tests' do
    inherit! :complete
    # Pods for testing
  end

  # Enables Flipper.
  #
  # Note that if you have use_frameworks! enabled, Flipper will not work and
  # you should disable these next few lines.
  use_flipper!
  post_install do |installer|
    flipper_post_install(installer)
+    installer.pods_project.targets.each do |target|
+      target.build_configurations.each do |config|
+        config.build_settings['APPLICATION_EXTENSION_API_ONLY'] = 'NO'
+      end
+    end
  end
end

target '<SHARE_EXTENSION_NAME>' do
  config = use_native_modules!

  use_react_native!(:path => config["reactNativePath"])
end
Run pod install in your ios/ directory.
Right click on your Share Extension folder, and choose Add Files to "ProjectName"
On the pop-up, select node_modules/react-native-share-menu/ios/ReactShareViewController.swift. Make sure Copy items if needed is NOT selected and that the selected target is your newly created Share Extension

Now go to your MainInterface.storyboard and:
Select the first item in the storyboard inspector
Select Show the Identity Inspector on the right
Replace the value in Class with ReactShareViewController

Open your Share Extension's Info.plist and add the following:
<key>ReactShareViewBackgroundColor</key>
<dict>
    <key>Red</key>
    <integer>1</integer>
    <key>Green</key>
    <integer>1</integer>
    <key>Blue</key>
    <integer>1</integer>
    <key>Alpha</key>
    <integer>1</integer>
    <key>Transparent</key>
    <false/>
</dict>
<key>NSAppTransportSecurity</key>
<dict>
    <key>NSAllowsArbitraryLoads</key>
    <true/>
    <key>NSExceptionDomains</key>
    <dict>
        <key>localhost</key>
        <dict>
            <key>NSExceptionAllowsInsecureHTTPLoads</key>
            <true/>
        </dict>
    </dict>
</dict>
Feel free to change the values in ReactShareViewBackgroundColor to whatever you want.
Finally, in your index.js file, register the component you want to render in your Share Extension view:
AppRegistry.registerComponent('ShareMenuModuleComponent', () => MyShareComponent);
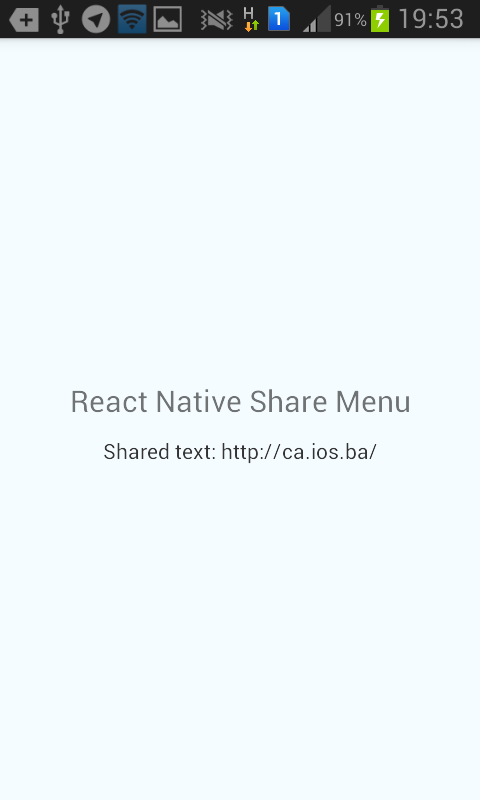
If you're rendering an empty component, you should be seeing something similar to this when you share to your app:

import React, { useState, useEffect, useCallback } from "react";
import { AppRegistry, Text, View, Image, Button } from "react-native";
import ShareMenu, { ShareMenuReactView } from "react-native-share-menu";

type SharedItem = {
  mimeType: string,
  data: string,
  extraData: any,
};

const Test = () => {
  const [sharedData, setSharedData] = useState(null);
  const [sharedMimeType, setSharedMimeType] = useState(null);

  const handleShare = useCallback((item: ?SharedItem) => {
    if (!item) {
      return;
    }

    const { mimeType, data, extraData } = item;

    setSharedData(data);
    setSharedMimeType(mimeType);
    // You can receive extra data from your custom Share View
    console.log(extraData);
  }, []);

  useEffect(() => {
    ShareMenu.getInitialShare(handleShare);
  }, []);

  useEffect(() => {
    const listener = ShareMenu.addNewShareListener(handleShare);

    return () => {
      listener.remove();
    };
  }, []);

  if (!sharedMimeType && !sharedData) {
    // The user hasn't shared anything yet
    return null;
  }

  if (sharedMimeType === "text/plain") {
    // The user shared text
    return <Text>Shared text: {sharedData}</Text>;
  }

  if (sharedMimeType.startsWith("image/")) {
    // The user shared an image
    return (
      <View>
        <Text>Shared image:</Text>
        <Image source={{ uri: sharedData }} />
      </View>
    );
  }

  // The user shared a file in general
  return (
    <View>
      <Text>Shared mime type: {sharedMimeType}</Text>
      <Text>Shared file location: {sharedData}</Text>
    </View>
  );
};

const Share = () => {
  const [sharedData, setSharedData] = useState('');
  const [sharedMimeType, setSharedMimeType] = useState('');

  useEffect(() => {
    ShareMenuReactView.data().then(({mimeType, data}) => {
      setSharedData(data);
      setSharedMimeType(mimeType);
    });
  }, []);

  return (
    <View>
      <Button
        title="Dismiss"
        onPress={() => {
          ShareMenuReactView.dismissExtension();
        }}
      />
      <Button
        title="Send"
        onPress={() => {
          // Share something before dismissing
          ShareMenuReactView.dismissExtension();
        }}
      />
      <Button
        title="Dismiss with Error"
        onPress={() => {
          ShareMenuReactView.dismissExtension("Something went wrong!");
        }}
      />
      <Button
        title="Continue In App"
        onPress={() => {
          ShareMenuReactView.continueInApp();
        }}
      />
      <Button
        title="Continue In App With Extra Data"
        onPress={() => {
          ShareMenuReactView.continueInApp({hello: "from the other side"});
        }}
      />
      {sharedMimeType === "text/plain" && <Text>{sharedData}</Text>}
      {sharedMimeType.startsWith("image/") && <Image source={{uri: sharedData}} />}
    </View>
  );
};

AppRegistry.registerComponent("Test", () => Test);
AppRegistry.registerComponent("ShareMenuModuleComponent", () => Share);
Or check the "example" directory for an example application.


$ npm version <minor|major|patch> && npm publish
Sponsored and developed by Meedan.
iOS version maintained by Gustavo Parreira.
FAQs
Add your app as a target for sharing from other apps and write iOS Share Extensions in React Native.
The npm package react-native-share-menu receives a total of 1,744 weekly downloads. As such, react-native-share-menu popularity was classified as popular.
We found that react-native-share-menu demonstrated a not healthy version release cadence and project activity because the last version was released a year ago. It has 1 open source maintainer collaborating on the project.
Did you know?

Socket for GitHub automatically highlights issues in each pull request and monitors the health of all your open source dependencies. Discover the contents of your packages and block harmful activity before you install or update your dependencies.

Security News
vlt's new "reproduce" tool verifies npm packages against their source code, outperforming traditional provenance adoption in the JavaScript ecosystem.

Research
Security News
Socket researchers uncovered a malicious PyPI package exploiting Deezer’s API to enable coordinated music piracy through API abuse and C2 server control.

Research
The Socket Research Team discovered a malicious npm package, '@ton-wallet/create', stealing cryptocurrency wallet keys from developers and users in the TON ecosystem.